• Skip to primary navigation
  • Skip to main content
  • Skip to primary sidebar
  • My Cookbook: Marbled, Swirled, and Layered
  • Recipes
  • Travel & Events
  • About this Blog
  • Bio
  • FAQ
  • Work with Me

Eat The Love

Recipes, Photographs and Stories about Desserts, Baked Goods and Food in general, with a healthy dose of humor and happiness for the food obsessed

You are here: Home / cake / Blueberry Cream Cheese Coffee Cake

Published: August 30, 2024 3 Comments

Blueberry Cream Cheese Coffee Cake

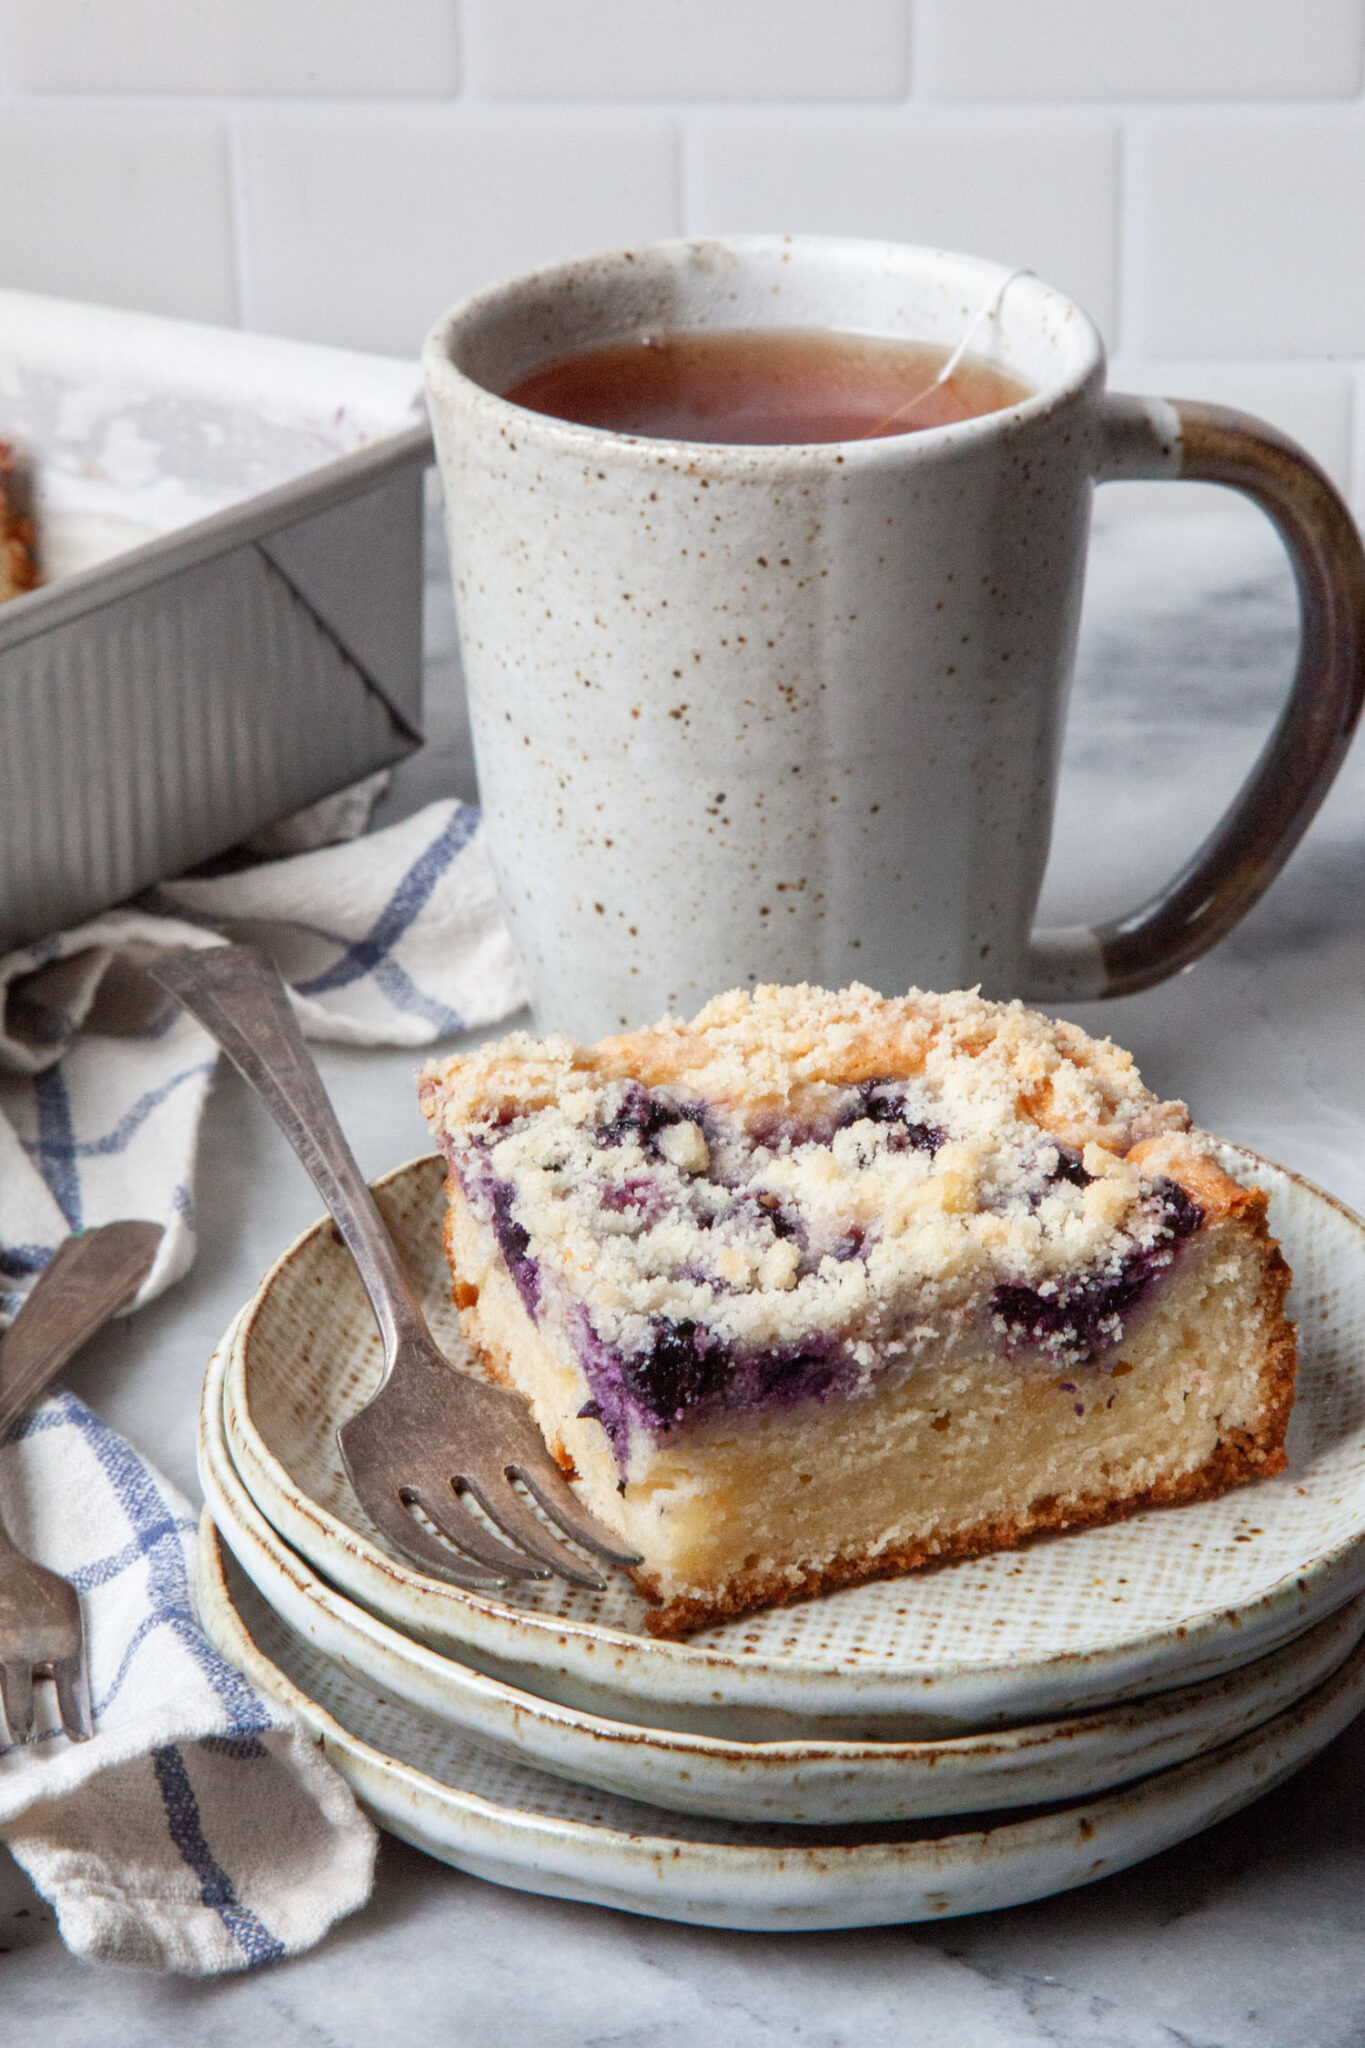
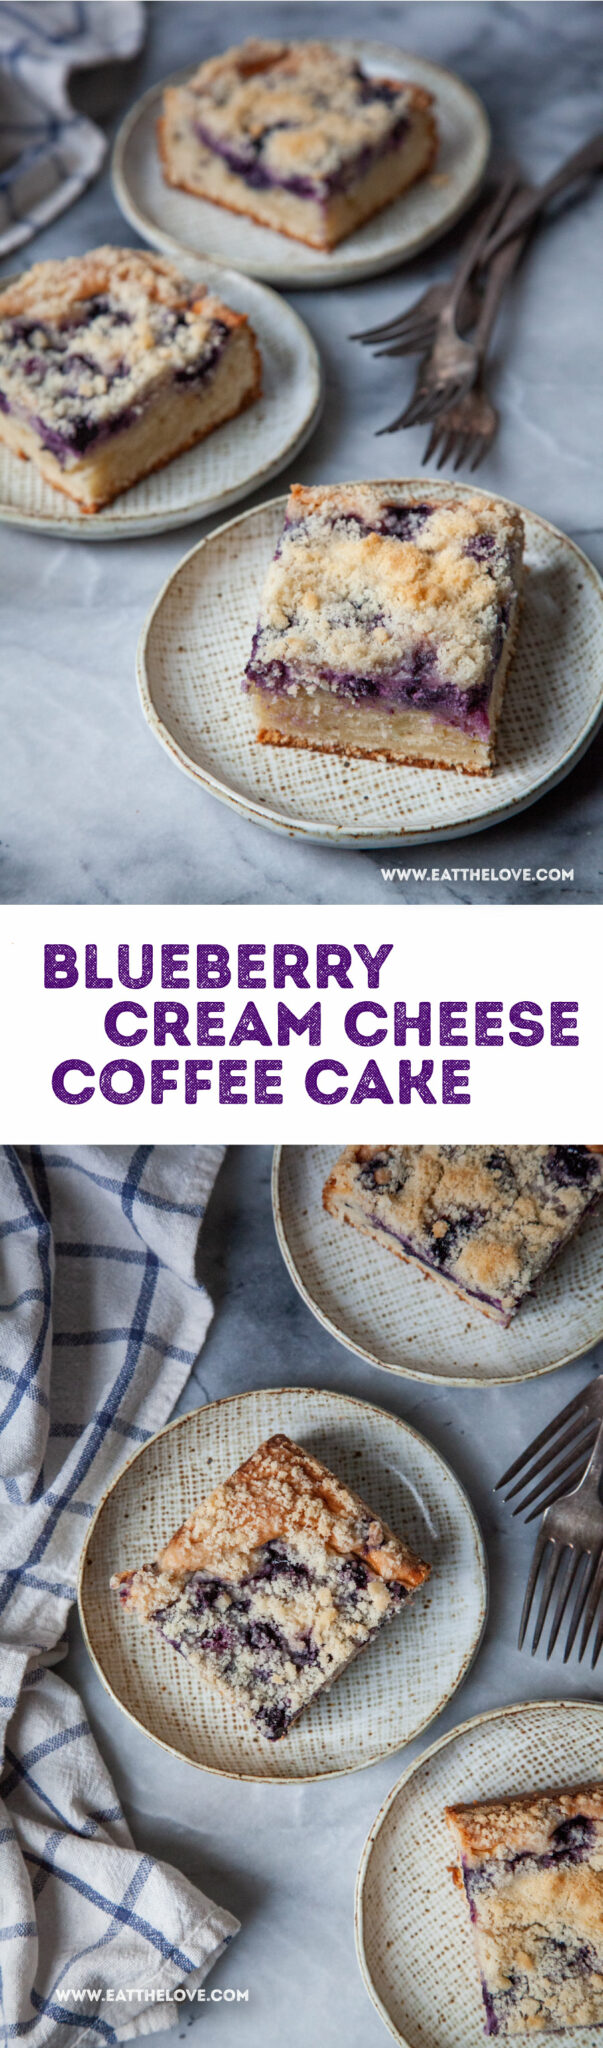
This blueberry cream cheese coffee cake is moist and tender. As an added bonus, the easy crumb topping is made from some of the cake batter!

Jump to Recipe

Pieces of blueberry cream cheese coffee cake on a ceramic plates. There is a blue checkered cloth napkin next to the plates. The text on the image says "Blueberry Cream Cheese Coffee Cake".

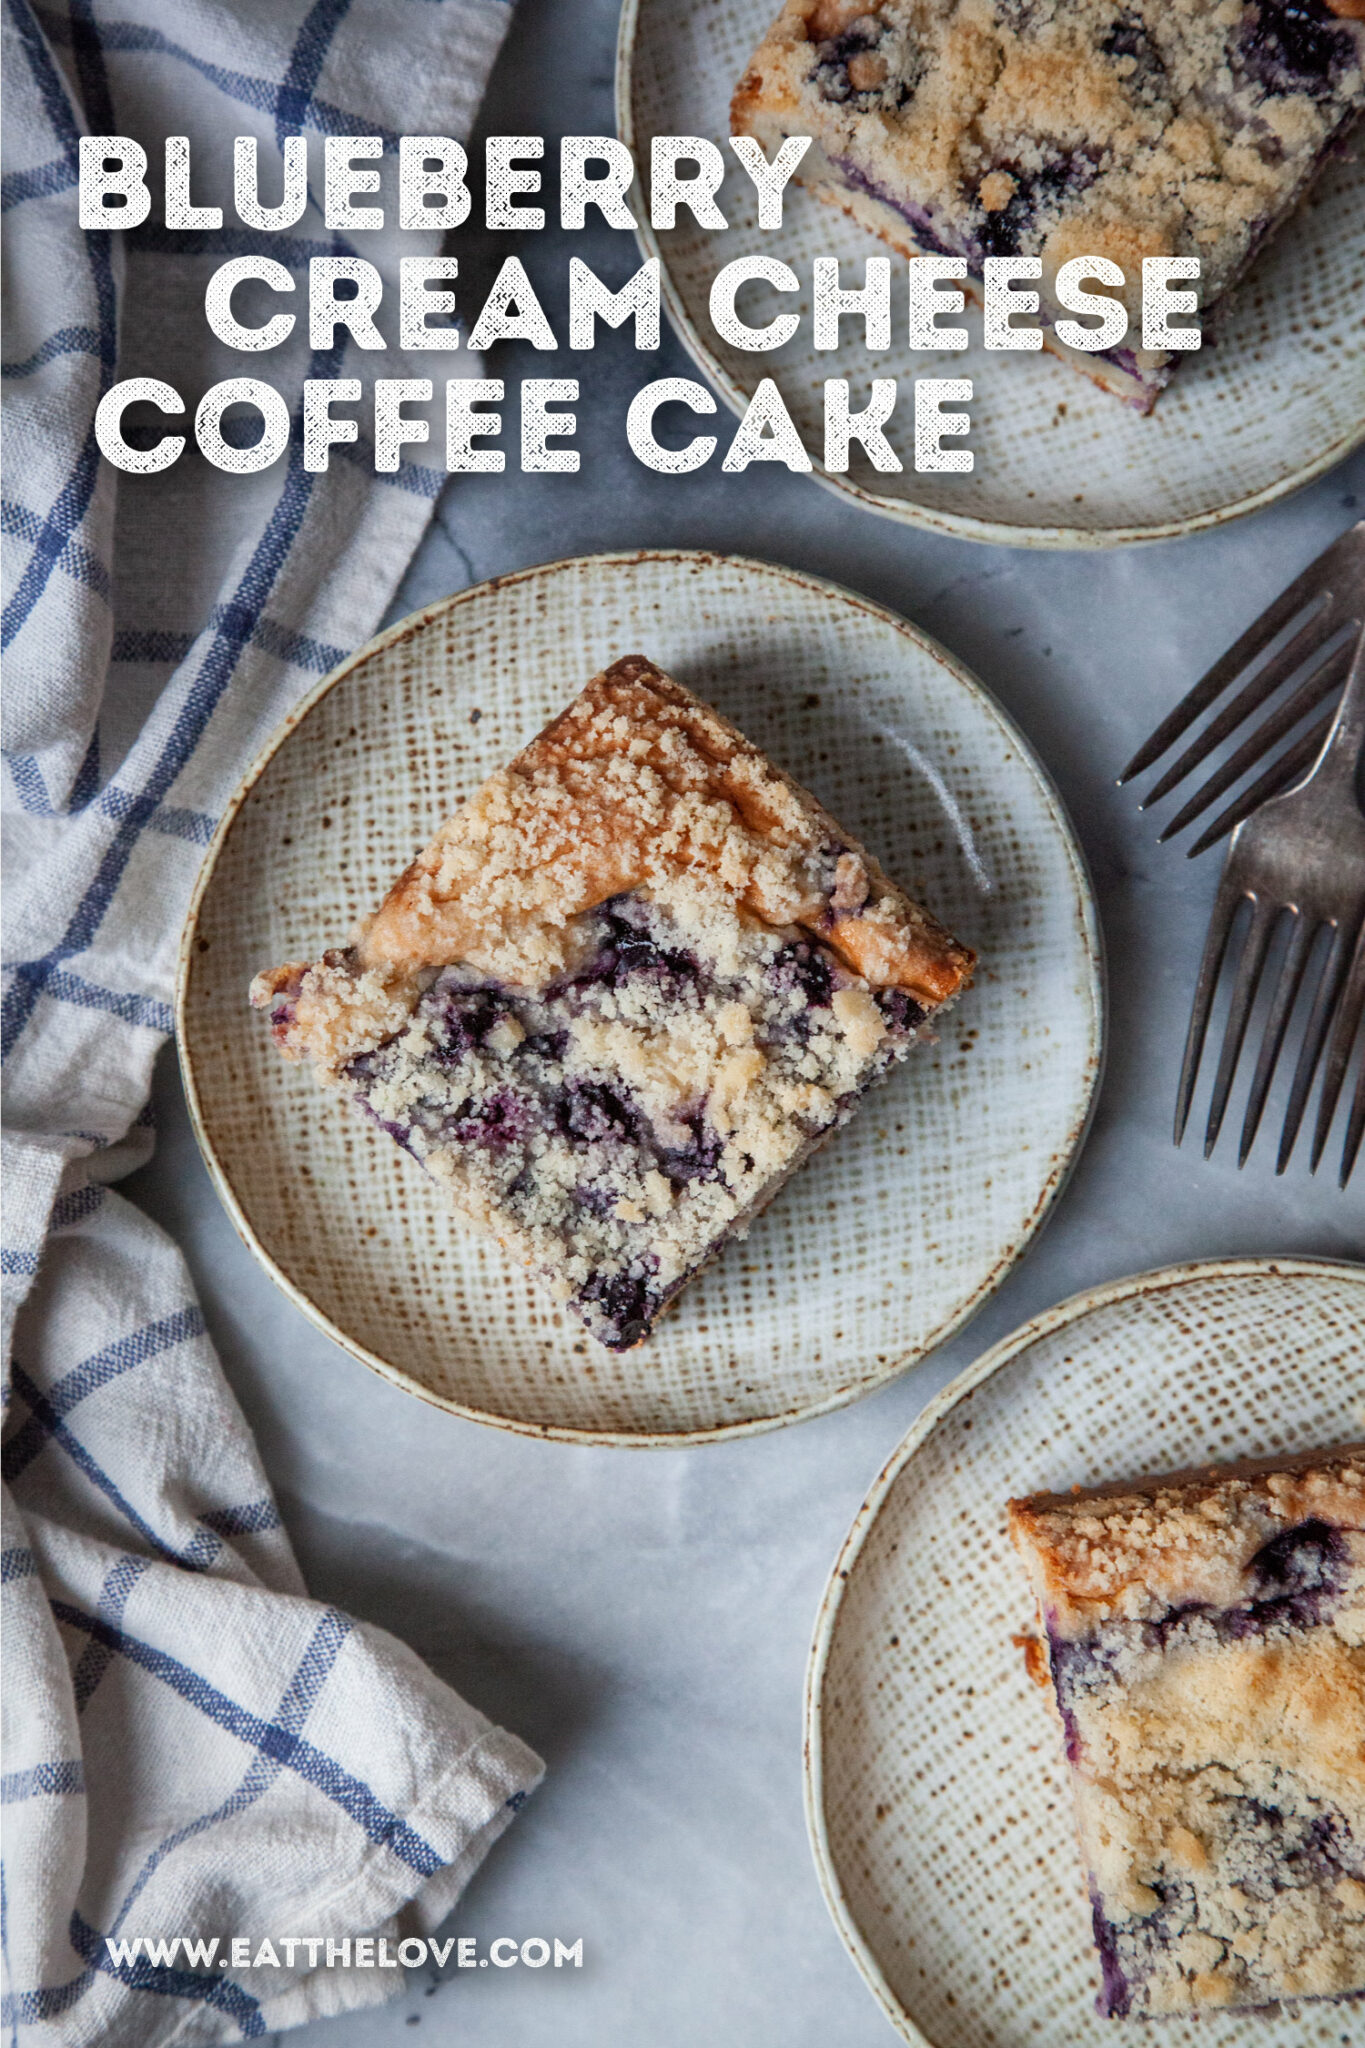
As someone who loves all things berry, blueberries hold a special place in my heart. Their inky blue-black color and sweet earthy flavor is always a lovely addition to baked goods. I eat them by the handful, when I’m not putting them in my homemade granola, baking them in a Swedish blueberry coffee cake, making a blueberry galette or blueberry pie or teaming them up with different fruits like my blueberry rhubarb pie and my grape blueberry pie.

Recently I’ve been playing around with various cream cheese coffee cake recipes, like my rhubarb strawberry buckle, and I came up with these lovely blueberry cream cheese coffee cake. The crumb topping is made from the cake batter, which simplifies the recipe, and makes it ideal for a casual treat for coffee, tea or a snack, while the cream cheese topping adds a moisture and richness without being too cloyingly sweet.

A slice of blueberry cream cheese coffee cake on a ceramic plate, with a mug of tea next to it, and the remaining coffee cake in the pan next to it.

How do you make this coffee cake

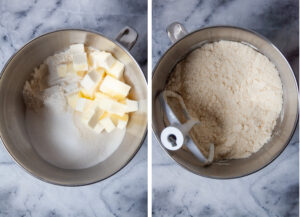
First make the cake batter by mixing together the flour and sugar in a stand mixer. Then add in cubes of butter, mixing until the butter has broken down and been incorporated. The mixture should look a bit like damp sand.

Scoop out some of the mixture and set it aside. This will be the crumb topping!

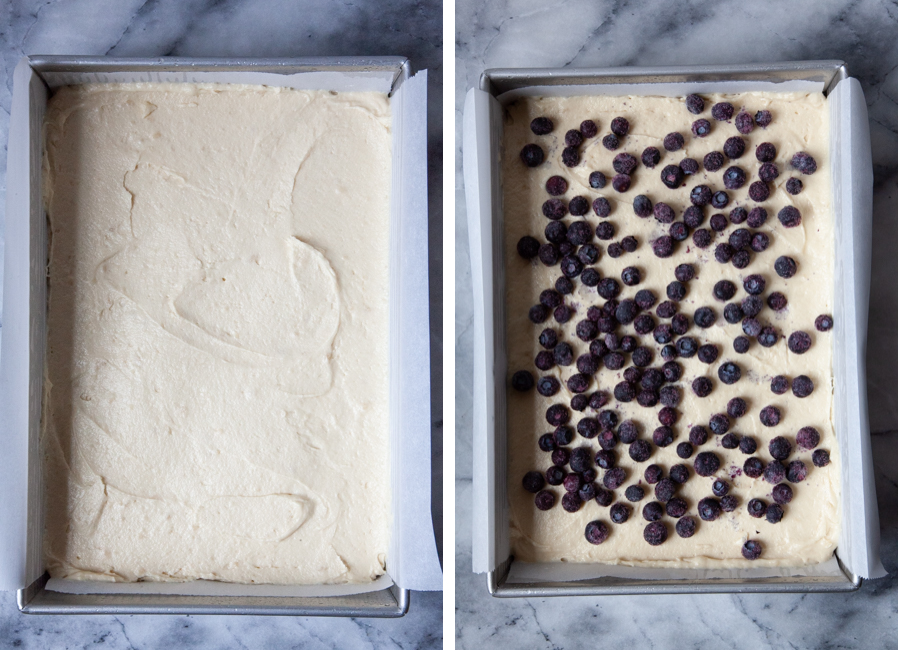
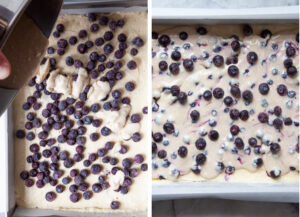
Then continue making the cake batter by adding the leavening (baking powder and baking soda), as well as the salt. Mix to incorporate and then pour in a beaten mixture of sour cream, eggs, and vanilla. Beat to incorporate the liquid ingredients, then scrape it into a pan and spread it out. Sprinkle some blueberries over the cake batter.

Left image is coffee cake batter spread out in a 9 x 13 inch pan. Right image is blueberries sprinkled over the cake batter.

Make the cream cheese layer by mixing cream cheese, sugar, egg, vanilla, cinnamon and a touch of cardamom into the bowl (no need to clean it) and mix until smooth. 

Now layer the cream cheese filling over the blueberries, and add more blueberries over the cream cheese. Sprinkle the crumb topping over the top and bake!

Left image is a hand sprinkling crumbs over the unbaked coffee cake. Right image is the baked coffee cake.

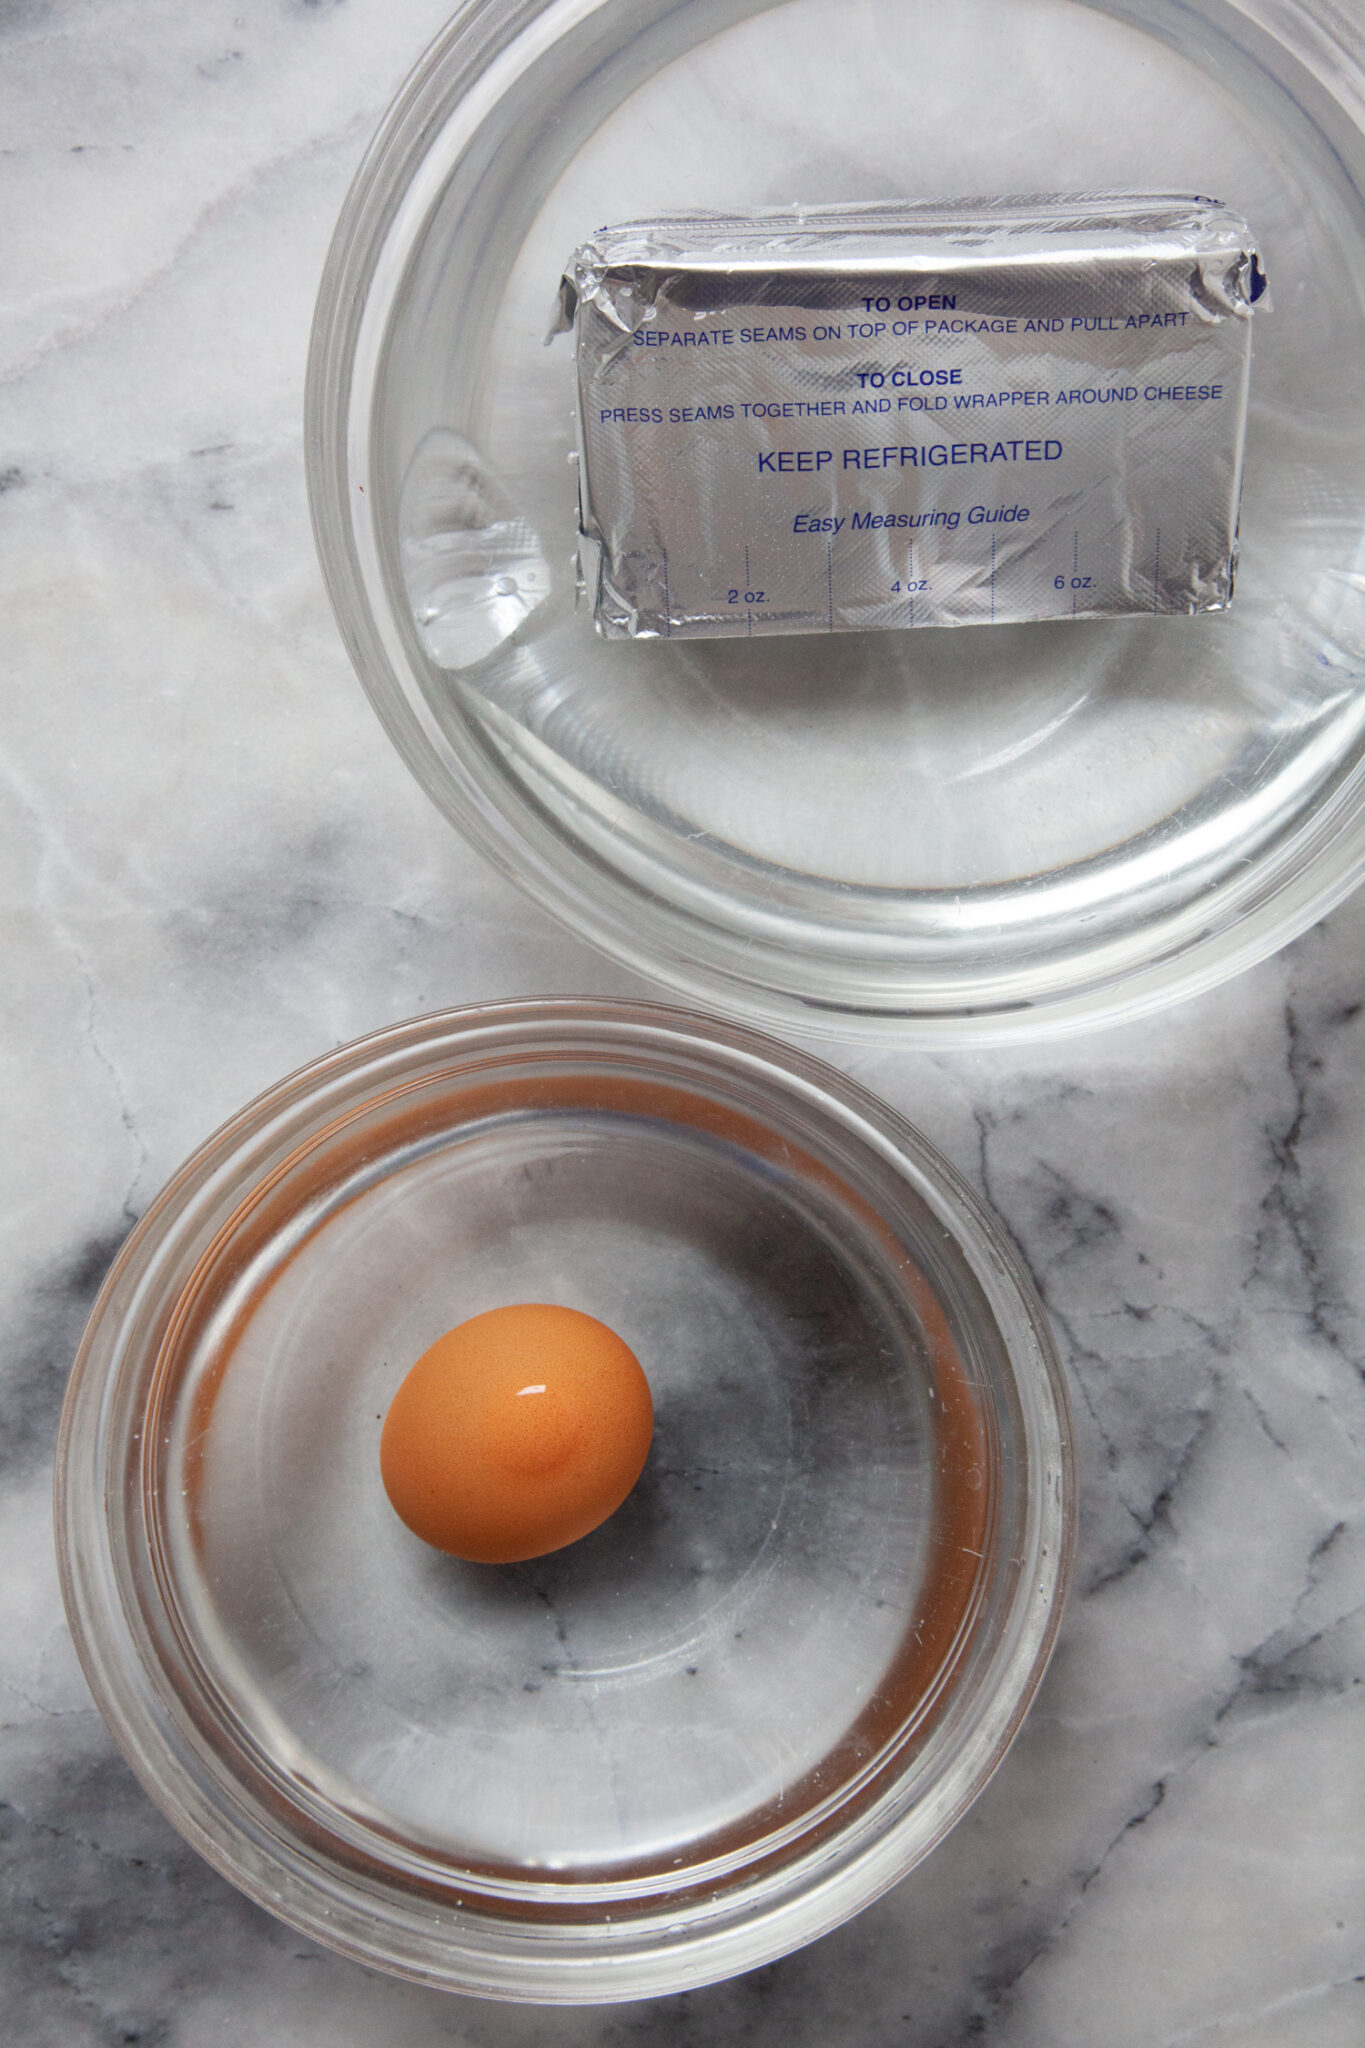
How to bring cream cheese and eggs to room temperature

Typically, most recipes tell you to bring cream cheese and eggs to room temperature before baking. This helps speed up the bake time, keeps the cake batter emulsified and well blended (as warmer eggs blend in better than cold eggs), as well as prevents the cake from baking with any cracks on top that occur because of uneven temperature. 

The easiest way to bring cream cheese and eggs to room temperature is to just take them out of the fridge an hour before making the cake. But if you’re like me, you probably don’t plan ahead. So instead, just fill two bowls with hot water from the tap. Then place the cream cheese (still wrapped in aluminum foil) in one bowl, and the eggs in the other bowl. Wait about 10 minutes, roughly the amount of time it takes gather all the ingredients together, prep the pan, and start making the cake. Once you’re ready for the eggs and cream cheese, the ingredients should be warmed up to room temperature. 

A bowl of warm water with a foil wrapped package of cream cheese in it. Next to it is a bowl of warm water with an egg in it.

How to store this coffee cake

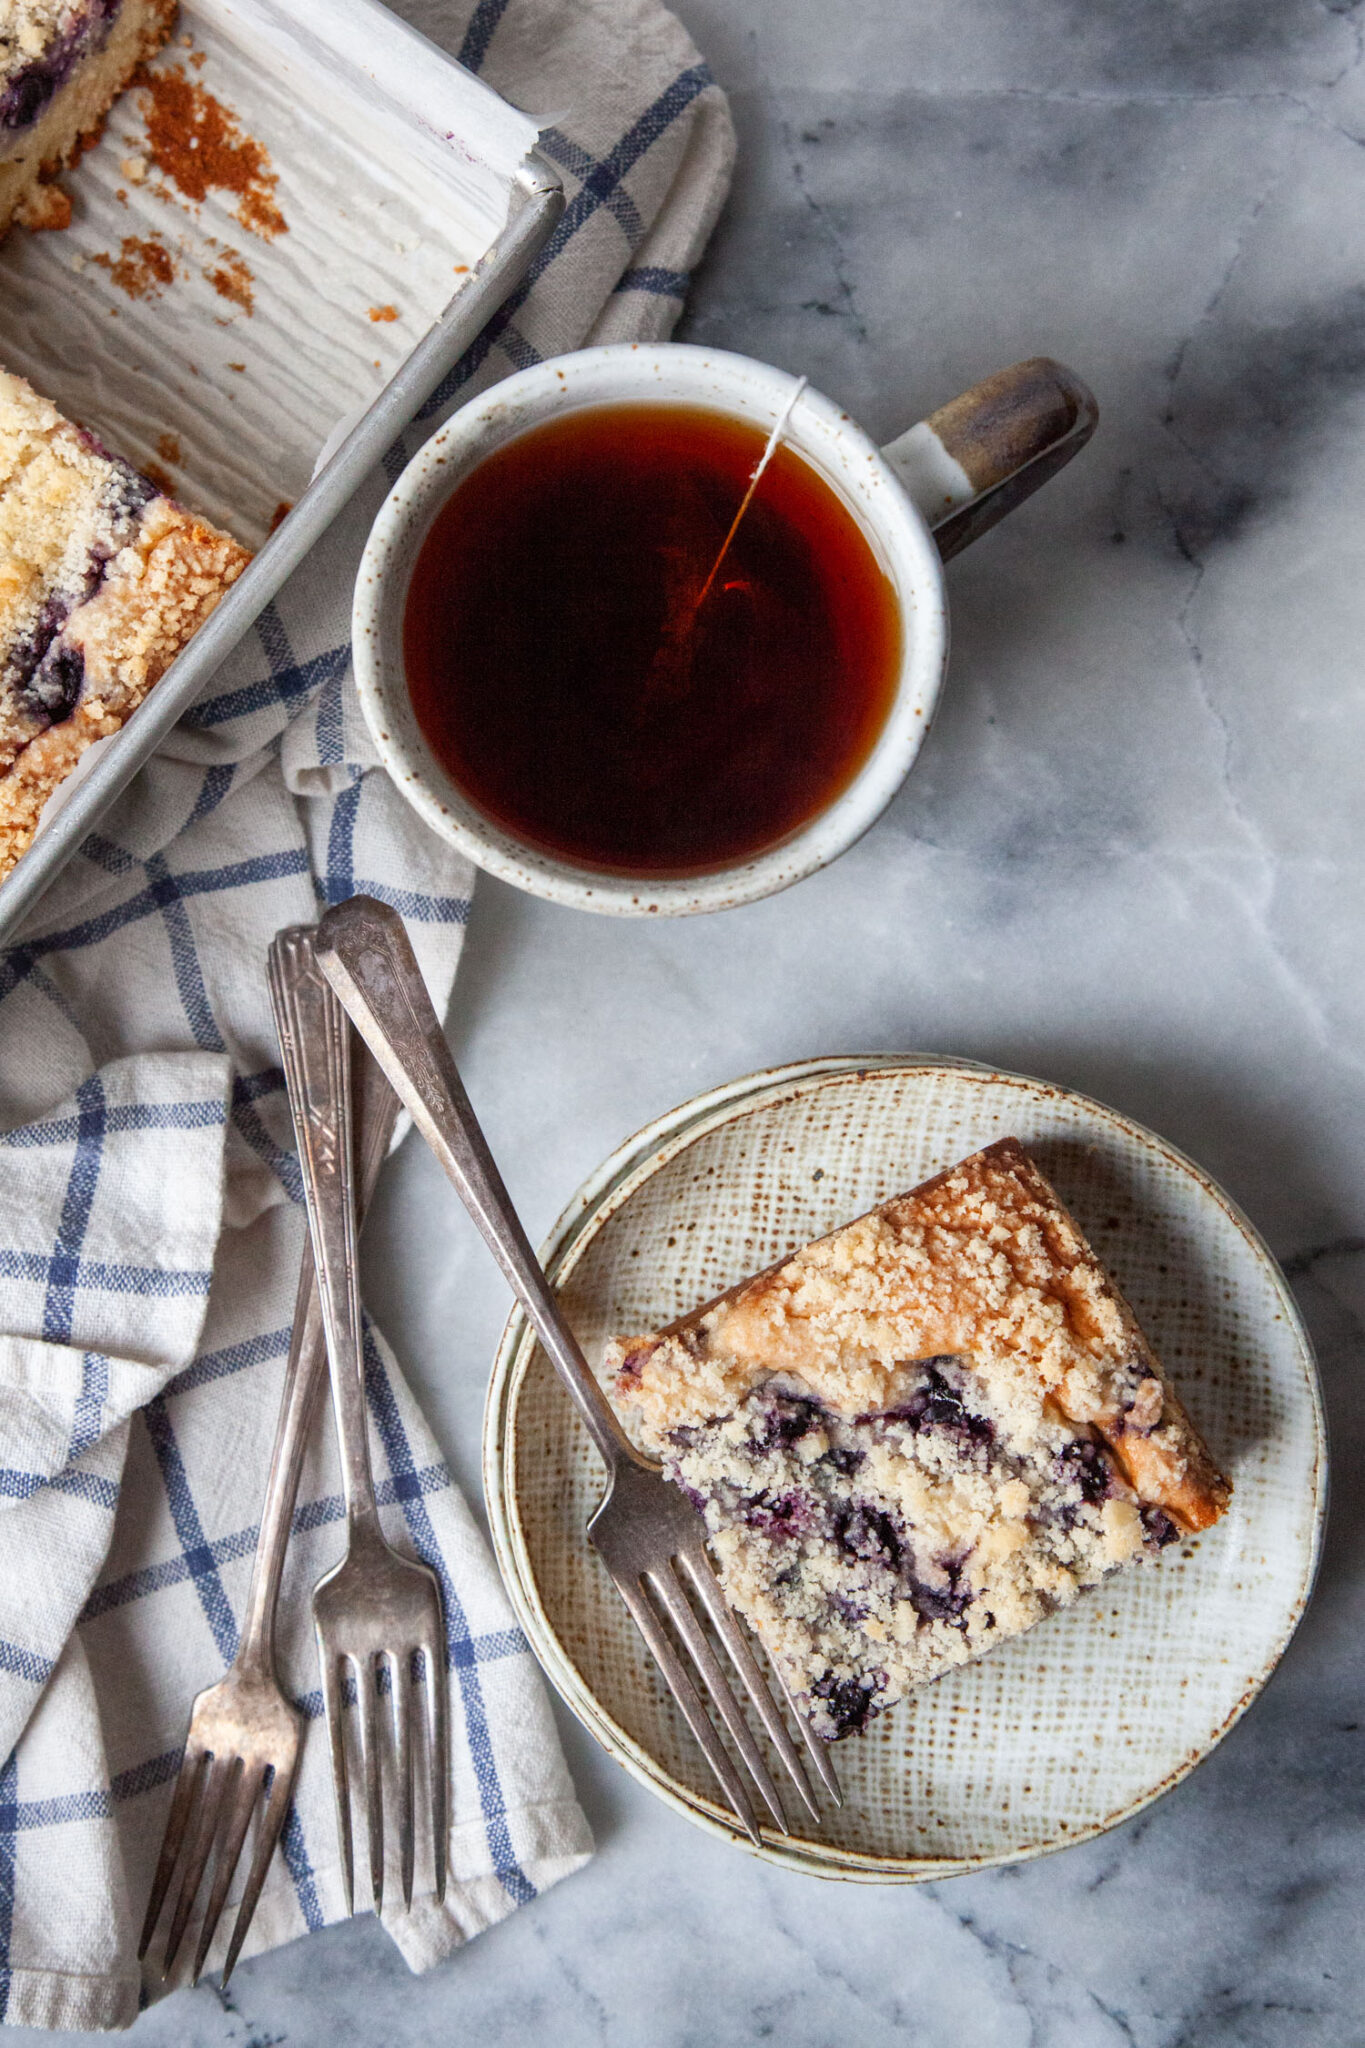
Because this coffee cake has cream cheese in it, I typically recommend it covered and stored it in the fridge. Covered, the cake will keep for 3 to 5 days. Bring the cake back to room temperature by leaving out on the counter or tabletop for 1 hour before serving.

A slice of blueberry cream cheese coffee cake on a stack of ceramic plate, with a mug of tea behind to it. The remaining coffee cake is in a pan next to the mug, sitting on a cloth napkin.

More coffee cake recipes

  • Cinnamon Streusel Coffee Cake
  • Pumpkin Coffee Cake with Pecan Streusel Topping
  • Mexican Chocolate and Corn Coffee Cake
  • Rhubarb Blackberry Coffee Cake
  • Peach, Basil, and Olive Oil Coffee Cake
  • Peach and Blueberry Coffee Cake
  • Apricot and Blueberry Cake
  • Cherry Buckle with Cocoa Cinnamon Crumb Topping
  • Strawberry and Grape Coffee Cake
  • Swedish Tea Ring Coffee Cake
Three slices of blueberry cream cheese coffee cake on ceramic plates.
Pieces of blueberry cream cheese coffee cake on a ceramic plates. There is a blue checkered cloth napkin next to the plates. The text on the image says "Blueberry Cream Cheese Coffee Cake".
Print Pin
5 from 2 votes

Blueberry Cream Cheese Coffee Cake

This Blueberry Cream Cheese Coffee Cake uses a scoop of the cake batter as the crumb on top, which simplifies the whole process. The cream cheese topping keeps the cake moist with a bit of tang. And the blueberries lend a fruit earthy juicy pop to each bite.
Course Breakfast, brunch, coffee time, Dessert, Snack
Cuisine American
Keyword blueberries, cake, coffee cake, cream cheese, fruit
Prep Time 25 minutes minutes
Cook Time 1 hour hour
Servings 16
Calories 498kcal
Author Irvin

Ingredients

Cake Batter and Crumb topping

  • 3 1/3 cups all-purpose flour 465 g
  • 1 1/2 cups granulated sugar 300 g
  • 1 cup + 2 tablespoons unsalted butter 2 1/4 sticks or 255 g
  • 3/4 teaspoon baking powder
  • 3/4 teaspoon baking soda
  • 3/4 teaspoon kosher salt
  • 1 1/2 cups sour cream 360 g
  • 2 large eggs room temperature (see note below)
  • 2 teaspoon vanilla extract
  • 1 1/2 cups blueberries (see note below), 225 g

Cream cheese topping

  • 8 ounces cream cheese room temperature (see note below)
  • 1/4 cup granulated sugar 50 g
  • 1 large egg room temperature (see note below)
  • 1 teaspoon vanilla extract
  • 1/2 teaspoon cinnamon
  • 1/2 teaspoon cardamom optional but recommended
  • 1/2 cup blueberries (see note below), 75 g

Instructions

  • Preheat the oven to 350°F. Lightly coat a 9 x 13 x 2-inch baking pan with cooking spray. You can optionally add parchment paper to it if you’d like but I found it unnecessary.
    Place the flour and sugar in the bowl of stand mixer fitted with a paddle attachment. Cut the butter into 1/2-inch cubes and add it to the bowl. Slowly mix the ingredients together, increasing speed to medium, until the butter has broken down and the entire mixture looks a bit like damp sand.
    Left image is a mixing bowl with flour, sugar and butter in it. Right image is the mixing bowl with those ingredients blended together until the texture of the mixture is like damp sand.
  • Scoop out about 1 1/3 cups of the sandy mixture, about 175 g, and reserve it for the crumb topping. Then add the baking powder, baking soda and salt to the mixing bowl and mix on low speed for about 15 seconds to incorporate it in.
    Left image is blended flour, sugar and butter mixture reserved in a bowl, with the remaining amount in a mixing bowl. Right image is baking powder, baking soda and salt added to the mixing bowl.
  • Combine the sour cream, eggs, and vanilla extract together in a glass measuring cup or medium sized bowl.
    Add the liquid to the mixing bowl and mix on low speed, slowly incorporating it and increasing the speed to medium.
    Mix for a full minute to completely incorporate the buttery dry ingredients and the liquid ingredients together. Because the butter has been incorporated and coated the flour, you don’t have to worry about overmixing this batter. So mix until it’s fairly smooth. But if there are a few lumps here and there, don’t stress about it.
    Left is dry ingredients and wet ingredients for a coffee cake batter in a mixing bowl. Right image is all the ingredients blended together.
  • Scoop the entire batter into the prepared baking pan, spreading it out so there is an even layer. Sprinkle the blueberries over the top of the cake batter.
    Left image is coffee cake batter spread out in a 9 x 13 inch pan. Right image is blueberries sprinkled over the cake batter.
  • In the same mixing bowl (no need to clean it!) make the cream cheese topping. Place the cream cheese, sugar, egg, vanilla, cinnamon, and cardamom in the bowl and then mix on low speed until mostly smooth. Since this is a layer of cream cheese on a cake and under a crumb topping, don’t stress if the batter has some small lumps in it.
    Left image is softened cream cheese, sugar, egg, vanilla and cinnamon in a mixing bowl. Right image is all of the ingredients mixed together until smooth.
  • Spoon or pour the cream cheese batter over the blueberries and cake batter, spreading it out evenly on top. Then sprinkle the additional 1/2 cup of blueberries over the top of the cream cheese batter.
    Left image is a bowl with cream cheese batter being poured over a blueberry topped cake batter in a pan. Right image is more blueberries sprinkled over the cream cheese batter.
  • Sprinkle the reserve crumb topping over the blueberries and cream cheese batter. Then bake in the oven for 60 to 70 minutes, or until the cake is golden brown on the edges and a toothpick inserted into the middle comes out clean. If you have an instant read thermometer, the internal temperature of the center of the cake should be somewhere between 205 and 210°F.
    Let cool completely before serving.
    Left image is a hand sprinkling crumbs over the unbaked coffee cake. Right image is the baked coffee cake.

Notes

1. You can use frozen or fresh blueberries if you wish. If using frozen blueberries, do not thaw them. Just add them on top like the fresh blueberries and bake as directed.
2. If you need to bring your cream cheese and eggs to room temperature quickly, fill a large bowl of hot water from the tap. Then place the cream cheese (still sealed in its foil wrapper) and the eggs in the bowl. Let the ingredients sit in the water for 10 minutes to bring them to room temperature. This is roughly the amount of time it takes to measure and mix the flour, sugar and butter ingredients and reserve the crumb topping. So as long as the first thing you do is submerge the cream cheese and eggs in the hot water, you should be good to go!

Nutrition

Calories: 498kcal | Carbohydrates: 38.2g | Protein: 9.1g | Fat: 34.2g | Saturated Fat: 21.8g | Cholesterol: 163mg | Sodium: 1481mg | Potassium: 662mg | Fiber: 3.5g | Sugar: 13.4g | Calcium: 311mg | Iron: 3mg

Pin It For Later!

Top image is three slices of blueberry cream cheese coffee cake on ceramic plates. Bottom image is three slices of blueberry cream cheese on ceramic plates. The text in the middle says "Blueberry Cream Cheese Coffee Cake".

Filed Under: cake, fruit Tagged With: blueberries, cake, coffee cake, cream cheese, fruit

Reader Interactions

Comments

  1. Olive says

    June 21, 2025 at 9:08 pm

    It was just okay. A lot of steps for average coffeecake. The cream cheese layer disappeared. Followed recipe exactly but nothing special. Disappointing.

    Reply
  2. Helen Grace says

    July 23, 2025 at 9:30 pm

    This looks absolutely divine! Speed Stars Blueberries and cream cheese are such a dreamy combo — can’t wait to try this with my morning coffee!

    Reply
  3. Helena says

    July 23, 2025 at 9:32 pm

    Just baked this today — Speed Stars the texture is amazing and the swirl of cream cheese is perfection! Definitely saving this recipe for brunches

    Reply
5 from 2 votes

Leave a Reply Cancel reply

Your email address will not be published. Required fields are marked *

Recipe Rating


This site uses Akismet to reduce spam. Learn how your comment data is processed.

Primary Sidebar

Follow Me On

Twitter-Link-to-Eat-the=Love Facebook-Link-to-Eat-the-Love Pinterest-Link-Eat-The-Love Instagram-Link-Eat-The-Love RSS-Feed-Link-Eat-The-Love
on Mastodon

Available Now: Marbled, Swirled and Layered
Available Now: Marbled, Swirled and Layered Available Now: Marbled, Swirled and Layered Available Now: Marbled, Swirled and Layered

"Mr. Lin, a graphic designer in San Francisco who writes the food blog Eat the Love, takes risks in nearly every one of the 150 elaborate recipes in his book. He doesn’t just paint the lily; he bejewels and shellacs it, too."
–MELISSA CLARK for the New York Times

“My goodness, this cookbook! It’s filled to the brim with recipes for the most splendidly beautiful cakes, cookies, breads, and tarts I think I’ve ever seen. My eyes kept getting wider and wider as I turned every page—both the flavor combinations and the photos are out of this world. Irvin Lin has most definitely outdone himself. This book is a triumph!”
—REE DRUMMOND, New York Times best-selling author of The Pioneer Woman Cooks

“Irvin Lin gives home-baked treats a twist, ramping them up with a range of contemporary flavors that are sure to surprise and delight. From beer-battered brownies to smoky butterscotch taking a classic cake to the next level, I can’t wait to mix, stir, and bake my way through Marbled, Swirled, and Layered!”
—DAVID LEBOVITZ, author of My Paris Kitchen

Search

Subscribe via Email

The Writer, The Baker, The Recipe Maker

Hey there! Thanks for visiting my blog. I'm Irvin Lin, a critically acclaimed cookbook author, IACP-Award winning photographer, IACP-nominated blogger, award winning baker, award winning former graphic designer, storyteller, recipe developer, writer and average joe bon vivant. I currently reside in San Francisco a block from Dolores Park and right near Tartine Bakery, Bi Rite Market & Creamery, and Delfina.

Feel free to contact me by clicking on that picture of me up above or emailing me eatthelove {at} gmail {dot} com.

IACP Photography Contest Best in Show WinnerIACP Photography Contest Best in Show Winner

“Irvin Lin is the creative mind behind his Eat the Love food blog. Lin’s impressive photography skills support his training in graphic design on the site, and you would never believe that is food blogger is a self-taught baker.” - PBS Food

“We love Eat the Love because Irvin's beautiful sweets look as good as they taste — his art director's eye appreciates the ruby sparkle of a pile of pomegranate seeds against the matte canvas of chocolate ganache.” - Saveur.com, Sites We Love

Popular Posts

Brookie Recipe (brownie and cookie) with potato chips, pretzels and double chocolate chips. Photo and recipe by Irvin Lin of Eat the Love.

Brookie Recipe with Salty Sweet Snack Treats

Perfect Soft Boiled Egg. Recipe and Photo by Irvin Lin of Eat the Love. www.eatthelove.com

Perfect Soft Boiled Egg

Korean Fried Chicken Recipe. Photo and recipe by Irvin Lin of Eat the Love. www.eatthelove.com

Korean Fried Chicken Recipe – insanely easy, super addictive

Personal Posts

Mexican Chocolate Corn Coffee Cake by Irvin Lin of Eat the Love.

Mexican Chocolate Corn Coffee Cake (and how AJ and I get engaged)

Grape and Blueberry Pie by Irvin Lin of Eat the Love.

Grape and Blueberry Pie

Crispy Oven Roasted Potatoes by Irvin Lin of Eat the Love.

Crispy Oven-Roasted Potatoes (and remembering a childhood friend)

Marbled, Swirled, and Layered.

My cookbook MARBLED, SWIRLED, and LAYERED

Recent Travel & Events

San Francisco Meals on Wheels Star Chefs and Vintners Gala 2019

Photo Essay: Meals on Wheels Gala 2019, part 2

Meals on Wheels Gala 2019

Photo Essay: Meals on Wheels Gala 2019, part 1

More Travel & Events

Wordless Recipes

EatTheLove Wordless Recipes #1 How to make your own ice cream "magic" chocolate hard shell

WORDLESS RECIPE #1: How to Make Your Own Ice Cream “Magic” Chocolate Hard Shell

Eat the Love presents: WORDLESS RECIPES #2 Halloween Edition - Haunted Honey Caramel Popcorn

WORDLESS RECIPE #2 Halloween Edition – Haunted Honey Caramel Popcorn

Molten-Lava-Chocolate-Cake-Wordless-Recipes-Valentines-Day-Eat-The-Love-Irvin-Lin-cover

WORDLESS RECIPES #3 Valentine’s Day Edition – Molten Chocolate Lava Cake

Bluth's Original Frozen Banana Copycat Wordless Recipe by Irvin Lin of Eat the Love. www.eatthelove.com

Wordless Recipe #4: Arrested Development’s Bluth’s Original Frozen Banana “Copycat” Recipe

Disclaimer

This blog currently has a partnership with Amazon.com in their affiliate program, which gives me a small percentage of sales if you buy a product through a link on my blog. I only recommend products (usually cookbooks, but sometimes ingredients or equipment) that I use and love, not for any compensation unless otherwise noted in the blog post. If you are uncomfortable with this, feel free to go directly to Amazon.com and search for the book or item of your choice.

Copyright © 2010 to 2023. Eat the Love. All rights reserved. | Privacy Policy

Rate This Recipe

Your vote:


A rating is required
A name is required
An email is required

Recipe Ratings without Comment

Something went wrong. Please try again.