How to make a picture-perfect Tarte Tatin, the classic upside-down French caramel apple tart, with step-by-step photos and instructions!

Fall is here, and that means ALL the apple desserts! Like my apple slab pie, my apple pandowdy with blackberries, my apple fritters, my fried apple pie, and my apple cider donuts. But somehow I’ve not shared with you my recipe for the classic French tarte tatin.
I’ve been making a variant of the tarte tatin dessert, the classic French upside-down caramel apple tart, for years. I bring it to dinner parties. I serve it as a dessert for special occasions. And I make it randomly when I’m just feeling a little bit fancy. But, true story, it’s not a fancy dessert. It’s surprisingly easy to make. And it never fails to impress. Maybe it’s because it has a French name, or because it has those beautiful glistening apple mounds nestled in a flaky crust, but numerous folks seem intimidated by making it. Fear not! Here’s how to make a picture-perfect looking tarte tatin with minimal effort, complete with step-by-step instructions and photos.
What is a Tarte Tatin
A Tarte Tatin is a classic French apple dessert, where a caramel is made in a pan, then apples are cooked in the caramel. A pie crust or puff pastry crust is placed on top, then the entire pan is placed in the oven. Once baked, the tart is inverted, leaving the crust on the bottom and apples on the top.
It’s a signature dish of the Hôtel Tatin, a hotel about 100 miles south of Paris, France. The hotel, run by the Tatin sisters, has origins from the 1880s, with various stories about how Stéphanie Tatin originally made the dish by accident. That said, there are references to a similar dish as early as 1840 in cookbooks. The tarte tatin is traditionally made with apples but you can make it with different fruit, like pears, quinces, peaches and even savory versions exist made with onions.
How do you make a Tarte Tatin
The traditional method of making a tarte tatin has you cooking sugar in a pan to make a caramel, adding butter to it, then adding the apples, cooking it until the apples have softened slightly. Then you place the crust on top and bake the pan.

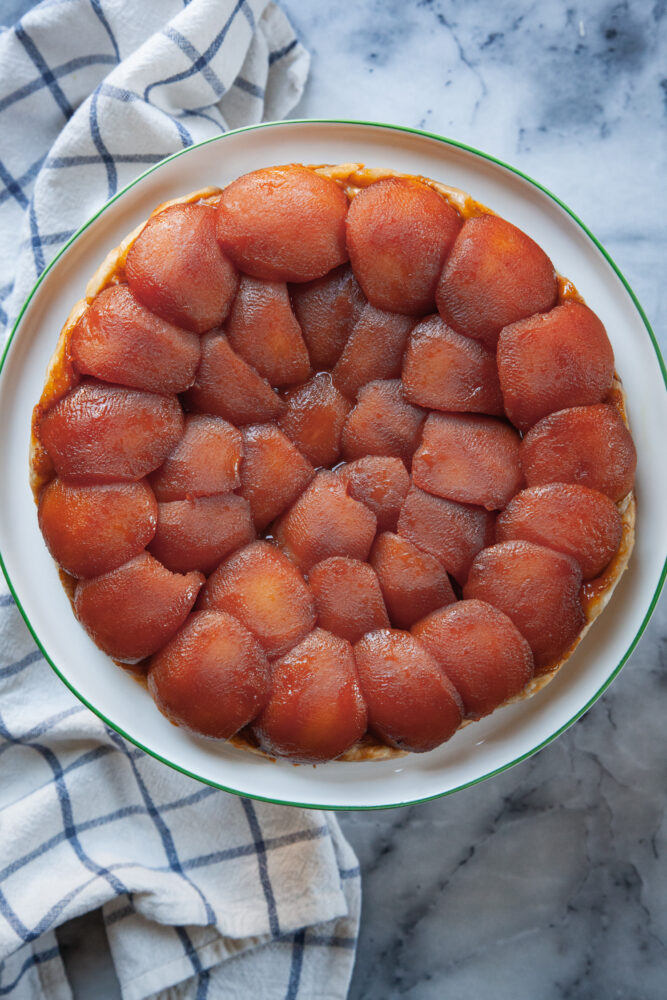
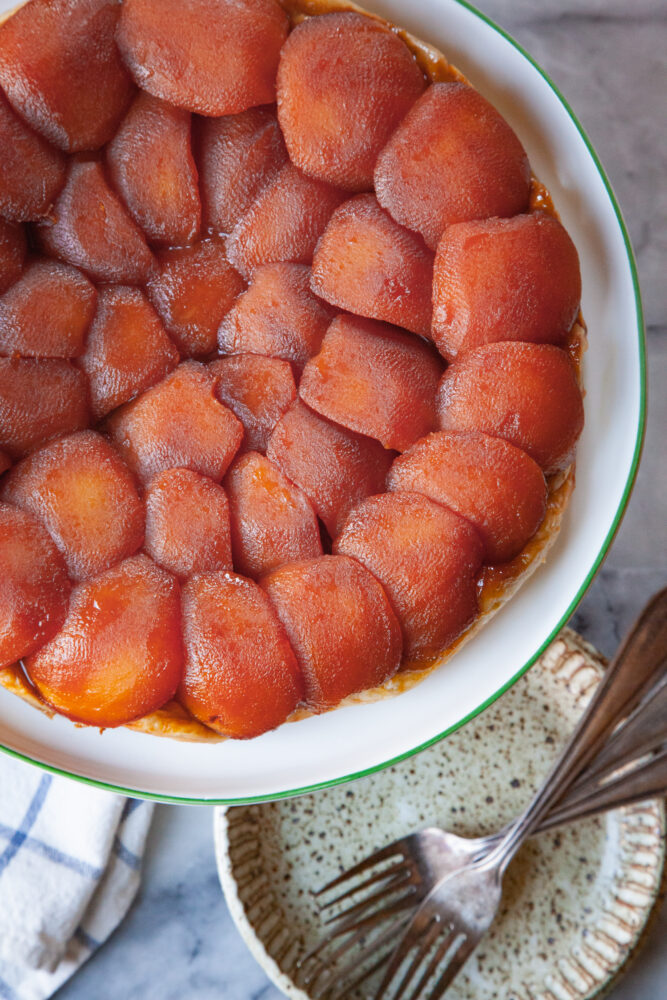
I deviated from this classic method because I have found that trying to cook all the apples in the same pan you bake it is difficult because apples shrink so much. To get the picture-perfect classic apple tarte tatin look, you need to cook the caramel and apples in a separate pan, then arrange them in a small pan, overlapping and shingling them so when they shrink, it still produces a full looking tart.
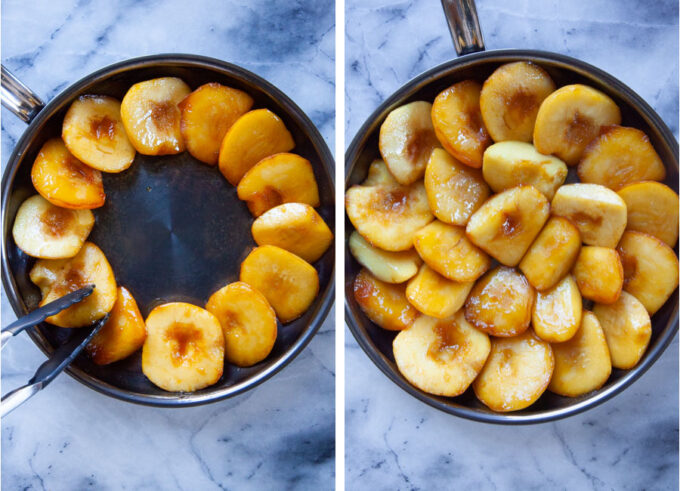
Make the caramel in a large 12-skillet by cooking sugar until is turns golden brown. Add the butter to cool it. Stir in vanilla and salt. Add the apples and cook until they start to soften and the edges of the apples look translucent. Then arrange the apples in a smaller 9-inch, 10-inch or 11-inch pan, overlapping them as you fit them all in. Pour the caramel all over the apples. Then roll out the pie crust, fit it over the apples and bake. Let cool until warm, then flip onto a serving platter.
Tricks on making the perfect looking Tarte Tatin
- Use baking apples: To get the best looking Tarte Tatin, make sure to use apples that will hold up baking and heat. My favorite baking apples include Braeburn, Cortland, Gala, Jonagold, and Pink Lady/Cripps Pink. The popular Honeycrisp apples also hold their shape well when baked, but they tend to be more juicy, so expect more caramel juice to flow and pool when you invert the tart. Make sure your serving plate has a lip to catch the juice. If you have access to heirloom apples like Arkansas Black or Gravenstein, they are excellent apples for baking. I avoid Red Delicious apples in baking, as they fall apart into mush when heated.
- Use two pans: I mentioned above that the traditional method of making a tarte tatin has you cooking the caramel and apples in one pan and then trying to arrange and bake it in the same pan. If you want a picture perfect tarte tatin, use one large pan (I recommend a 12-inch skillet) to cook the caramel and apples, then arrange the apples in a smaller pan (9 to 11-inch skillet) overlapping them to accommodate with shrinking then pour the caramel over the apples. The overlapping apples and the ability to carefully arrange the apples in the new smaller pan will lead to a better looking tarte tatin.
- Have cold butter ready: Caramel goes from the ideal translucent golden brown to acrid black fast. Have cold butter ready to add to the pan to stop the cooking! Make sure to place the butter in a small bowl or have it next to you cut up, so you can use it when it’s needed.
- Use a large 12-inch skillet with a silver bottom: If you’ve never made caramel before, I highly recommend using a large skillet with a silver bottom. The light colored bottom will help you judge the color of the caramel. Dark non-stick pans are great for clean up but the dark color makes it hard to see what color the caramel is.
- Wait for the tart to cool slightly before inverting: Most recipes have you invert the tart fairly quickly. Not only is the pan and tart super hot (which is dangerous) but the caramel is often very liquidy and will run all over the place. Let the pan cool for 30 minutes makes it much more easier to manage when flipping over. It also gives it time for the caramel to settle and thicken. If any apple stick to the pan, just carefully remove it from the pan and replace it onto the tart. This is much easier to do when the apples and pan aren’t scalding hot!

Short cut
If you want to skip making the pie crust, feel free to use store bought pie crust or store bought puff pastry. I personally prefer a pie crust over a puff pastry crust for a tarte tatin, but either works!
How do you store a Tarte Tatin
Store tarte tatin in the refrigerator, in an airtight container, for up to 3 days. Bring to room temperature and serve or warm it up gently in a 300°F or toaster oven for 10 minutes if you’d like.
If you like this Tarte Tatin, check out these other Fall desserts and baked goods:
- Apple Brown Betty with IPA Beer
- Pumpkin Bread
- Apple and Fig Cobbler with Eggnog Biscuits
- Fig, Blackberry and Goat Cheese Tart
- Apple and Cranberry Pie with Almond Butter Crust
- Apple and Berry Cobbler with Cinnamon Berry Swirl Biscuits
- Southern Comfort Pear and Frangipane Pie
- Fig Financiers

Tarte Tatin
Ingredients
Pie crust
- 1 1/4 cup all-purpose flour 175 g
- 1/2 teaspoon kosher salt
- 1/2 cup cold unsalted butter 115 g or 1 stick
- 5 to 7 tablespoons ice cold water
Filling
- 3 1/4 to 3 1/2 pounds apples roughly 8 to 10-medium sized ones
- 2 tablespoons apple cider vinegar
- 4 tablespoons cold unsalted butter 57 g
- 3/4 cup white sugar 150 g
- 1 teaspoon vanilla extract
- 1/2 teaspoon kosher salt
Instructions
Make the Pie Crust
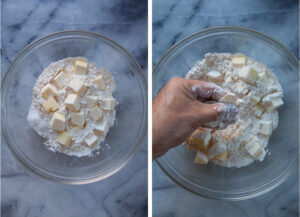
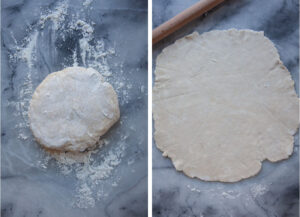
- Make the pie crust by placing the flour and salt in a medium-sized bowl. Cut the butter into 1/2-inch cubes and sprinkle them over the flour. Toss the butter with your hands to coat them with flour, then use your fingers to smash the butter into flat small pieces, roughly the size of peas.

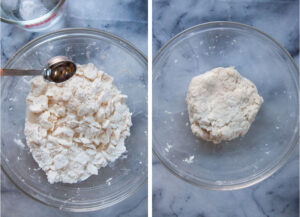
- Drizzle 5 tablespoons of water over the mixture and toss with a fork. Use your hand to massage the dough, until all the water is absorbed and evenly distributed, and a cohesive dough has formed. Add more water, 1 tablespoon at a time, if the dough seems too dry and isn’t forming properly. Gather the dough into a single ball, then flatten it into a 1-inch thick disk. Wrap in plastic wrap and place in the refrigerator until ready to use.
Make the Caramel and Apple Filling
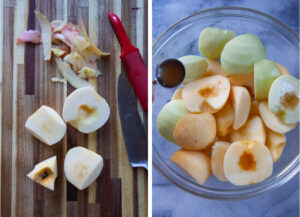
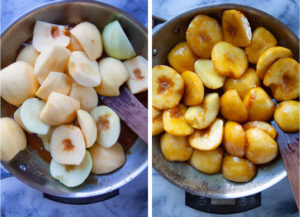
- Make the filling by peeling an apple and then cutting it into 3 wedges, discarding the core. The larger size chunks of apples will look best for the tarte tatin. Repeat with the remaining apple, placing the pieces in a large bowl. Sprinkle with apple cider vinegar and toss to prevent them from browning.
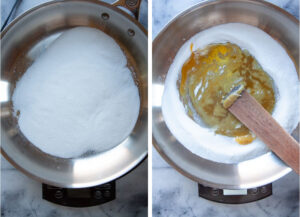
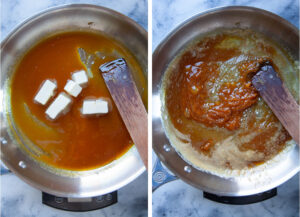
- Cut the cold butter into 1/2-inch chunks and set next to the stove. Sprinkle the sugar into a large 12-inch skillet (preferably one with a silver or light-colored bottom if you have never cooked caramel before). Cook the sugar on high heat, until it starts to melt, then reduce the heat to medium low. Continue to cook, stirring frequently, until all the sugar has melted and started to turn golden brown.
- Once the sugar is a golden brown, remove from heat and add the cold butter carefully. It will steam and sputter, and the caramel might seize up and harden. Don’t worry about this. Just stir the butter into the hot caramel as much as you can.Preheat the oven to 400°F.
- Move the pan back to the burner. Add the apples to the pan and cook them on medium low heat, stirring as best you can. The caramel will be hard and chunky but as the apples start to exude liquid as the pan heats up again, the caramel will loosen and dissolve back into a liquid. Continue to cook the apples until they have started to soften slightly, the edges of the apples have turned slightly translucent, and the caramel has liquified again, about 10 minutes or so. Remember, the apples will continue to cook in the oven so no need to cook completely on the stove. Remove the pan from the heat.
Arrange the Tart and Bake
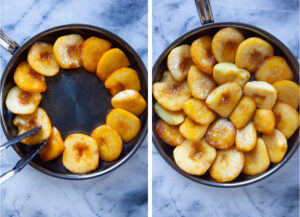
- Take a 9, 10 or 11-inch oven-proof skillet or pie pan and carefully arrange the apples, round side down in concentric circles. I like to pick the biggest apple slices and use those around the edge of the pan, working my way in with smaller apple slices. “Shingle” the apples so they overlap about 1/3 of the way if you can. This allows you to fit in more apples into the pan, as well as accommodates for when the apples shrink more in the baking. Use as many apples as you can fit in, but don’t stress too much if you can’t use all the apples. Save the remaining caramelized apples for another use, like topping on yogurt or ice cream, or just snacking on them.
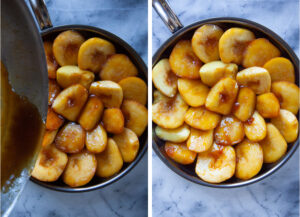
- Whisk in the vanilla and salt into the remaining caramel in the large 12-inch skillet that you cooked the apples in. Then scrape and pour the caramel over the apples.
- Take the chilled dough from the fridge and roll it out on a clean, lightly floured surface into a 10 to 12-inch circle. Roll it out roughly an inch larger than the skillet pan you are using.
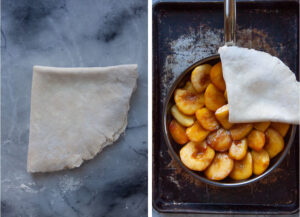
- Fold the pie crust in half, then in half again, making it look like a quarter pie wedge. Place the crust over the apples and unfold.
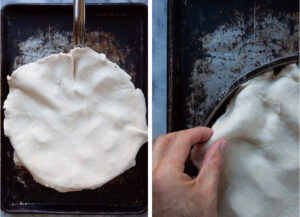
- Tuck the edges of the pie crust into into the side of the pan.
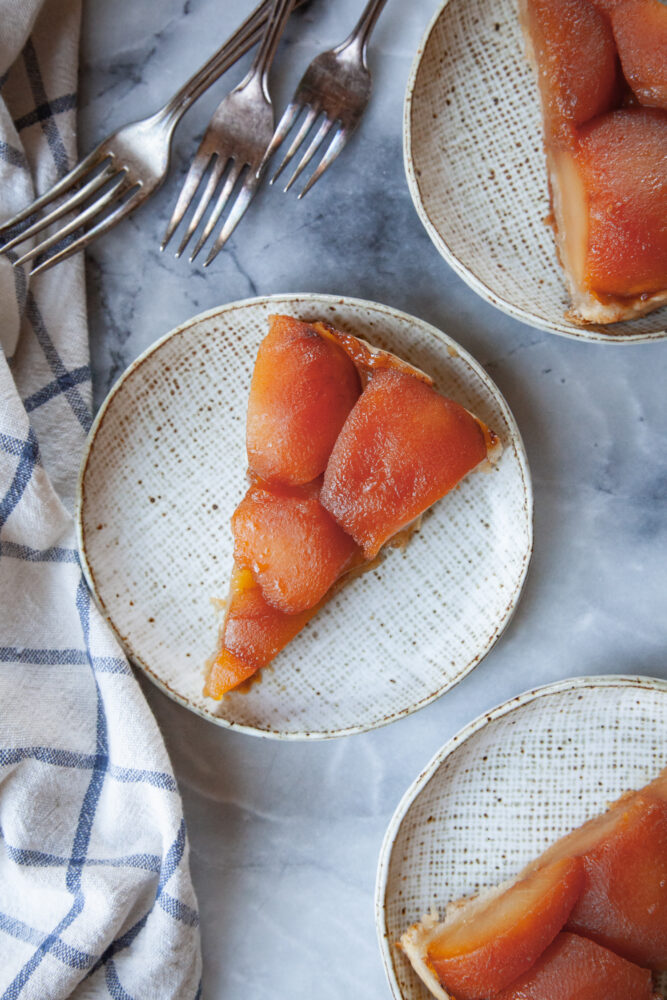
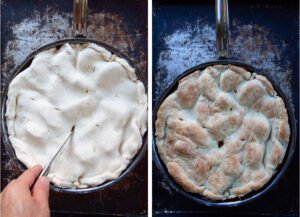
- Cut a few steam vents into to the crust. Place the pan on a rimmed baking sheet (to catch any spillage and to help move the pan in and out of the oven) and bake for 25 to 35 minutes, or until the crust looks golden brown and juices are bubbling out of the steam vents. A smaller 9-inch skillet will be closer to 25 to 30 minutes, while a larger 10-inch skillet will be closer to 30 to 35 minutes.Let the tarte tatin rest and cool on a wire rack for 30 to 45 minutes. Then place a serving platter or cake stand upside down on it and carefully invert the pan. The tarte tatin should easily release onto the platter. If any apples stick to the pan, just carefully loosen and replace them back onto the tarte tatin. Serve warm as is, or with ice cream or whipped cream if desired.
safisdesserts says
I LOVE this post. Very interesting info! Perfect just what I was looking. Nice PICS. I’m so glad you enjoyed this recipe. Thank You !!!
Beautifully executed. Starting to end I couldn’t stop myself and went on reading it. Pics are very attractive.
lolbeans says
An extremely simple and perfect recipe. The ingredients are not too complicated.
KariG says
Oh, thank you. I’ve had my eye in a tarte tatin for years, but caramel has never been a friend (grainy even with acid, doesn’t flow right, you name it). You’ve made this recipe accessible, and I think the tips will be the clincher. Will now try my hand…
Woody says
As a reference, I cooked the apples and caramel in a separate pan to achieve the picture-perfect classic apple tarte tatin appearance. Next, I layered and shingled the apples in a small pan so that even as they shrank, the tart would still appear to be full.