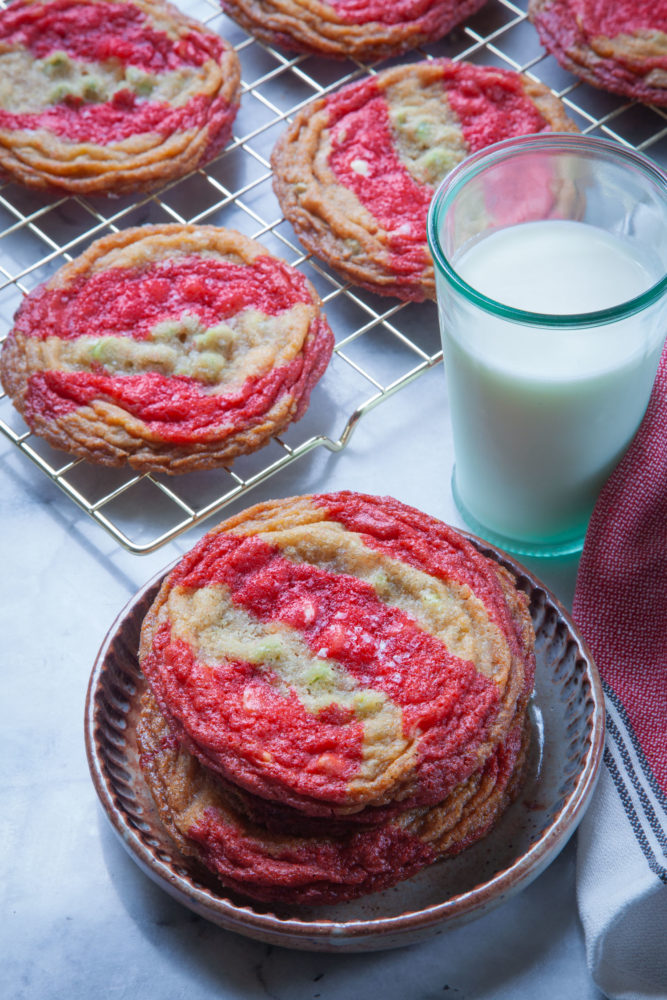
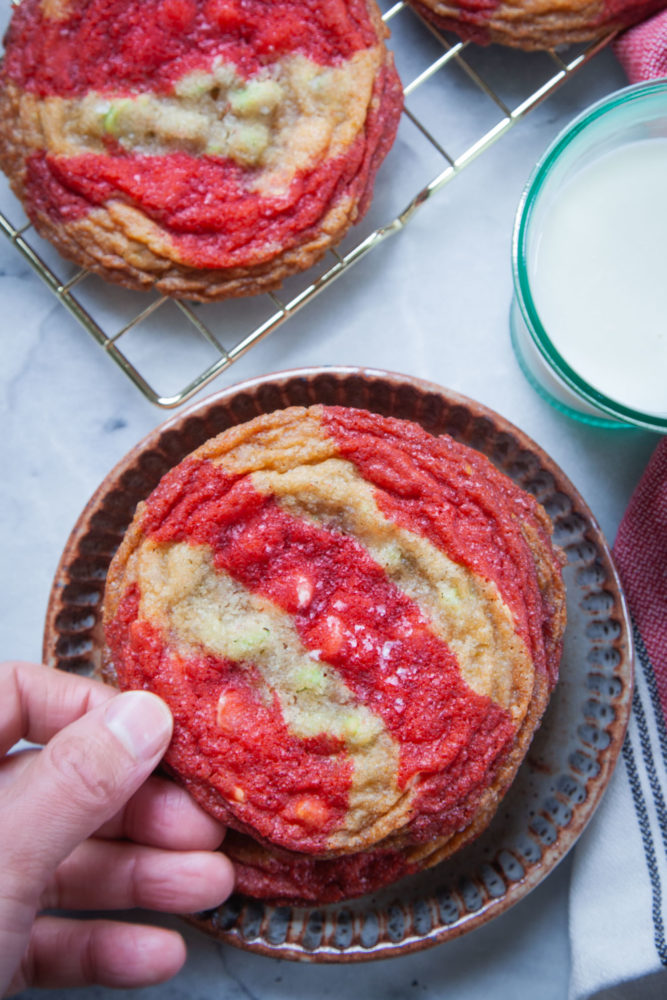
These fun and whimsical striped chewy peppermint chocolate chip cookies are easier to make than they look with my step-by-step instructions!

I’ve been tinkering with this idea of revisiting and revising my old white chocolate peppermint cookie with sea salt that uses leftover crushed candy canes for awhile. But honestly, my friend Steven made it recently and had texted me to tell me he loved it immensely. Which made think, why should I mess with a much beloved cookie recipe? Even if it’s much beloved by…one person. And though I adore the combo of chocolate and mint, like in my peppermint Texas sheet cake and in my mint chocolate chip cookies (that are designed to taste like mint chocolate chip ice cream) I knew I wanted to yet another riff on this flavor combo. So before I knew it, I was sketching and brainstorming these striped chewy peppermint chocolate chip cookies. They’re fun and whimsical, with me playing and combining different colored cookie doughs like in my rainbow chocolate chip cookies. And though they look complicated, I have step-by-step instructions and even a video to show you how to make them!
How do you make this cookie?
This cookie looks fairly fancy pants, because I used two different doughs to make the stripes. I have a recipe in my cookbook Marbled, Swirled, and Layered (<- affiliate link) that creates a criss-cross style cookie and I adapted it to make my rainbow chocolate chip cookie. Here I make just two different colored doughs, cut them into strips, and then form the cookie.
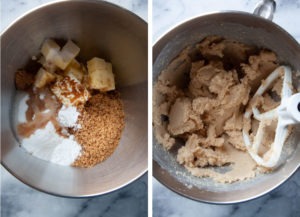
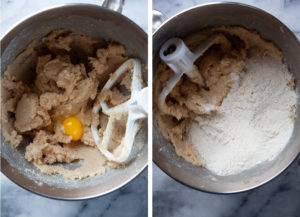
First make the cookie dough by creaming together butter, white sugar, brown sugar, vanilla and peppermint extract, salt, baking powder, and baking soda. Then add 2 eggs, one at a time. Add the flour and mix until a dough forms.
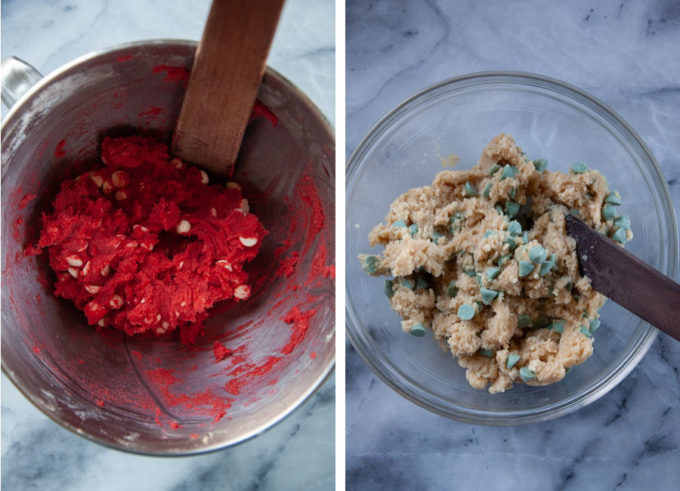
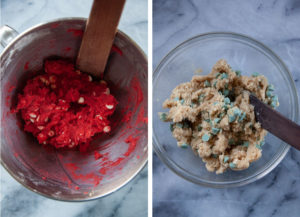
Divide the dough in half, adding red food coloring to one half of the dough. Then mix in white or semi-sweet chocolate chips (your preference) to the red dough and mint chip or semi-sweet chocolate chips (again your preference) to the white dough. Wrap the dough up and chill it in the fridge for at least 2 hours or preferably overnight.
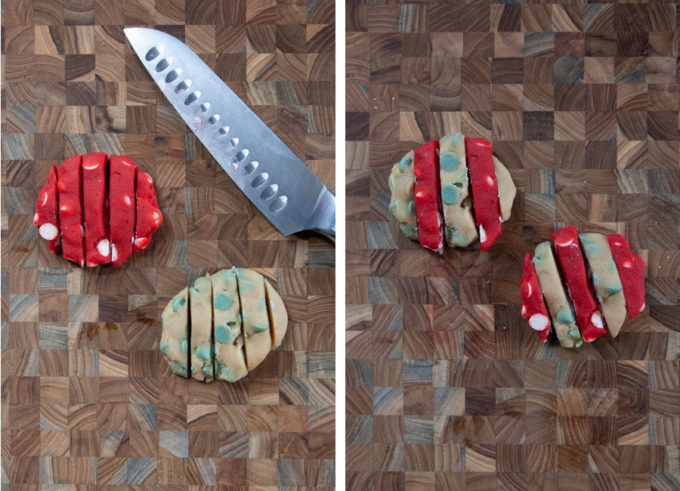
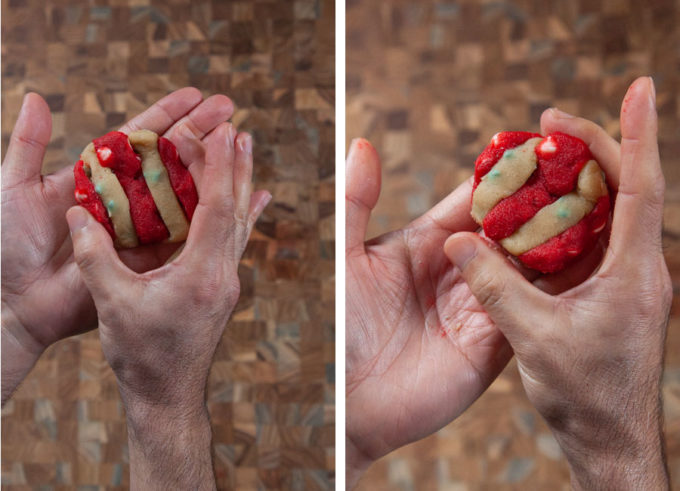
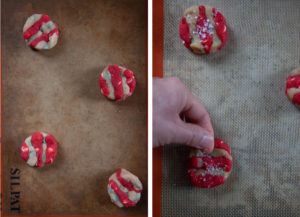
Once the dough is chilled, roll out balls of dough and flatten them into disks. Then cut the disks into 5 even strips. Alternate the strips to form a dough disk that has white and red strips. Press together to form a cohesive disk, sprinkle some flaky salt on top and bake!
Watch a video for how to form these cookies
What sort of food coloring should you use?
I designed this cookie to use liquid food coloring, the kind you find at a typical grocery store. Look for in the same place you will find frosting or cake decorating, or near the flavor extracts and spices.
Keep in mind that the red food coloring is an artificial red coloring. I have yet to find a natural red food coloring that holds its color when baked. Most natural food coloring works best at room temperature, tinting frostings and icings. But if you experiment and find a natural based food coloring that will hold its color after baking, leave a comment below! I’d love to find one.

What chocolate chips should use?
I use a combination of white chocolate chips and mint chips in this recipe. But you can use semi-sweet, bittersweet, milk chocolate chips or chopped chocolate chunks in this cookie. You can even chop up mint chocolates like Andes chocolate and use those. But my go-to brand for white chocolate chips and mint chips is Guittard, a family-owned company here in San Francisco.
How do you store these cookies and how long will they last?
Store these cookies in an airtight container or in a heavy-duty resealable Ziploc bag. I found they lasted about 3 days sealed tight at room temperature. I don’t recommend storing these cookies with other cookies, as the mint flavor will migrate to the other cookies. Or, as my partner says…they will mint-aminate them! So store them separate and away from anything that you don’t want smelling and tasting like mint.
You can also freeze these cookies. Store them in a heavy-duty resealable Ziploc bag and freeze for up to 3 months. Thaw to room temperature for about 2 hours before enjoying.
Can you make the dough ahead of time?
Yes! Working with a chilled dough will make it easier to manipulate and form the stripes. I recommend a chilling the dough a minimum of 2 hours but you can make them the night before, or up to 3 days beforehand. Just wrap the dough tightly in plastic wrap and store in the fridge until you are ready to use.
You can also freeze the dough. You can freeze the dough as is, before forming the cookies. Just tightly wrap it in plastic wrap, then slide it into a heavy-duty resealable Ziploc bag. The dough will keep in the freezer for up to 3 months. Thaw overnight in the fridge before forming the cookies.
Or you can freeze the cookie dough already formed into cookie disks! Just form the cookies, and then place them on a rimmed baking sheet. Place the baking sheet in the freezer, letting them freeze solid. Then store them in a heavy-duty resealable Ziploc bag. Take them out and bake them directly from the freezer, adding an additional 2 to 3 minutes to the bake time to allot for the frozen dough.
If you like these striped chewy peppermint chocolate chip cookies, check out these other chocolate and chocolate chip cookie recipes:
- Bakery-style chocolate chip cookies
- Sourdough chocolate chip cookies
- Monster cookies with M&Ms, Reese Pieces, and chocolate chips
- Hot Chocolate Cookies
- Chocolate Salted Caramel Cookies
- Crispy chocolate chip cookies
- Butterscotch triple-chocolate chip cookies
- Reverse pan-banging chocolate chip cookies
- Chewy, not cakey, pumpkin chocolate chip cookies

Striped Chewy Peppermint Chocolate Chip Cookies
Ingredients
- 1 1/2 cups unsalted butter, at room temperature 340 g or 3 sticks
- 1 3/4 cups white sugar 350 g
- 1/2 cup packed brown sugar 110 g
- 1 1/2 teaspoon baking powder
- 1 1/4 teaspoons baking soda
- 1 teaspoon kosher salt
- 1 1/2 teaspoon peppermint extract
- 1 teaspoon vanilla extract
- 2 large eggs
- 3 1/2 cups all-purpose flour 490 g
- 2 teaspoon liquid red food coloring
- 1 1/2 cups white chocolate chips or another chocolate chips (see note below, 275 g
- 1 1/2 cups mint chips or another chocolate chips (see note below), 275 g
To finish
- Flaky sea salt like Maldon optional but recommended
Instructions
- In the bowl of a stand mixer fitted with a paddle attachment, place the butter, white sugar, brown sugar, baking powder, baking soda, salt, peppermint extract, and vanilla extract. Mix the ingredients together on low speed until the ingredients start to come together. Then increase the speed to medium low and cream until the mixture lightens in color and clings to the side of the bowl, about 1 to 2 minutes.
- Scrape down the side of the bowl and then mix in the eggs on slow speed, one at a time, making sure the first egg is incorporated before adding the next one. Again, scrape down the bowl.Add the flour, mixing slowly or turning the mixer on and off so the flour doesn’t fly all over. Once most of the flour is absorbed, increase the speed to medium low and mix until all the flour is incorporated.
- Scoop out half of the dough and place it in a separate bowl. If you have a scale, this should be roughly 600 grams of dough.Add the food coloring to the dough remaining in the bowl of the stand mixer then mix to incorporate the food coloring. You may need to scrape down the sides a couple of times. But mix until you have a uniform color.
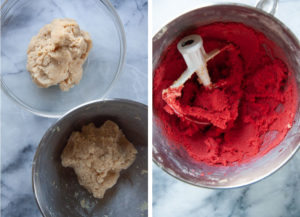
- Stir the white chocolate chips into the red dough by hand, making sure the chips are evenly distributed. Stir the mint chips into the white dough in the other bowl by hand, making sure the chips are also evenly distributed.
- Scoop out the dough and place it on a large piece of plastic wrap. Push the dough into a disk, about 1-inch thick, wrap tightly with the plastic wrap and repeat with the other dough, in a different piece of plastic wrap. Refrigerate both doughs for a minimum of 2 hours or overnight preferably.
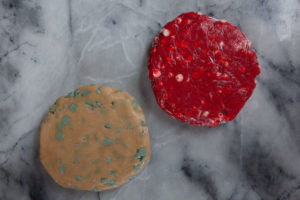
- Once the dough has fully chilled and feels firm, preheat the oven to 350°F and line a baking sheet with parchment paper or a silicon baking mat.Break off a chunk of the white dough and roll into a 1 1/2-inch ball. If you have a scale, that’s about 70 grams each. Press down on the ball to form a disk that is about 2-inches wide and 1-inch thick. Repeat this process with the red dough, rolling the dough into a 1 1/2-inch ball, then pressing it into a disk.
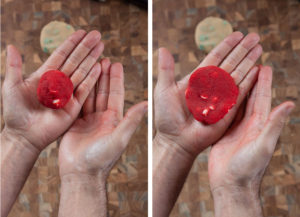
- Cut each disks into 5 strips with a sharp chef’s knife.Now assemble the cookie by taking one piece of the white dough and one piece of the red dough and making alternating strips of dough. Try to fit the edge strips to the edge strips, and the middle strips to the middle strips so you have roughly the same form of disk.

- Then use your fingers to squish and form a thick disk with the stripes intact.

- Place the dough disk on the lined baking sheet and sprinkle with a pinch of the flaky sea salt if using.Repeat this process with the remaining dough, placing 4 disks of cookies per baking sheet. You want the disk about 2 to 3 inches apart from each because these cookies spread! Bake in the oven for 14 to 16 minutes or until the edges of the cookies are wrinkly and golden brown. The center of the cookie will rise dramatically but then fall once they cool. Make sure NOT to overbake them if you want them chewy. If you like them more crisp, you can bake them a minute or two longer. While the first sheet of cookies is baking, form another batch of cookies to bake.Let the cookies sit on the baking pan for 5 minutes before moving them to a wire cooling rack to cool further before serving
geometry dash says
I made these last night and they were amazing! Definitely adding them to the rotation!!
Jeff the Chef says
These cookies sound great! I love mint and chocolate. I’m not sure if I’ve had white chocolate with mint, but I’m sure I’d love that, too. Thanks for all the tips, especially the one about stoarage.
Brown Sunny says
It was wonderful, the first time I made a cake that was both delicious and beautiful, my girlfriend suika game loved it