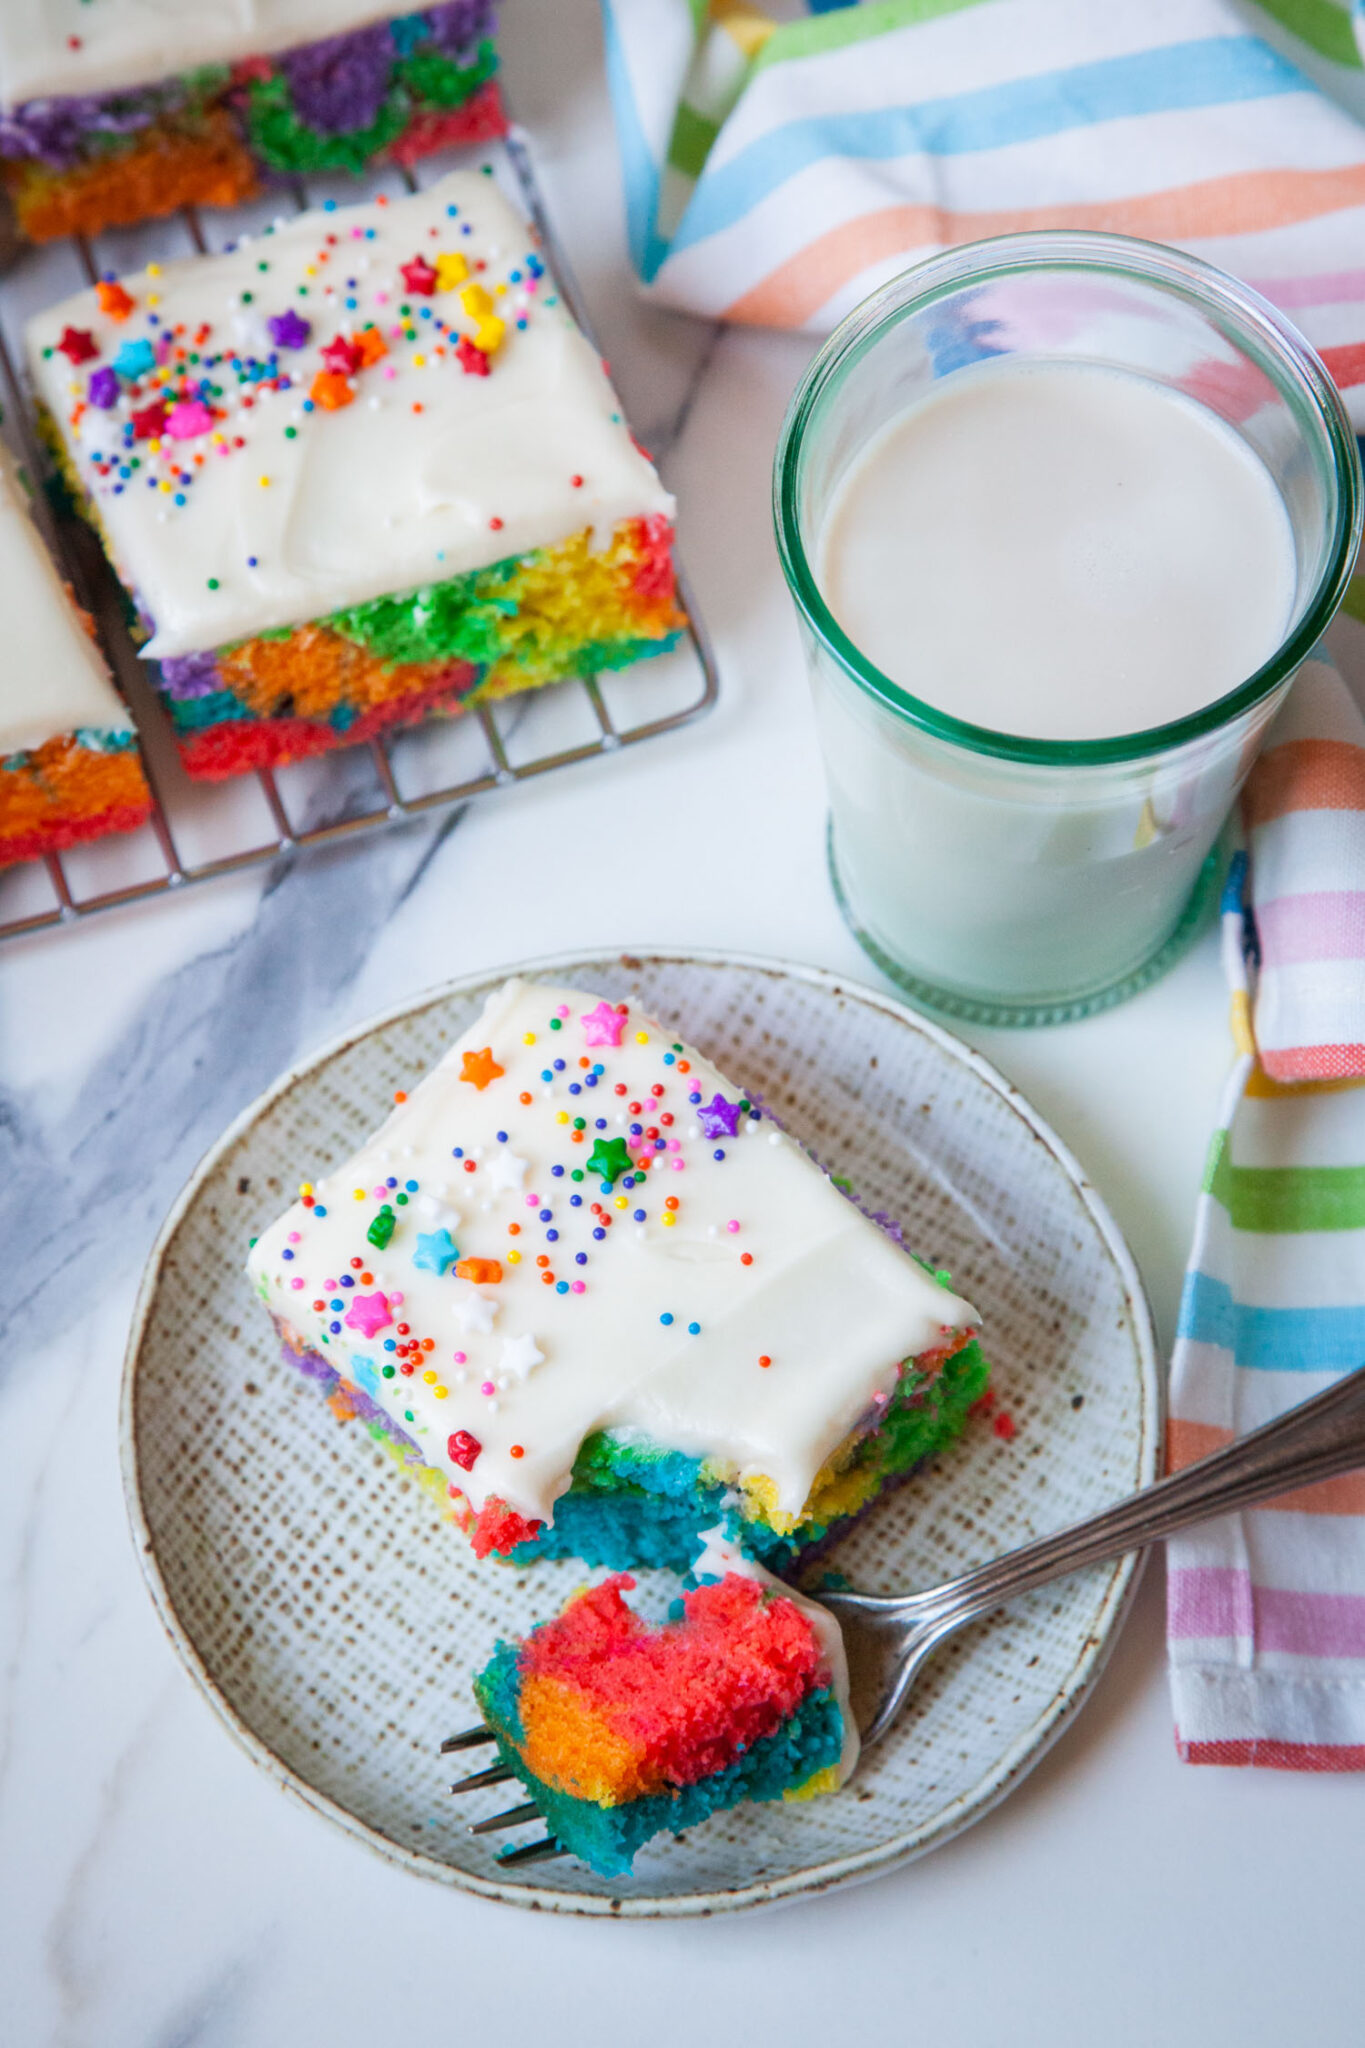
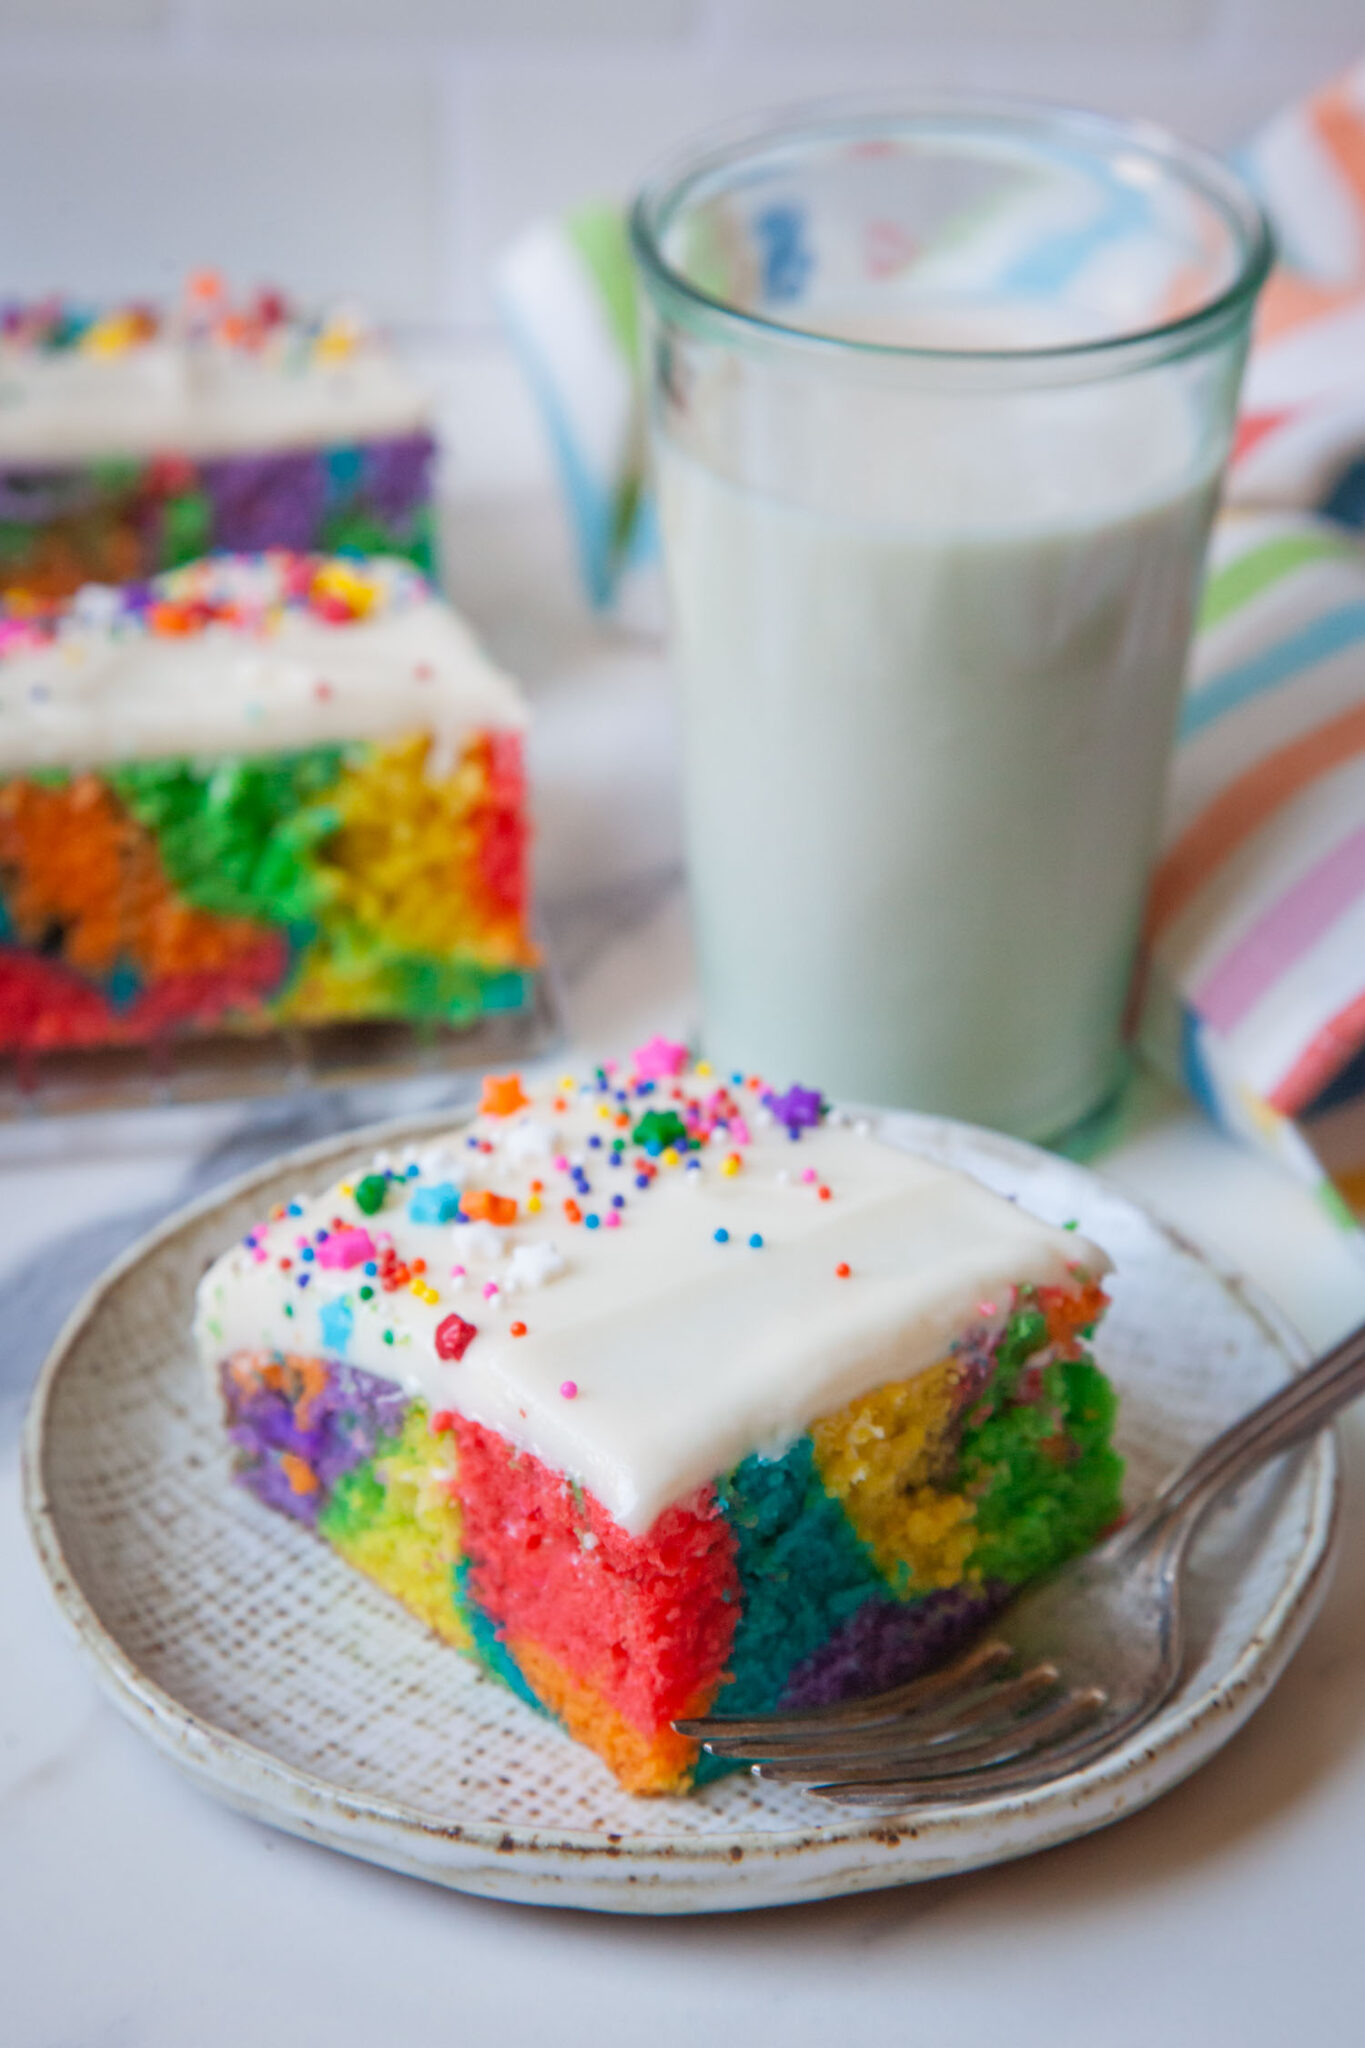
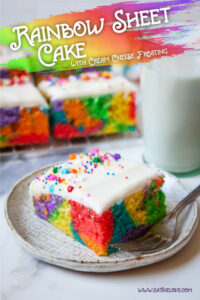
This super fun rainbow sheet cake is made from scratch with a tangy creamy cheese frosting, but it is easier to make than it looks!
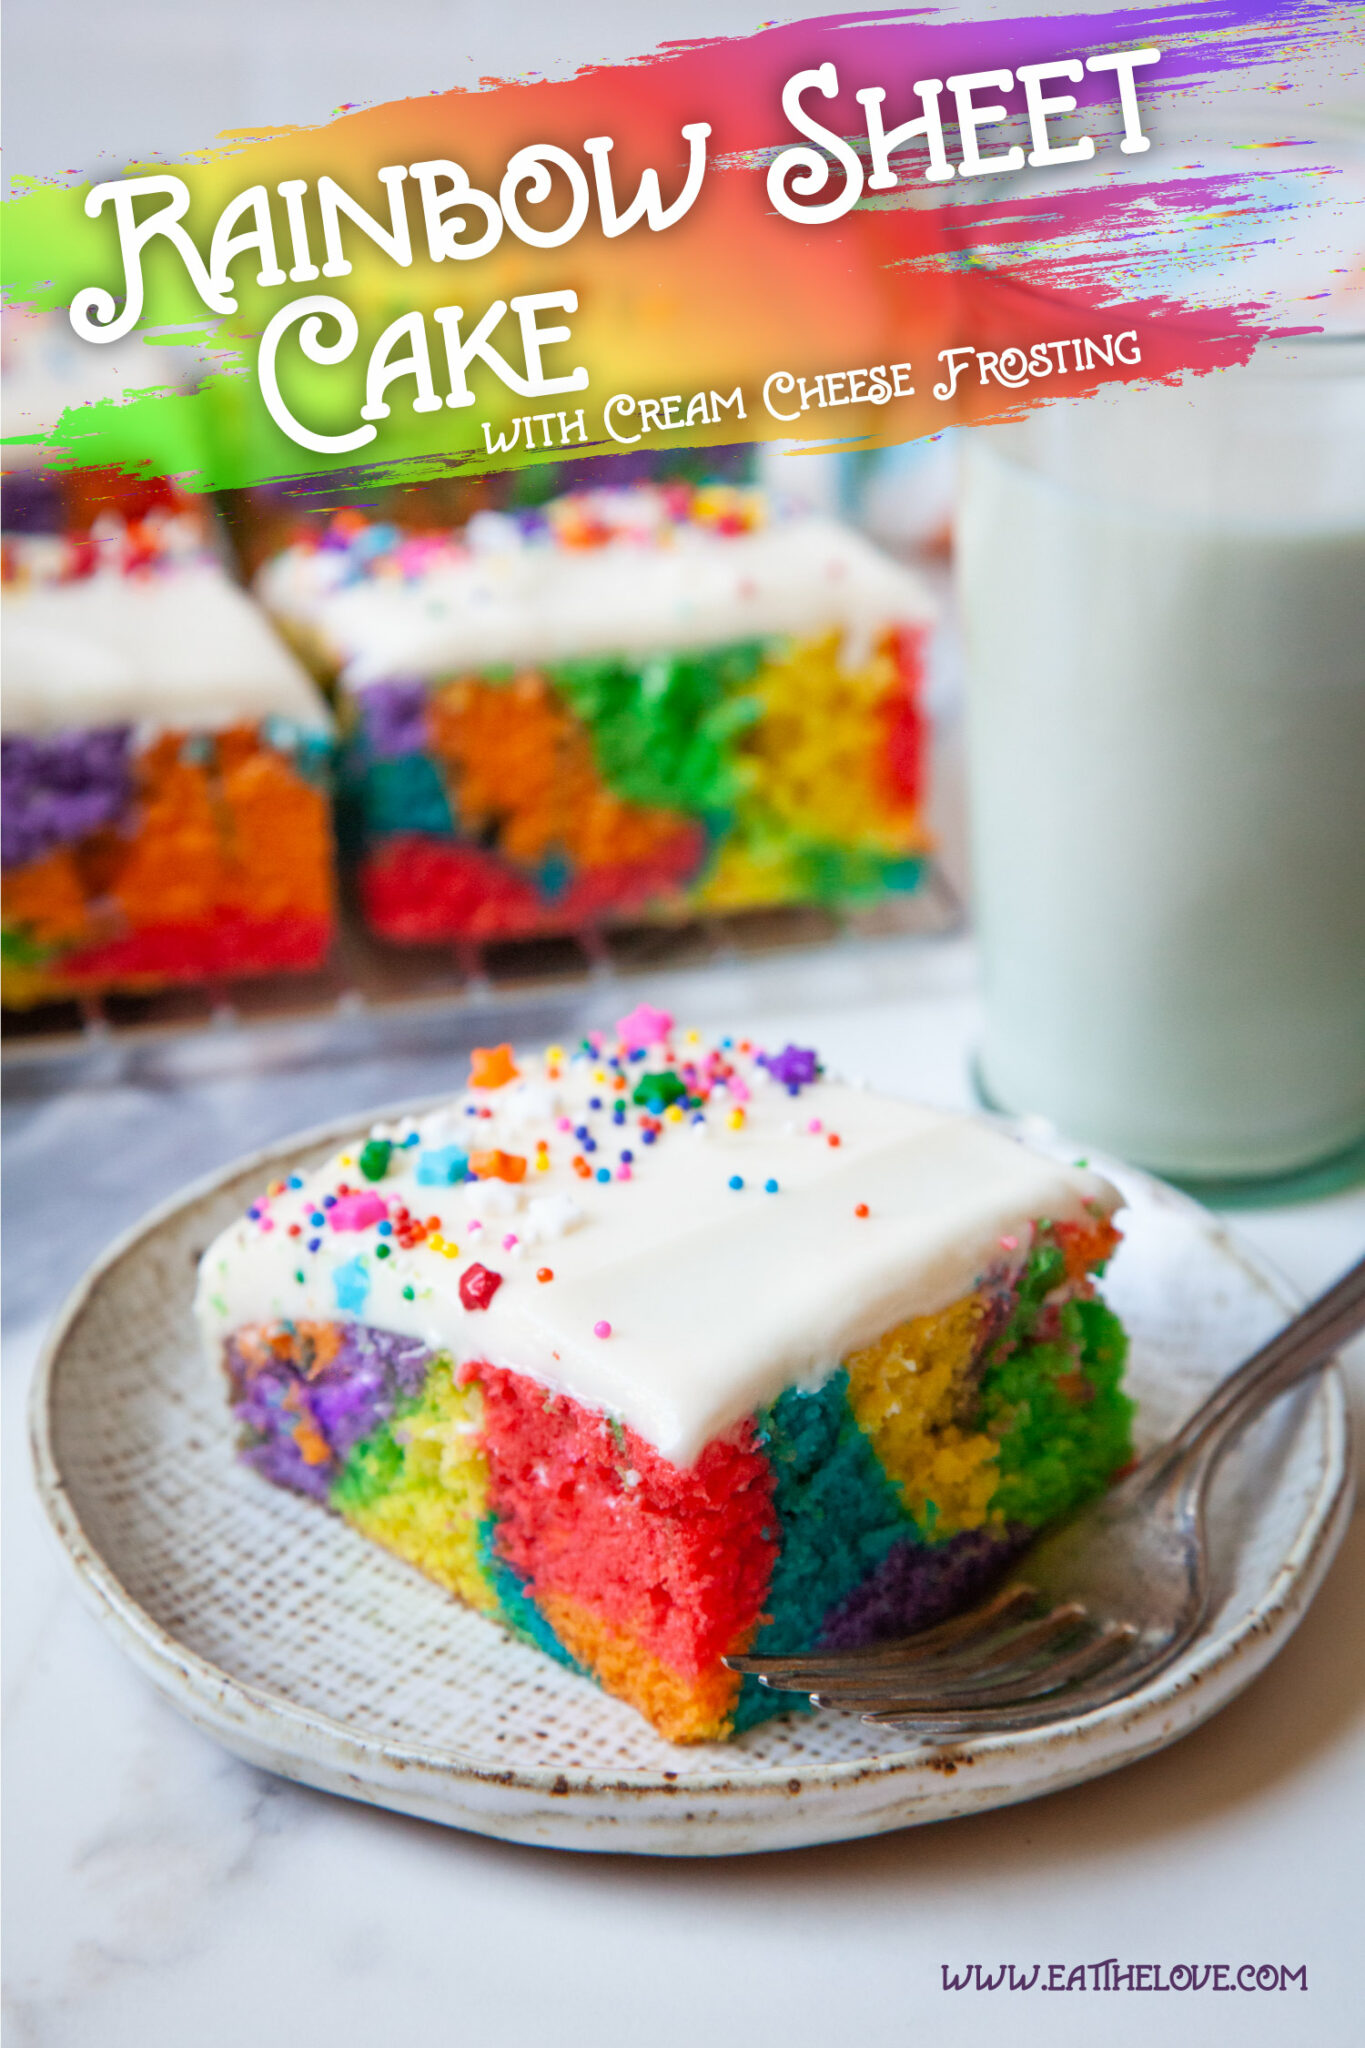
I’ve fully embraced rainbow food, as evident by my rainbow chocolate chip cookies, psychedelic rainbow swirled cheesecake brownies, and my rainbow layer cake. But when I was brainstorming ideas for another rainbow dessert (there can never be enough) I thought about the classic rainbow layer cake. The idea of stacking multiple layers can be daunting for a lot of folks. But what if I made it into a not-so-basic rainbow sheet cake? Layered and swirled with different colored cake batter, this super fun cake is almost as easy to make as a typical sheet cake. And as a friend’s kid said, as he took a huge forkful bite of it, “rainbow colors makes everything taste more fun!”
How to make this cake
This cake recipe features a technique called “reverse creaming” which sounds fancy but don’t worry, it’s not! It actually simplifies everything. I explain it in detail in the recipe below, but here’s a quick overview of how to make it.
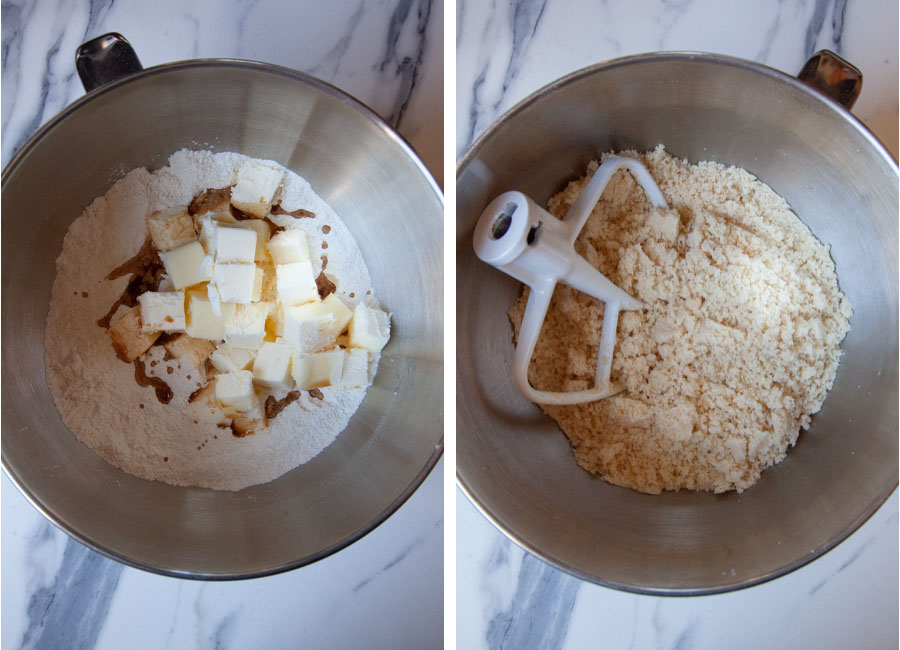
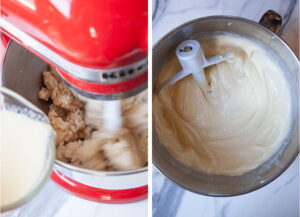
First whisk together flour, cornstarch, white sugar, baking powder and baking soda in the bowl of a stand mixer. Then cut up room temperature butter and sprinkle it all over the dry ingredients, along with some vanilla extract. Slowly turn on the mixer fitted with a paddle attachment and mix all the ingredients together until they start to look crumbly and the butter has been incorporated.
Beat together the buttermilk and the eggs. Drizzle the wet ingredients slowly into the bowl with the mixer on low speed, until all the liquid has been added and absorbed and a smoother batter forms.
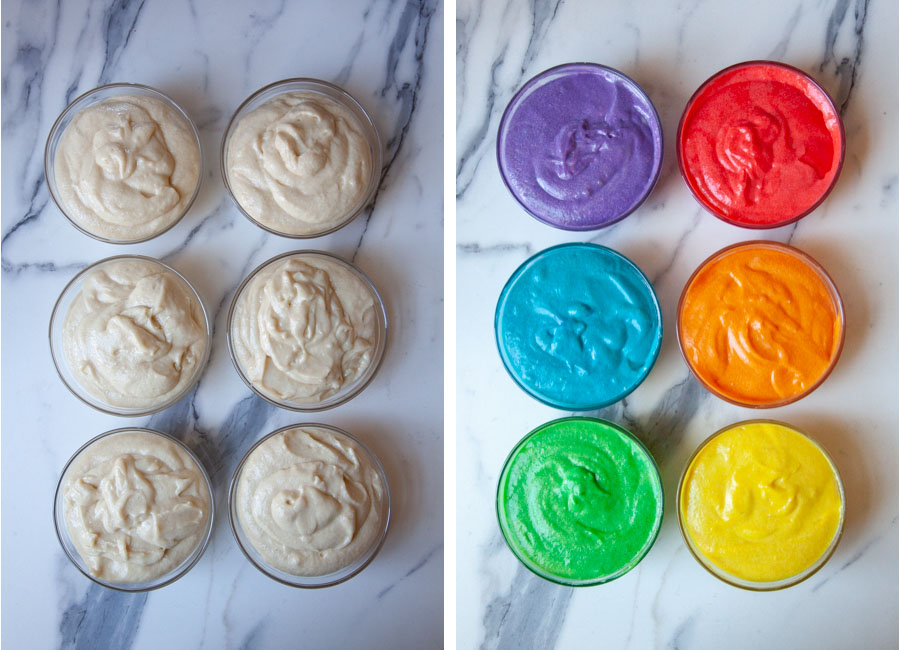
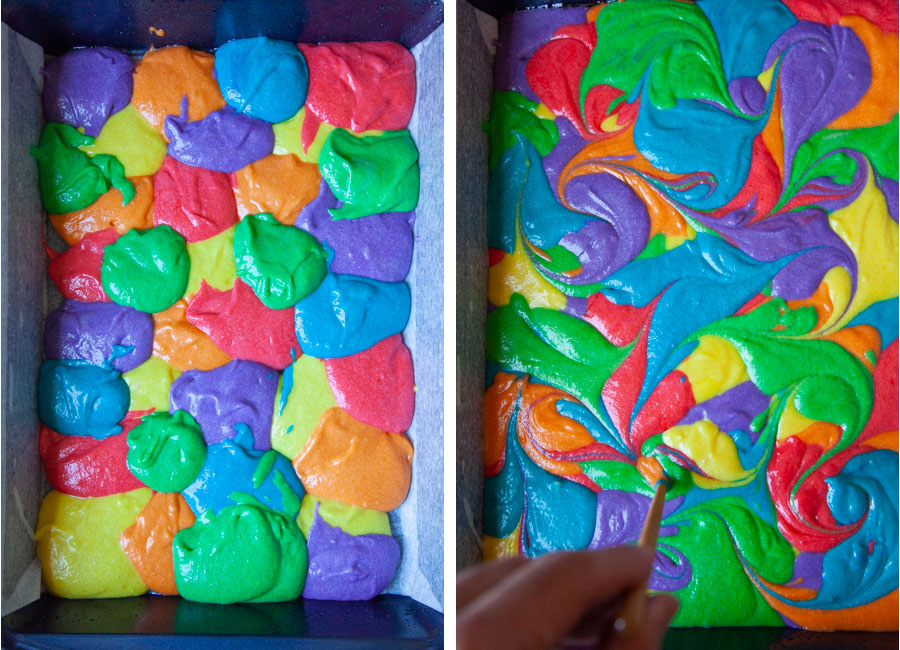
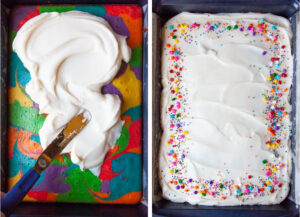
Divide the batter into 6 bowls, add food coloring, and then randomly place the various colored batter into the pan, spooning different batter into the pan over each other. Gently marble and swirl, then tap the pan on a table or counter, to get rid of any air bubbles. Bake and cool completely!
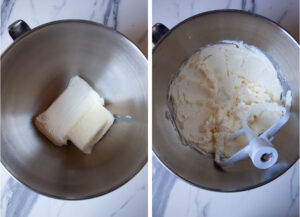
Once cooled to room temperature, make the frosting by mixing together cream cheese and butter. Add in the sifted powdered sugar, 1 cup at a time, along with vanilla and salt. Mix until a frosting forms. Spread it generously over the top of the cake, then add the decorative sprinkles and serve!
What is the reverse creaming method?
The reverse creaming method was created by Rose Levy Berenbaum in her classic book The Cake Bible. A typical cake is made by creaming together sugar and butter. But with the reverse method, the butter it mixed with the flour, along with other dry ingredients like white sugar, baking powder, baking soda, and salt. The butter coats the flours and other dry ingredients, creating a tighter velvety smooth crumb over the more traditional creaming method with butter and sugar which leads to a coarser and fluffier cake.
Both methods are great ways to make a cake, but I used the reverse creaming method because I wanted a tighter crumb for this cake, so help highlight the fun-colored batters in the cake when you slice into.
Buttermilk substitute
I use buttermilk in this recipe because I like the slight tang it gives the cake. But if you don’t have buttermilk, or you don’t feel like buying a carton of it for just this recipe you can easily make a substitution.
Stir in 1 tablespoon of white vinegar or lemon juice to 1 1/3 cup of milk and let sit for 5 minutes or until it starts to thicken. This mixture is called “clabbered milk” and can be used as a substitute in this recipe.
Or you can mix 1 cup whole milk with 1/3 cup full fat sour cream. This mixture will also work as a substitute in this particular recipe.

How to soften cream cheese and butter
It’s important to use softened room temperature cream cheese and butter in the frosting. If you use cold ingredients, the resulting frosting will by lumpy!
The easiest way to soften cream cheese and butter is to just leave it out on the countertop for 1 to 2 hours. I typically try to take out the cream cheese and butter after I’ve baked the cake. Once the cake it out of the oven, I place it on a wire rack to cool, and then pull the cream cheese and butter out of the fridge and let it set it out. By the time the cake has completely cooled (conveniently 1 to 2 hours) the two items have also been brought to room temperature!
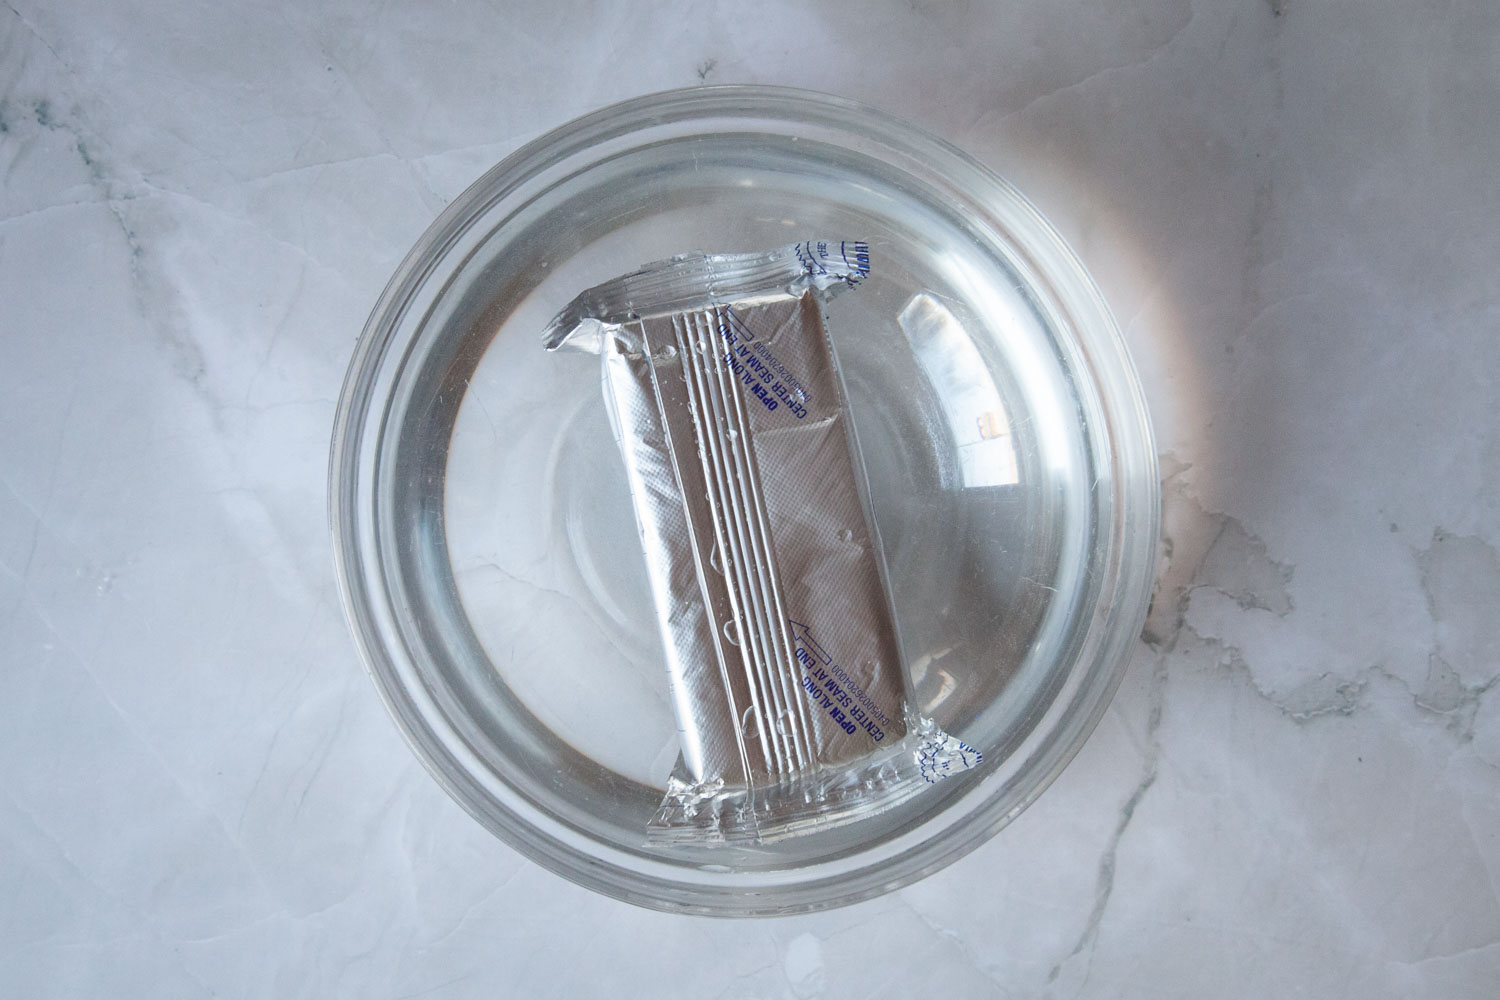
But if you forget or you need to quickly bring the ingredients to room temperature, my favorite way to do it is first cut the butter into 1/2-inch chunks and set it aside, with each cube spread out and not touch each other. Then fill a large bowl with hot water from your tap. Submerge the cream cheese, still wrapped in the foil, in the hot water. Let the cream cheese sit in the water for 10 minutes, and the butter sit on the counter for the same amount of time. 10 minutes later, the cream cheese should be softened, and the butter should be warm enough that you will have minimal lumps.
How to store this cake
Because this cake has a cream cheese frosting, I recommend storing it in the refrigerator loosely covered. Bring the entire cake to room temperature by placing it on the counter or on a kitchen table an hour before serving. The cake should keep for 3 to 5 days in the fridge.
You can also freeze the cake by placing individual slices on a baking sheet and putting it in the freezer. Once the cake is frozen solid (about 2 hours) store the slices of cake in an airtight container or large freezer Ziploc bag.
If you like this rainbow sheet cake, check out these other cake recipes:
- Peach Upside Down Cake
- Easy Strawberry Cake
- Dark Chocolate Texas Sheet Cake
- Pumpkin Layer Cake
- Chocolate Guinness Cake
- Cinnamon Streusel Coffee Cake
- Pumpkin Coffee Cake
- Swedish Blueberry Cake (Blueberry Tosca Cake)
- Meyer Lemon and Matcha Bundt Cake
Rainbow Sheet Cake with Cream Cheese Frosting
Ingredients
Cake Batter
- 2 1/2 cups all-purpose flour 350 g
- 2 tablespoons cornstarch
- 1 3/4 cups white sugar
- 1 teaspoon baking powder
- 1/2 teaspoon baking soda
- 1 cup butter at room temperature 225 g or 2 sticks
- 1 tablespoon vanilla extract
- 1 1/3 cups buttermilk well shaken
- 3 large eggs
To decorate
- food coloring
- Cream cheese frosting
- 8 ounces cream cheese softened
- 1/2 cup butter softened, 115 g or 1 stick
- 3 cups powdered sugar sifted, 345 g
- 2 teaspoon vanilla extract
- 1/4 teaspoon kosher salt
To decorate
- Rainbow sprinkles
Instructions
- Preheat an oven to 350°F. Lightly coat a 9 x 13 x 2-inches baking pan with cooking oil, then line it with parchment paper.Make the cake batter by first placing the flour, cornstarch, sugar, baking powder, and baking soda in the bowl of a stand mixer. Whisk together to blend.

- Cut up the butter and place it in the bowl, along with the vanilla extract. With the paddle attachment, mix the ingredients together, until the butter has completely broken down and incorporated, creating a crumbly texture that looks like wet or damp sand.
- Beat together the buttermilk and eggs in a glass measuring cup.
- With the mixer turned on to low speed, drizzle the liquid slowly into the bowl. Stop and scrape down the sides of the bowl once or twice, to make sure the entire batter is completely mixed together.
- Divide the batter into 6 different bowls, about 1 cup per bowl, or about 220 grams of batter if you have a scale. Add yellow, orange, red, purple, blue, and green food coloring to each of the bowls and mix together thoroughly to form 6 different colored batters.
- Now spoon the colored batter into the prepared pan, evenly distributing the batter all over, making sure to alternate color spoonfuls of the batter all over. Take a chopstick or butter knife and carefully swirl the batter decoratively (do not swirl too much). Gently tap the pan on the counter, to help settle the batter and remove any air pockets.Bake 30 to 35 minutes, or until a toothpick inserted in the middle of the cake comes out clean. Let cool completely in the pan.
- Once the cake has cooled completely, make the cream cheese frosting by placing softened cream cheese and butter into the bowl of a stand mixer fitted with the paddle attachment. Cream the two ingredients together, until well-blended. See note below about softening both ingredients.
- Add the vanilla and salt, then sift in 1 cup of powdered sugar (see note below on why it’s important to sift in the powdered sugar). Mix together, until the dry ingredients are incorporated. Sift the other 2 cups of powdered sugar, one at a time, making sure to scrape down the bottom and sides of the bowl between additions. If the frosting is too loose, you can add an additional 4 to 8 tablespoons of powdered sugar, a tablespoon at a time, until it has thickened to a spreadable consistency. Or cover and place the bowl in the refrigerator for 30 to 60 minutes, to help stiffen it. Note: It’s important you sift the powdered sugar. See note below for the reason why.
- Frost the top of the cake, and then add decorative sprinkles on top before serving!


Notes
- Buttermilk: I use buttermilk in this recipe but if you don’t have buttermilk, I have a section above on substitutions for buttermilk using more common ingredients.
- Food Coloring: I don’t list the amount of food coloring needed because different food color has different strengths. If you have liquid food coloring (the kind you get from a grocery store, that come in the tear drop shaped bottles) you’ll have to add more. If you have thicker gel coloring or professional food coloring, it will be more intense, so less food coloring will be needed. It’s always best to start with a few drops of color regardless of the type of food coloring you have, mix it in, and then add more to darken the batter if you need to.
- Soften Cream Cheese and Butter: Be sure to use softened cream cheese and butter, or the frosting will be lumpy. The best way to soften them is to place them on the counter or kitchen table when you cake has baked. By the time it has cooled completely, the cream cheese and butter should have been brought to room temperature. But I have a section above on how to quickly soften cream cheese and butter if you forget to do this, or if you are in a hurry.
- Sift Powdered Sugar: Be sure to sift in the powdered sugar. Because powdered sugar is ground so fine, it is hygroscopic, and will absorb the ambient water in the air, clumping together. Clumpy powdered sugar won’t properly dissolve in the frosting, no matter how much you mix it. So, it’s important you sift the powdered sugar into the frosting, or you’ll end up with lumpy frosting.
Nutrition
Pin it for Later

howe says
This rainbow cake is perfect for a more festive occasion where eating the cake while playing gunspin brings out the art in baking.
ZeeMom says
Can the cake be made the day before a party and then frosted the day of? If so, what would be the best way to store the cake overnight so it doesn’t get stale?
Cat says
Cake overall had good structure and the instructions were straightforward. I felt that the flavor was a little flat- I found it odd that there was no salt in the batter. Unless I missed it? But as a whole the colors were fun and my kids thought it was so cool!