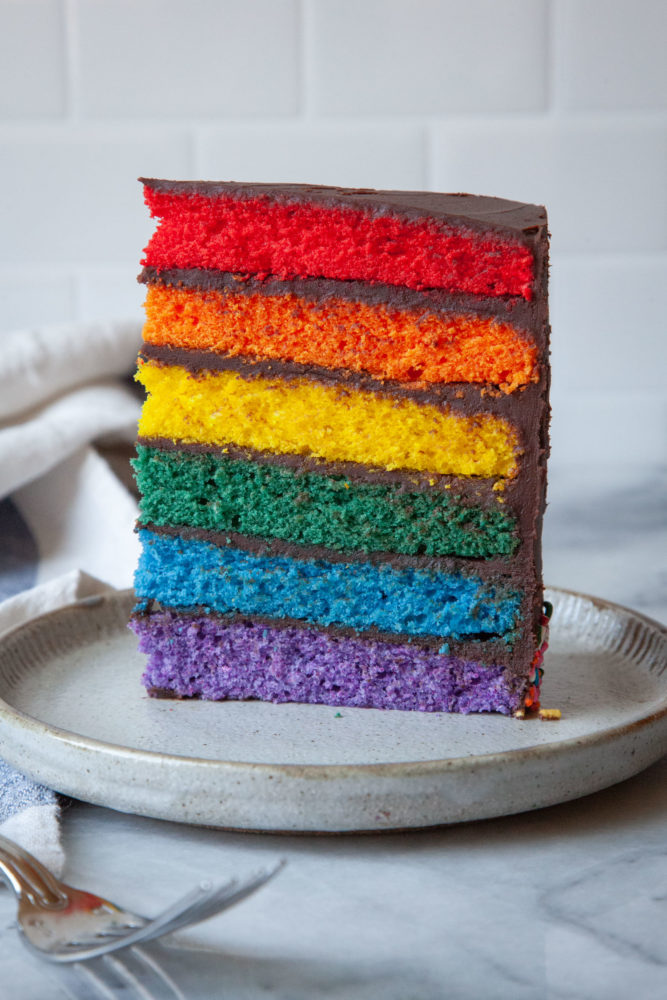
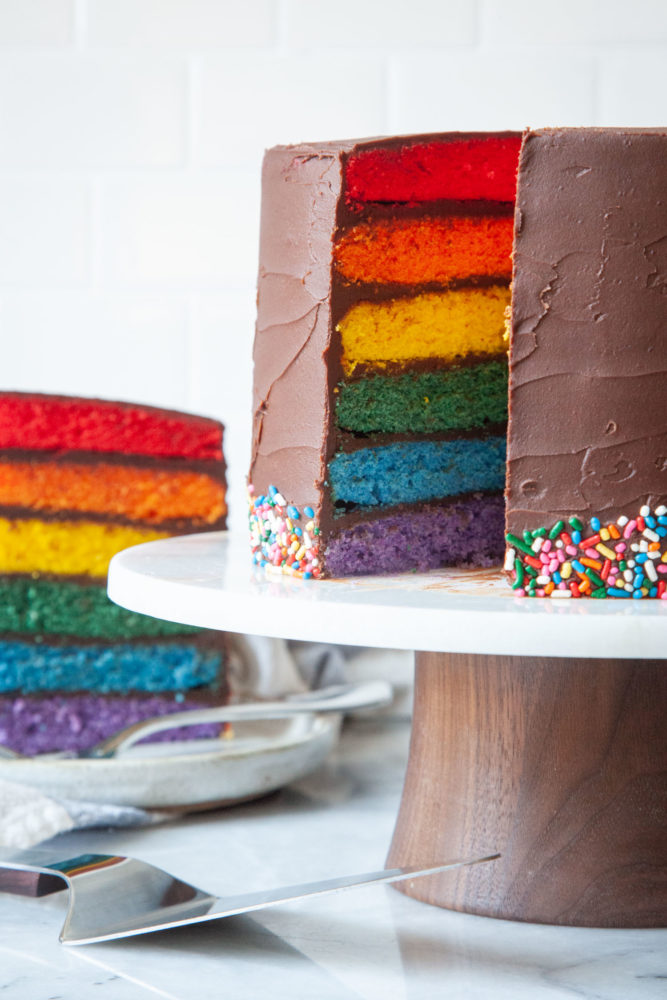
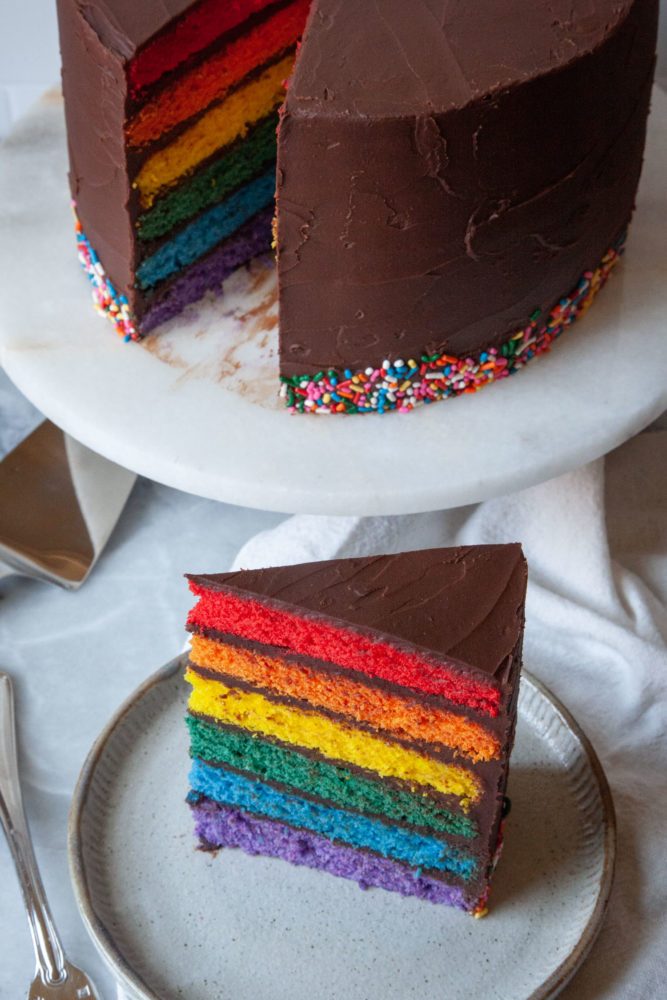
This fabulous rainbow layer cake is frosted with rich dark chocolate frosting, which makes the bright and vivid cake layers pop out even more.
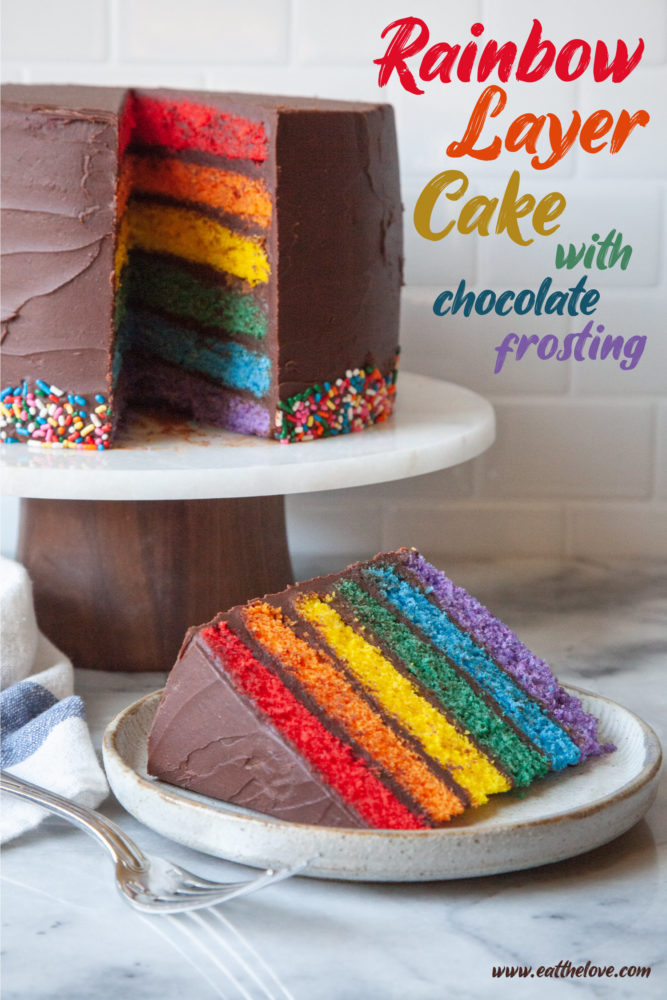
Even though I’m gay, I’m a bit late to the rainbow party when it comes to dessert. Perhaps it’s the over-the-top fabulousness that comes with rainbow treats, a fabulous that doesn’t always fit with my everyday ho-hum life. But once I made my rainbow chocolate chip cookies last year, it kind of broke the seal. I ended up developing a rainbow rice krispie treats for my friends over at Simply Recipes. And this year, I decided it was time for me to make a towering rainbow layer cake, one frosted with rich fudgey chocolate frosting and adorned with rainbow sprinkles. Because if I’m going to make a rainbow layer cake, why not go all out?
What makes this different than other rainbow layer cakes?
Most rainbow layer cakes have white frosting, but I really wanted a deep and rich flavored chocolate frosting that made the colors of the layers pop even more. So I adapted the chocolate frosting from my Smith Island Cake that is in my cookbook Marbled, Swirled and Layered (<- affiliate link).
If you really love white vanilla frosting, you can swap out the chocolate frosting with your favorite vanilla frosting. Just make sure to double a typical recipe you might need for a double or triple layer cake. With six layers, this cake needs extra frosting for coverage.
How do you make this cake?
Though it looks complicated, this cake is only slight more difficult to make than a traditional layer cake. The main difficulty is the dividing the cake batter into 6 batches and add food coloring, as well as frosting a few more layers.
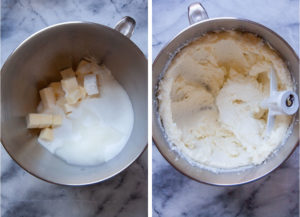
Make the cake batter in the typical way, by first creaming the butter and white sugar together, along with some vanilla, baking powder, baking soda and kosher salt. I use imitation clear vanilla because I want to keep the cake batter as white as possible before adding the food coloring, but you can use real vanilla if you’d like.
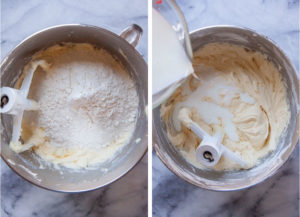
Once the sugar and butter mixture is fluffy and light colored, add the eggs, one at a time, scraping down the sides of the bowl, then add the egg whites, mixing it in. Add half the flour, all the buttermilk and the remaining flour.
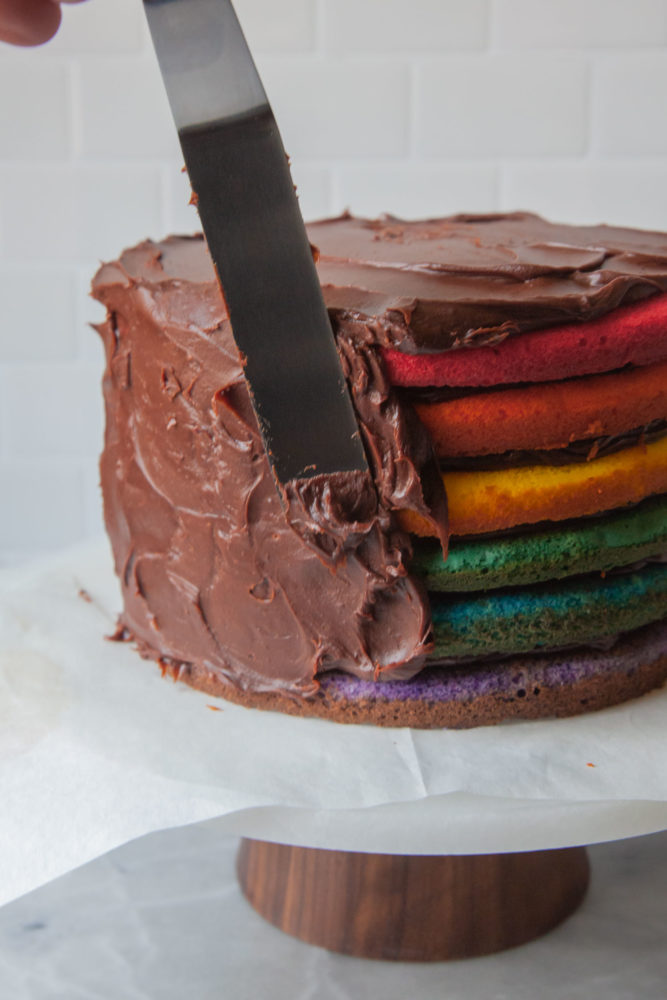
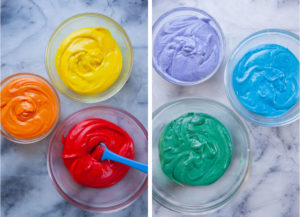
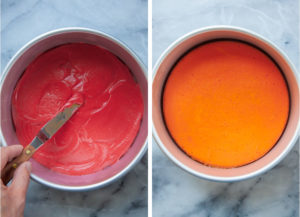
Divide the batter into 6 different bowls and add the food coloring to each. Then pour each into a greased and parchment paper lined 8-inch pan and bake. Once baked, let them cool in the pan for 15 minutes, then release on a cooling rack and let cool completely before frosting.
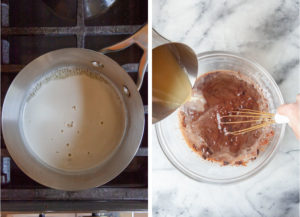
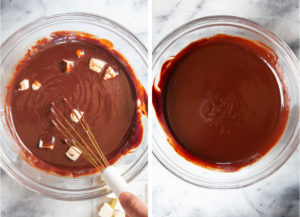
While it’s baking, make the frosting by softening some chocolate in a microwave, then heating up cream, sugar, and vanilla together in a pan until hot (but not boiling). Stir it into the chocolate until it’s smooth, then add butter to form a fudgy smooth icing. Chill in the fridge until spreadable.
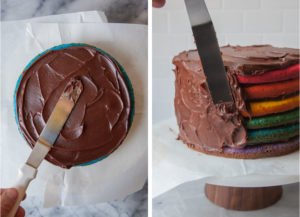
When the frosting is at the right consistency, stack the purple layer on a cake stand or cake plate and frost it. Then add the blue layer on top of it. Continue adding the layers in the order of the rainbow, spreading a thin layer of frosting between each cake layer, and then frost the top and sides. Press some rainbow sprinkles onto the bottom sides and now you have a stunning and gorgeous cake!
What to do if you don’t have six cake pans?
Don’t worry if you don’t have 6 cake pans! Who does? Just bake the cake in batches!
Bake 2 or 3 layers at a time. Then let the cake cool for 15 minutes in the pan. Run a thin knife, spatula or plastic dough scraper around the side of the pan and release the cake layer onto a cooling rack.
Wipe out the cake pan with a paper towel (no need to wash it). Spray the pan with cooking oil and line with a piece of parchment paper on the bottom. Bake the remaining layers.
How do I get the intense colors?
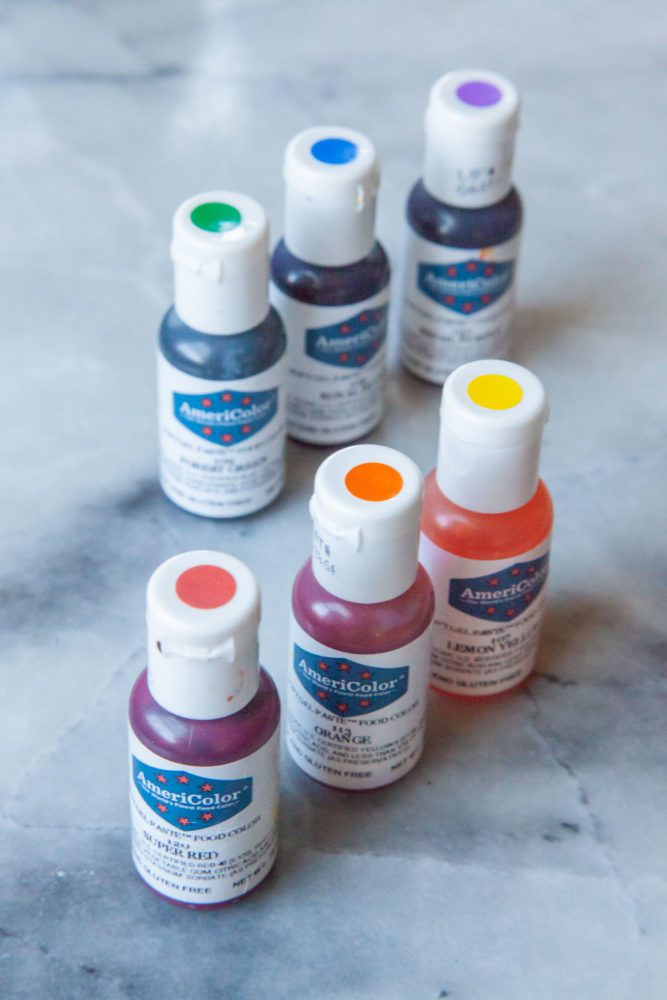
Gel food coloring is key to getting the vivid and striking colors. To get the intense cake layer colors, you need professional gel food coloring. My favorite brand is AmeriColor but any professional gel food coloring will give you better results than the liquid stuff you find at grocery stores. You can find professional grade food coloring at craft stores like Michaels, JoAnn or online (<- affiliate link).
Using liquid food coloring, like the type you can get at a grocery store that comes in the teardrop shape bottles, just won’t get you the same intense color. You need to add a lot more, and that messes with the liquid ratio of the cake. I don’t recommend using that type of food coloring.
The Americolor gel paste food coloring I use includes Regal Purple, Royal Blue, Forest Green, Lemon Yellow, Orange, and Super Red. I also noticed that I wasn’t super happy with the orange colored layer, so I ended up adding just a drop or two of the super red to nudge the cake layer to a more suitable orange. Use your own judgement about that layer. Each layer really only requires about 1/4 teaspoon of the gel food coloring, with the exception of the red, which I used a scant 1/2 teaspoon, because I really wanted it vivid in color.
More Tips and Tricks
- 8-inch pans: This cake uses 8-inch pans, which are slightly less common than 9-inch pans. I like using the 8-inch pans because the cake has more height, and I can fit three 8-inch pans on a rack in my oven. But if you only have 9-inch pans, you can bake the layers in those. Just check the pan around 12 or 13 minutes to see how it’s baking. The thinner layer of cake batter means it might bake up faster.
- Use tall pans: I recommend using 3-inch tall cake pans if you have them. Tall cake pans means the cake layers will bake up more evenly and flat, without the typical center dome. However, the cake will be fine if you use 2-inch tall cake pans. Just expect the cake to dome a little more in the center.
- Use cake flour: I use cake flour to create a more tender crumb in the cake. You can use all-purpose flour if that is all you have but keep in mind that the cake will be a little more tough and crumbly. If you find that the cake texture is too much like cornbread, consider buying a box of cake flour and trying that out.
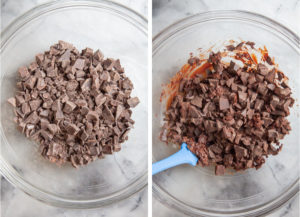
- Pick a chocolate you like to eat: This frosting is fairly intensely chocolate, almost a ganache with heavy cream and sugar added in. Pick a chocolate you like to eat out of hand, as that’s what you’ll mostly be tasting when you eat this cake.
- Frost thinly: Because there are so many layers, use a thin coating of frosting between layers and the sides and top. Don’t worry though, you will still have a lot of chocolate frosting in an individual slice. The thinner frosting layers just means a better balance of cake and frosting ratio.
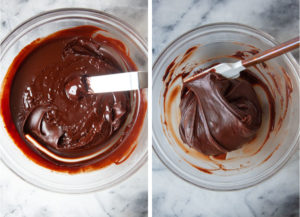
- The frosting needs the right temperature: Because this frosting is like a ganache, you need to have it the right temperature to use. Too cool and it’s stiff and hard to work with. Too warm and it’s runny. I make the frosting, then cool it in the fridge anywhere from 1 hour to 2 1/2 hours, depending on how cold your fridge is. Stir the frosting halfway through the chill time to get the entire frosting the same temperature. If it gets too cold, just let it sit at room temperature to warm up a bit, or microwave it in 10 second burst, stirring between cook times. It doesn’t take long to warm up again!
- Place the cake on a baking sheet before adding sprinkles: I like to press sprinkles onto the bottom edge of the cake for fun but sprinkles bounce everywhere. I place the cake on a rimmed baking sheet, so the sprinkles don’t go all over the table. Once I’m done decorating the cake, I can pour the sprinkles back into the canister to use again.
Make Ahead
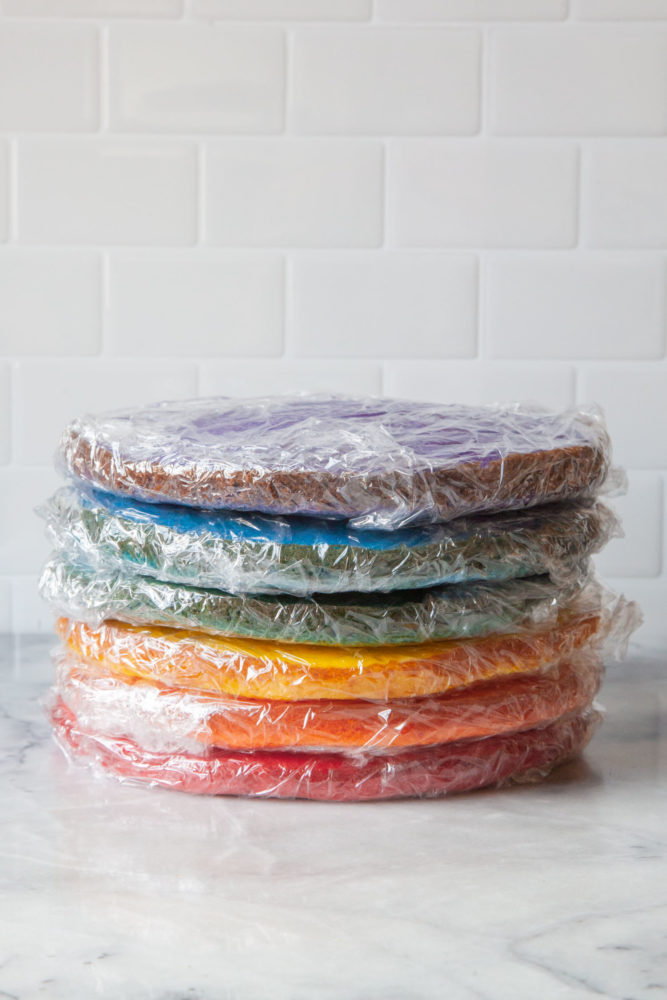
You can make the cake layers one day and then assemble and frost the cake the next day if you wish. Wrap the cake layers in a plastic wrap tightly after they have cooled and come to room temperature. Make the frosting the day before, and microwave in 10 second bursts, stirring between cook times, to warm it up to spreadable consistency. Then assemble and frost.
The cake keeps for about 3 days already assembled under a cake dome at room temperature. Keep in mind the longer it sits out, the less fresh it will be.
Storage
Store this cake at room temperature for up to 3 days under a cake dome. You can also freeze this cake if you want. I like to slice the cake into individual pieces, place the slices on a small pieces of parchment paper, and then freeze on a baking sheet. Once solid, I’ll place them all in an air-tight container, layered with the parchment paper, for longer storage. Then I can thaw out a piece individually to eat. The frozen cake will keep in the freezer for up to 2 months.
If you like this Rainbow Layer Cake, check out these other cake recipes
- Chocolate Rolled Cake
- Chocolate Cupcake Cones
- Swedish Blueberry Cake
- Marble Rum Cake
- Chocolate Marshmallow Cake
- Manhattan Cocktail Cake
- Strawberry Rhubarb Buckle Coffee Cake

Rainbow Layer Cake
Ingredients
Cake batter
- 1 1/4 cup unsalted butter at room temperature 285 g or 2 1/2 sticks
- 2 1/2 cups white sugar 500 g
- 1 tablespoon clear imitation vanilla or real vanilla
- 1 1/2 tablespoon baking powder
- 1 teaspoon kosher salt
- 1/4 teaspoon baking soda
- 4 large eggs
- 2 large egg whites
- 3 1/2 cups cake flour 455 g
- 1 1/2 cups buttermilk well shaken
Coloring
- 1/4 teaspoon AmeriColor Gel Regal Purple
- 1/4 teaspoon AmeriColor Gel Royal Blue
- 1/4 teaspoon AmeriColor Forest Green
- 1/4 teaspoon AmeriColor Gel Lemon Yellow
- 1/4 teaspoon AmeriColor Gel Orange plus 1 to 2 drops of Super Red (optional)
- 1/2 teaspoon AmeriColor Gel Super Red
Frosting
- 12 ounces chopped dark bittersweet chocolate 340 g
- 1 1/4 cups heavy cream 290 g
- 1 1/4 cups white sugar 250 g
- 1 1/2 teaspoon vanilla extract real or clear
- 10 tablespoons salted butter if unsalted add 1/2 teaspoon kosher salt, 140 g or 1 1/4 sticks
To finish
- Rainbow sprinkles optional
Instructions
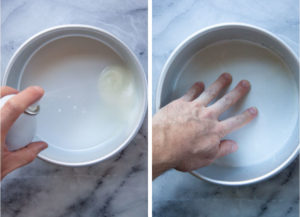
- Preheat the oven to 350°F.Spray six 8-inch cake pans with cooking oil, then line the bottom of the pans with parchment paper. If you don’t have six cake pans, see the section above about baking in batches.

- Place the butter, sugar, vanilla, baking powder, salt, and baking soda in the bowl of a stand mixer fitted with a paddle attachment. Start the mixer on low, slowly bringing the mixer up to medium speed as the butter becomes more pliable and the sugar is incorporated. Mix for 5 or 6 minutes, or until the butter and sugar are fluffy and light in color. Scrape down the sides of the bowl once or twice while you cream the ingredients.
- Scrape down the sides of the bowl then add the eggs, one at a time, scraping down the sides between additions. Add the egg whites beating to incorporate. Don’t worry if the batter looks broken as you add eggs. That’s normal.
- Add half the flour and slowly stir it in with the mixer. Scrape down the sides, add the buttermilk, scrape down again, and then add the remaining flour.
- Divide the batter into 6 different bowls. This will be about scant 1 1/2 cups of batter, or about 300 grams each if you have a scale. Mix in the food coloring to each bowl with a spoon or spatula. Note that to achieve the right shade orange, I added a drop of red food coloring gel to the orange layer, but you might want to skip that if you like the way the orange gel comes out.
- Scrape and pour the batter into the pans, spreading the cake batter evenly into the pan. It will be a thin layer. Bake for 15 to 17 minutes, or until a toothpick inserted comes out clean, the top of the cake springs back when you gently press it with your fingers, and the cake starts to pull away from the sides of the pan.If you don't have 6 pans or you can't fit them all in the oven, see my section above for baking the cake layers in batches.Let the cakes cool in the pan for 15 minutes, then run a thin knife, spatula or plastic dough scraper around the side of the pan, then carefully release the cake layer onto a cooling rack. Peel away the parchment paper. Let cool completely before frosting.
- While the cake layers are baking, make the frosting by placing the chocolate in a large microwave safe bowl. Microwave for 30 seconds, stir, and microwave for an additional 30 seconds. The chocolate will not be melted but the bowl will be warm, and the chocolate touching the bowl will be melty.
- Place the cream, sugar and vanilla in a medium pot and heat on the stove on medium heat stirring frequently, until the sugar has dissolved, and the cream is heated. Bubbles should start to form on the side of the pot. Do not let it boil.Pour into the bowl of chocolate and stir until the chocolate is melted.
- Add the butter to the melted chocolate, 1 or 2 tablespoons at a time, stirring until the butter is melted and incorporated.
- Cover with plastic wrap and place in the refrigerator for 1 to 2 1/2 hours. Stir halfway through chilling the frosting. You want the frosting to be cool enough to be spreadable like peanut butter or Nutella, but not too thick or stiff. If it’s too stiff, stir it and let it sit on the counter at room temperature for 5 to 10 minutes to warm up a bit.
- Once the cake layers are cooled, and the frosting is the right thickness, place a small dab of frosting on a cake plate or pedestal and place the purple layer on it. Frost a thin layer of chocolate frosting all over the top of it, then add the blue layer. Repeat this process, frosting the cake layers, adding the green, yellow, orange and then red on top. Frost the sides and top with the remaining frosting.Press a small amount of rainbow sprinkles around the bottom edge of the cake before serving.

Parul Gupta says
Very Yummy Cake Water Comming From My Mouth To See It
Mav says
Hi, I’m going to try this over the weekend.. hoping mine turns out as fabulous as yours! Two questions:
Can I reduce the amount of sugar in the frosting as I don’t want it to be too sweet. And secondly, is the amount of baking powder correct? 1.5 tablespoons seem like a lot. Thanks!
Anuki Dissanayake says
Can you also make 7 seven layers instead of six?
Irvin says
Yes! Just divide the dough into 7 bowls. If you have a scale, it will be closer to 255 grams instead of 300 grams or about 1 1/4 cups of batter. I’d also reduce the bake time slightly, maybe start testing the pans at 12 minutes? It will vary depending on your oven. But a 7 layer rainbow cake would be super fun!
Linda Blackwood says
Can I use substitute semi sweet chocolate for the bittersweet?
Irvin says
Yes! You can use semi-sweet chocolate. Just keep in mind the icing will be slightly sweeter as semi-sweet has more sugar in it than bittersweet.
Marcy Bryan says
Hi, can’t wait to try this recipe. My grandson wants a rainbow cake for his birthday. One question though, is 1.5 tablespoons the correct measurement for the baking powder. Thank you , M Bring
Con says
I would also like to know if Tablespoons or Teaspoons.
Thanks
youtube ad blocker says
This letter serves as a reminder that influencers have a responsibility to their audience. It’s not just about likes and followers; it’s about the impact they have on people’s lives. youtube ad blocker
diummew3 says
This is so pretty and cheerful! The purple layer even turned out pretty. Sometimes purple foood colouring bakes up to look a bit grey. I’m going to make this and have a rainbow party!
harry styles7117 says
I love colorful crafts papa’s games
Kavyamehra says
Kavyamehra.com Click on the post and enjoy your day..
Kiara Dutta says
Thanx for sharing this amazing recipe.. Thanx Again
wakad city says
Simply give us a call to reserve our services whenever you have time in Pune. https://www.puneangel.com ! We provide services around-the-clock. Our primary goal is to make sure that our clients are satisfied enough to return time and time again to our respected business!
Simone says
I made this cake, exactly like the recipe instructed, for my daughter’s 10th birthday and we all loved it!! My daughter said that the ganache filling made the whole cake taste like chocolate and she was happy about that because she was able to get both: her favorite colors and flavor! It would be great to have this adapted to make a rectangular cake for a bigger party. Thank you!
Redesaf says
This Rainbow Layer Cake is a true showstopper! The rich dark chocolate frosting perfectly contrasts the vibrant, colorful layers, making each slice as stunning as it is cupcake 2048 delicious. A feast for the eyes and the taste buds! 🌈🍫✨
Carmel Bogle says
I loved the bright colors, I made it for my son’s birthday when he specifically requested rainbow cake with chocolate and sprinkles! The kids told me it tasted good which is a big two thumbs up! :). I uses straws to help the integrity say in place and refrigerated after iced to help cover the sides properly and added some sparkling water to try and give it a bounce since I couldn’t find cake flour
yasmeen says
Tasty Recipe thanks for share
songless says
Thanks for this post, my friends and I have been playing songless and it’s incredibly fun and addictive.
valorant crosshair says
Appreciate the info! I’ve spent hours customizing my scope with valorant crosshair and it’s been incredibly useful.
whatsmyname says
Thank you for sharing! whatsmyname made searching for usernames much easier and more efficient than other tools.
sans fight says
I keep coming back to sans fight because it’s so fast-paced and fun.
what county am i in says
Thanks to the creator of this article! what county am i in is the fastest way I’ve found to get local info.
am i ugly test says
Cheers to the creator — am i ugly test gave me an objective analysis of my selfie.
shadow-milk says
This is such a fun and heartfelt piece—you balance the personal story with practical baking details beautifull. take-care-of-shadow-milk
Xiomara Walls says
this rainbow cake with dark chocolate frosting sounds absolutely stunning! I love how you describe the colors popping. It’s awesome you’re embracing the fabulousness! This looks like a project as intricate as trying to master a level in DDgames.
angelica says
Love this! Our [love name calculator](https://lovecalculator.blog/) is guiding you through the complexities of the heart to find your true direction in love.
moca test says
I really appreciate the effort put into this post, thanks to the author! The specialized help from mocatest has been invaluable in overcoming specific challenges I faced in my coursework.
Basant Club login says
The <a href="https://basantclub2.com/"Basant Club Login process is extremely smooth and fast. I appreciate how quickly the page loads and how easily it verifies my details. Even with slow internet, the login system works without errors. I’ve never experienced unnecessary delays or glitches. It’s simple, secure, and very user-friendly, making it one of the most convenient login experiences I’ve had on gaming apps.
Anne Franklin says
Wow this cake came out great. Followed the instructions as written- put both wrapped cakes and frosting overnigtht in the fridge. I left the frosting out for just over an hour to help it soften to spreadable. The cake looked like his when sliced into. The only part that didn’t look like the picture was the sprinkles. Tough to get on and didn’t look so perfect.
Agra Call Girls says
Agra escort services focus on keeping everything fully confidential and safe.