• Skip to primary navigation
  • Skip to main content
  • Skip to primary sidebar
  • My Cookbook: Marbled, Swirled, and Layered
  • Recipes
  • Travel & Events
  • About this Blog
  • Bio
  • FAQ
  • Work with Me

Eat The Love

Recipes, Photographs and Stories about Desserts, Baked Goods and Food in general, with a healthy dose of humor and happiness for the food obsessed

You are here: Home / cake / Cream Cheese Pound Cake

September 10, 2024

Cream Cheese Pound Cake

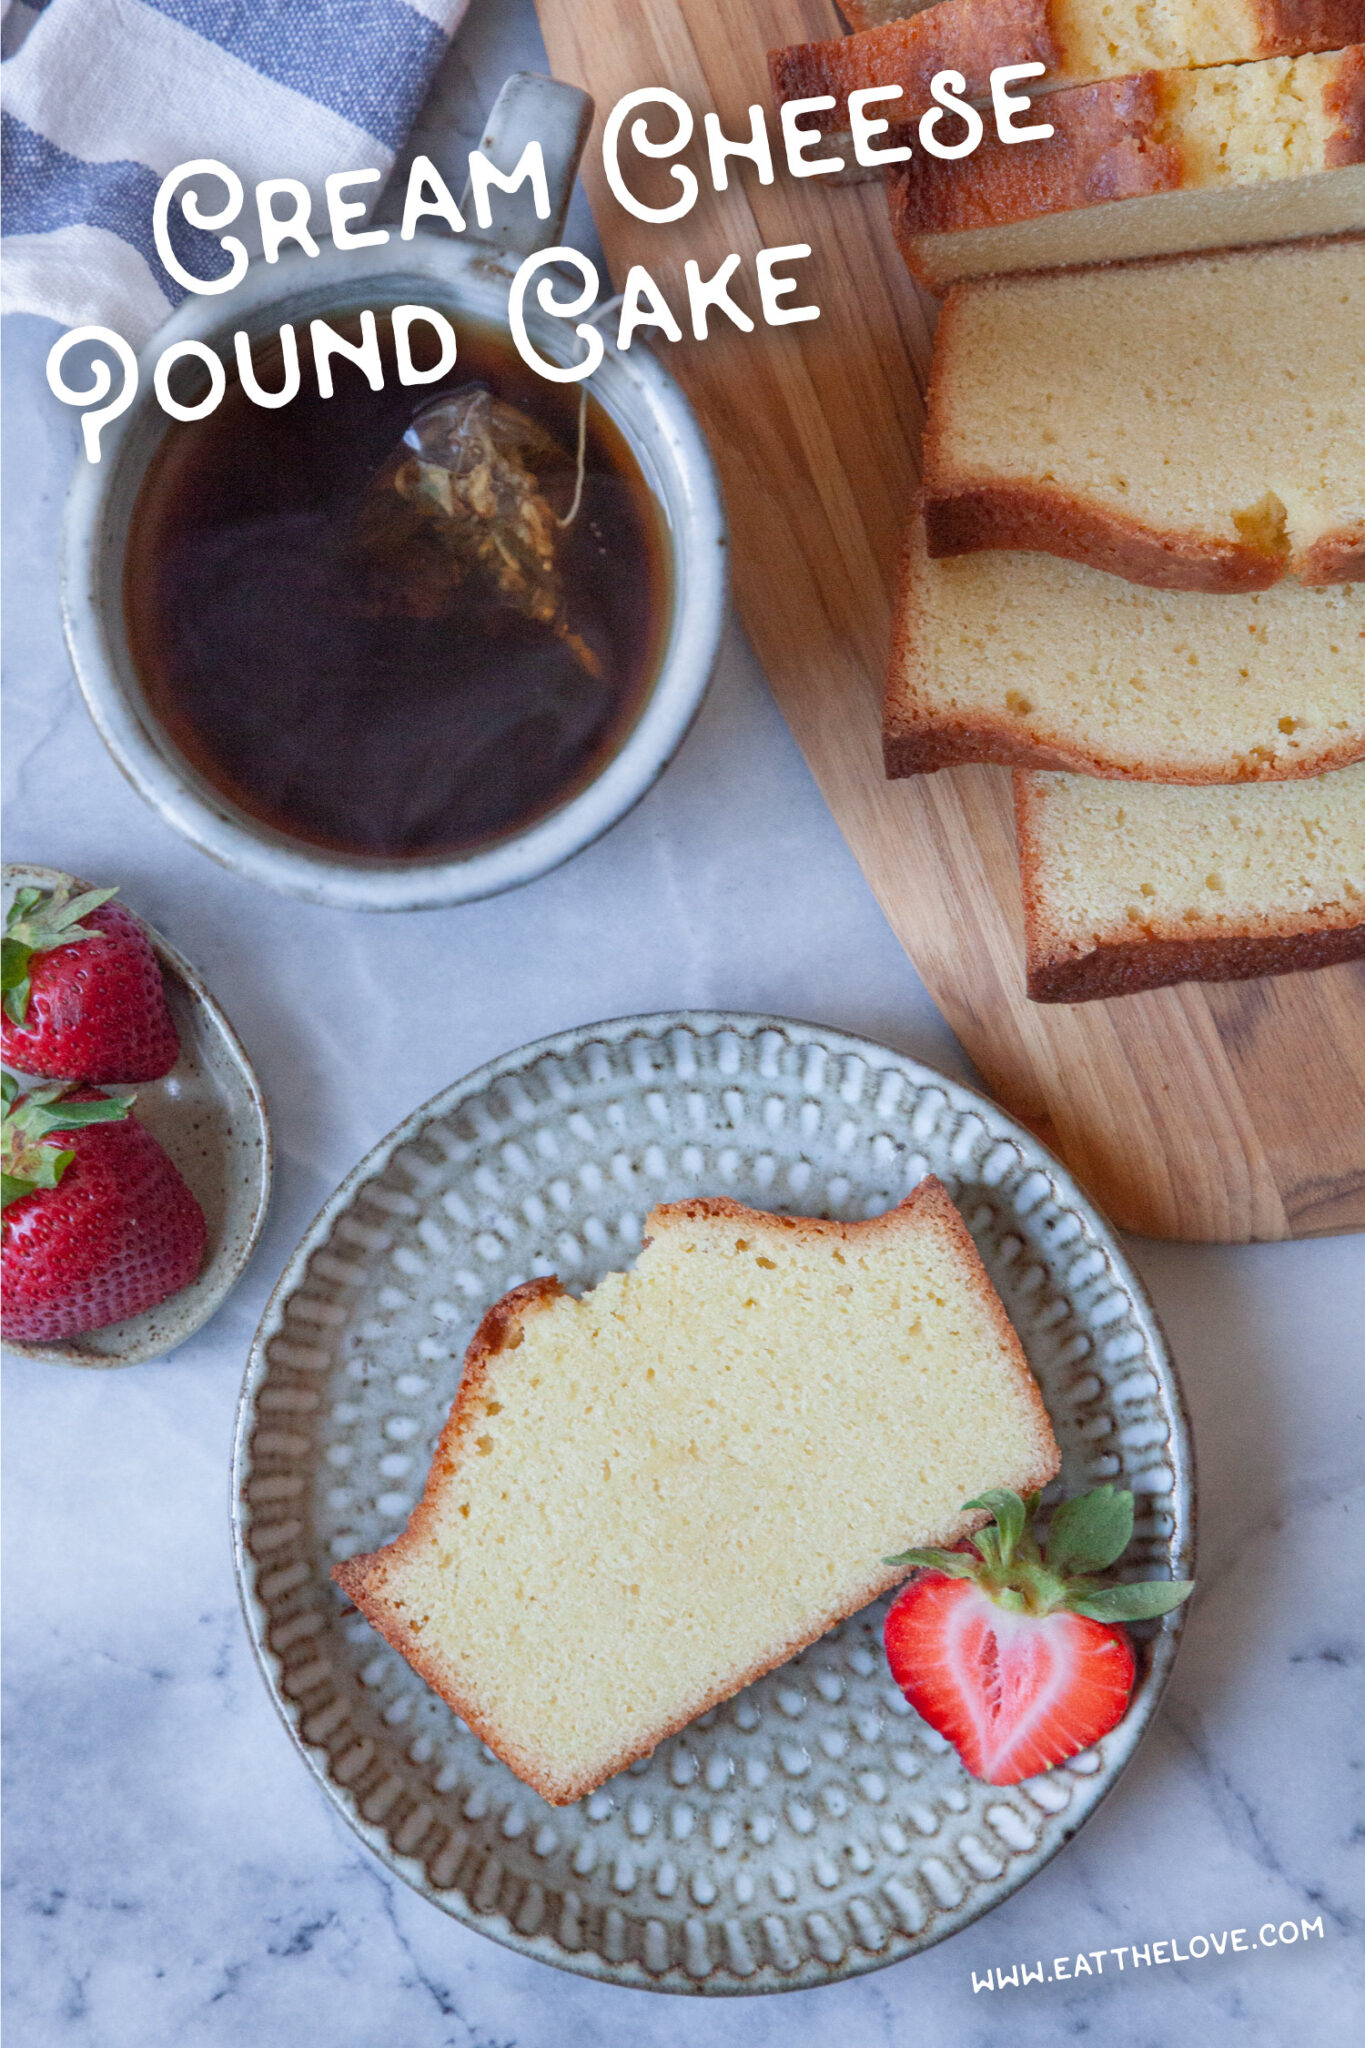
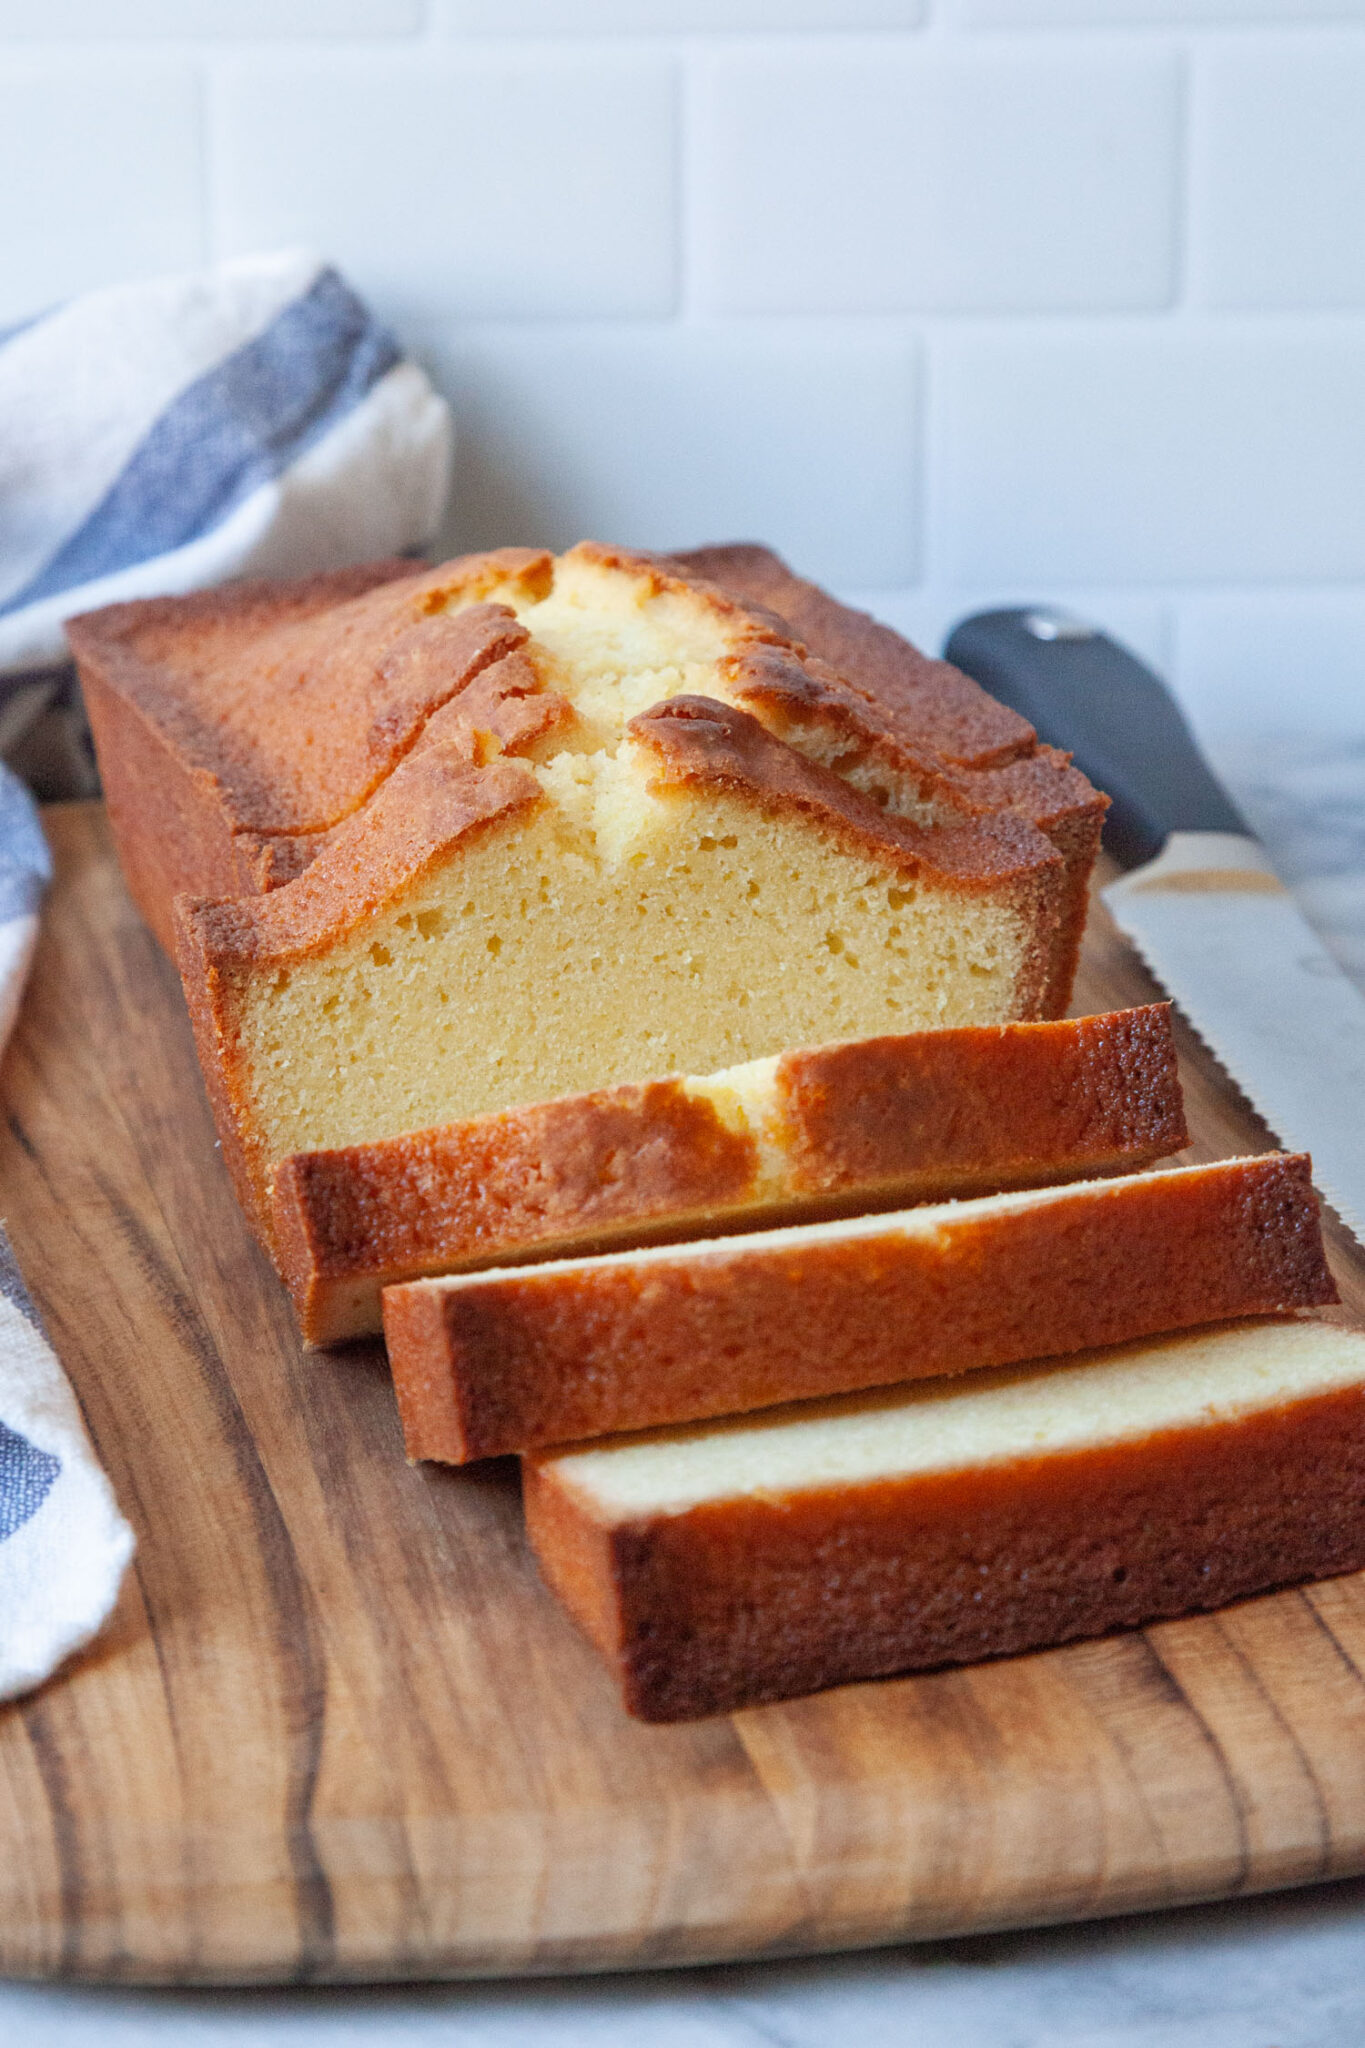
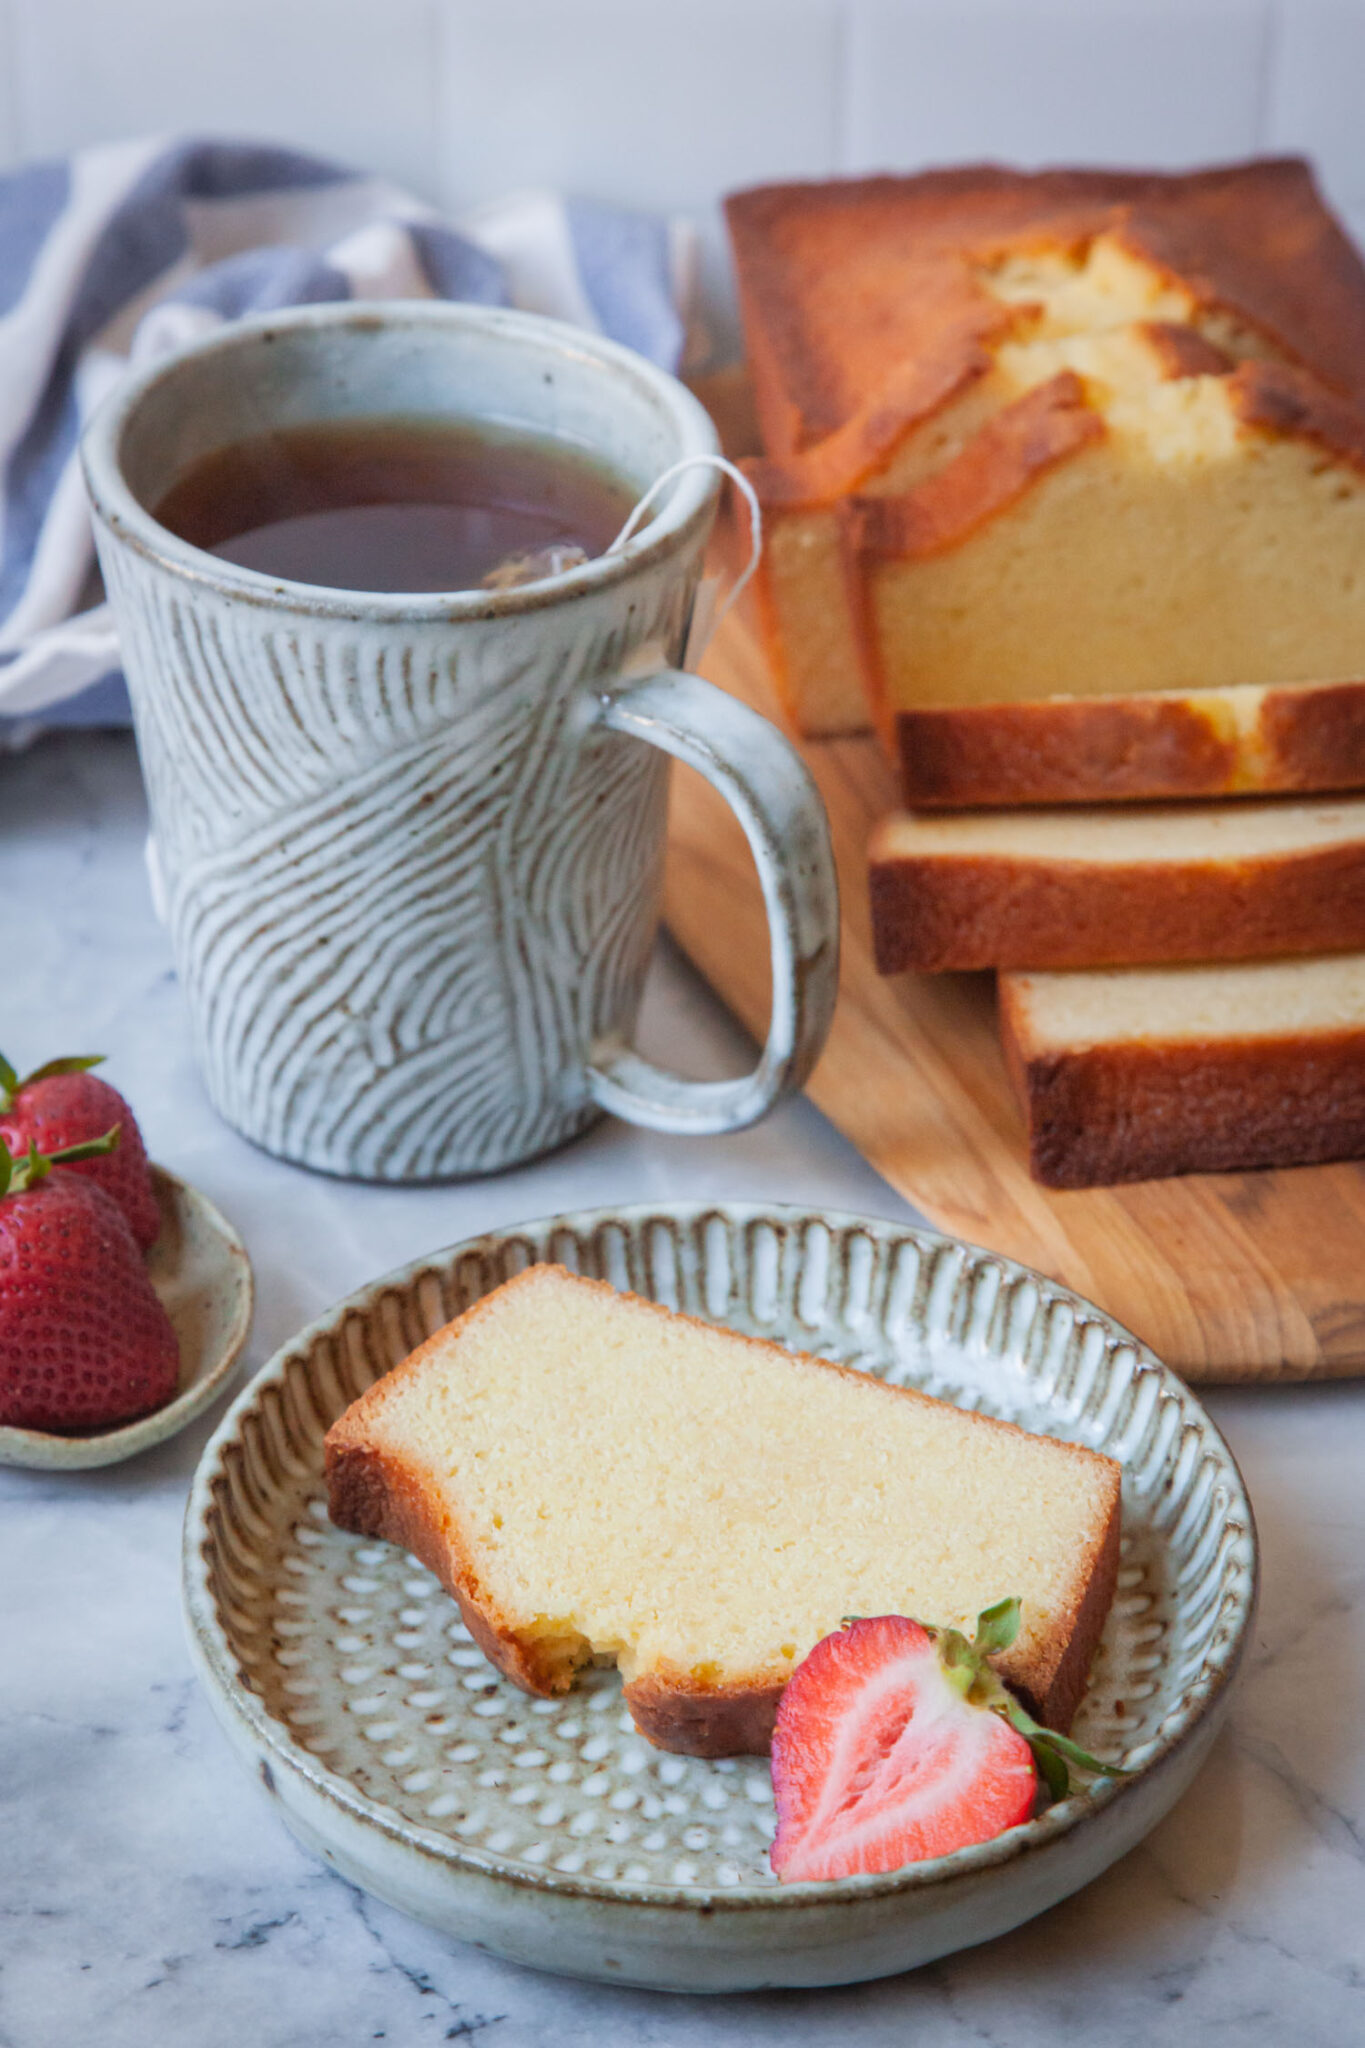
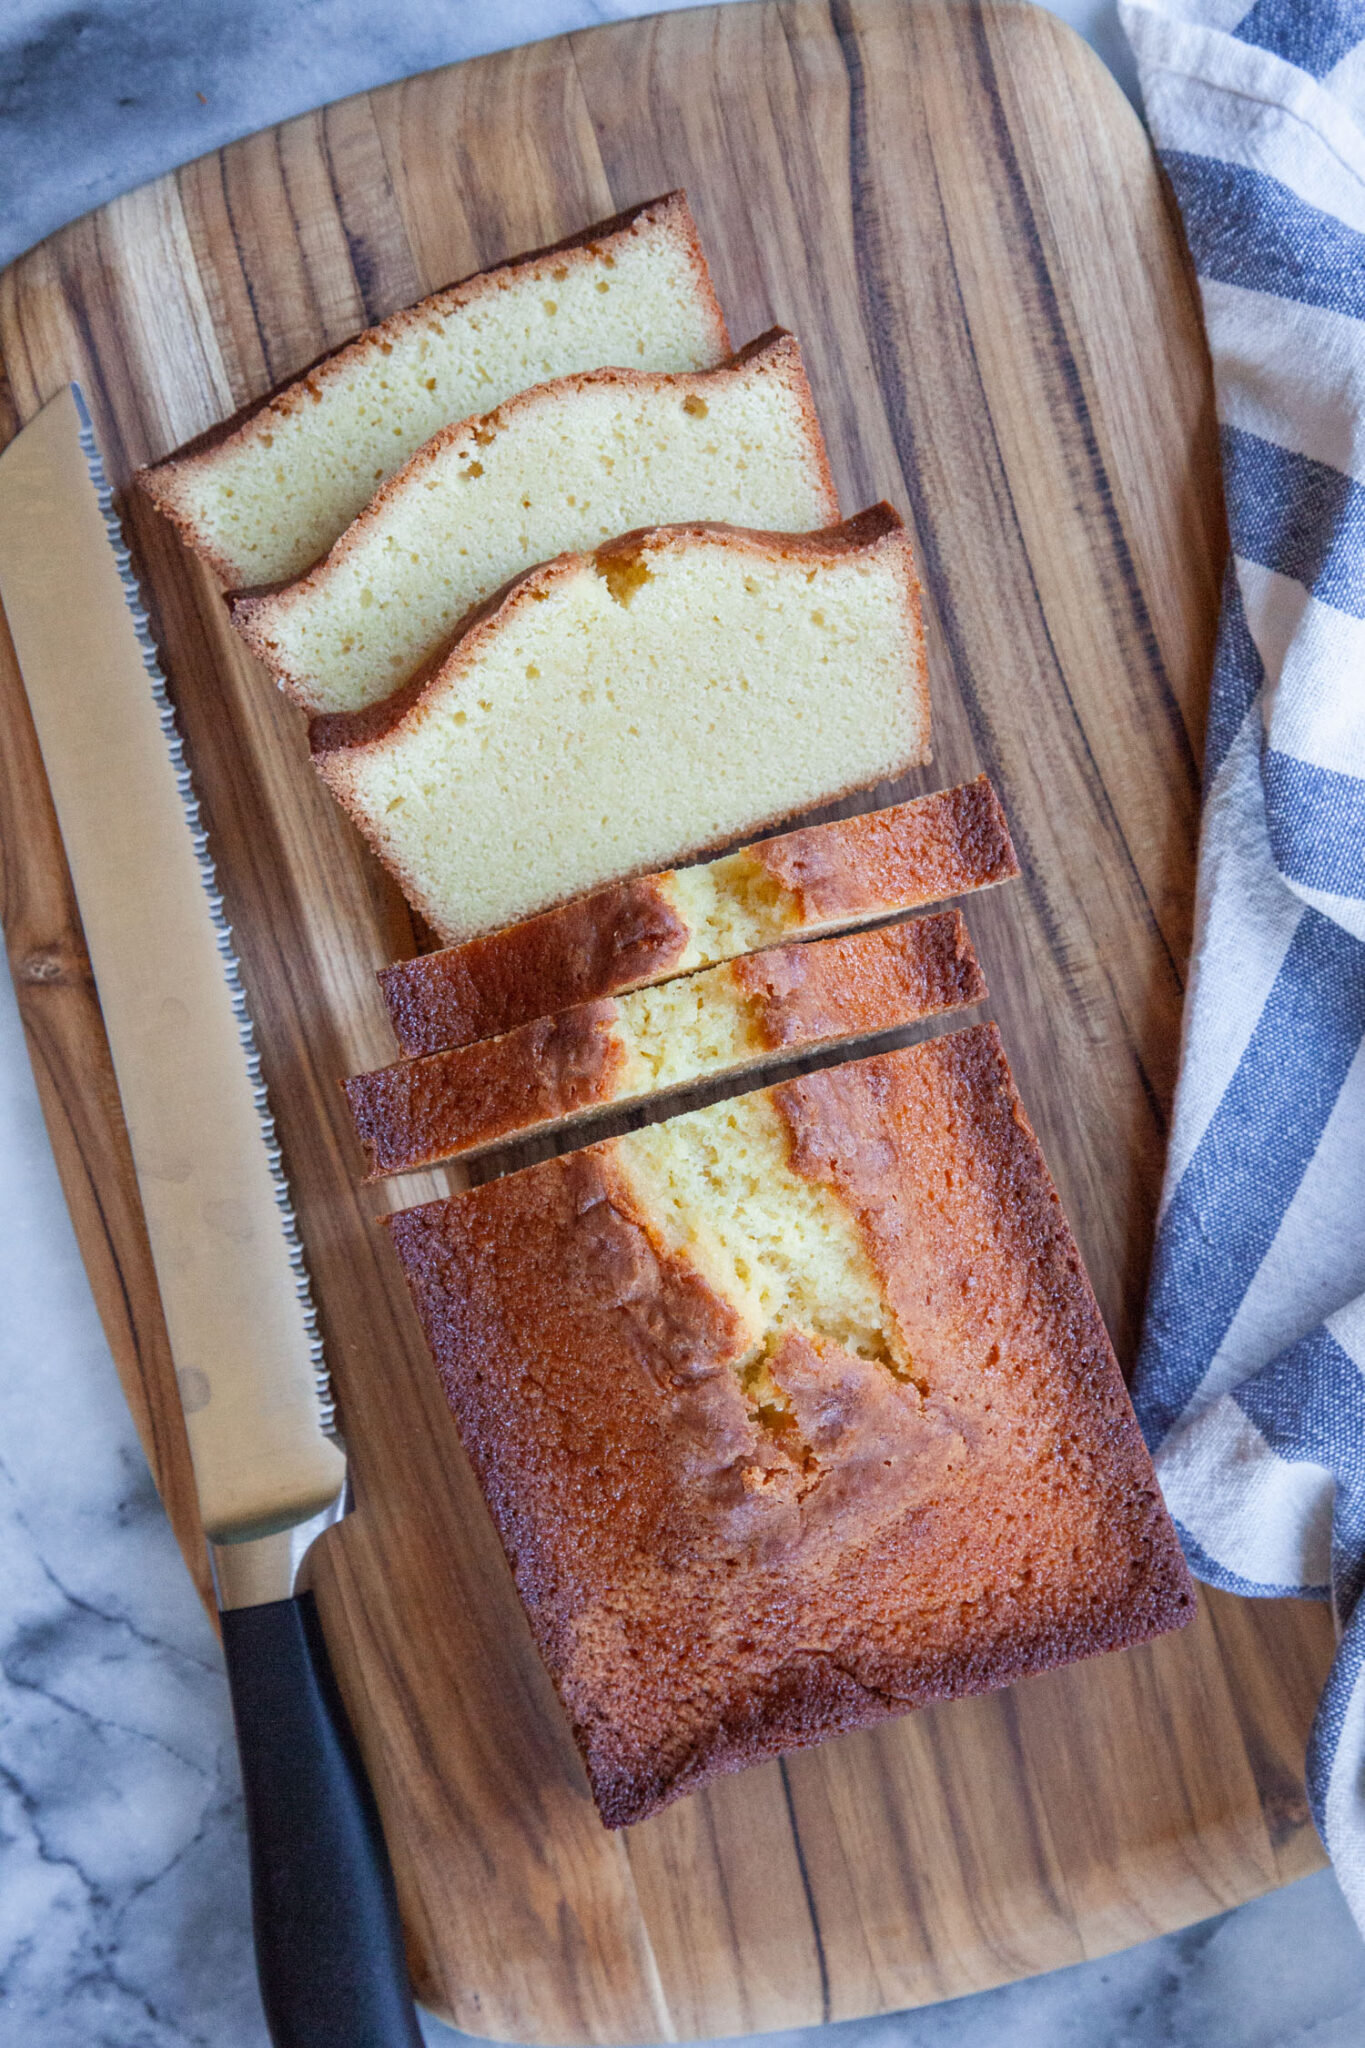
This cream cheese pound cake has just the right rich butter flavor and the ideal velvety tight crumb for a poundcake.

Jump to Recipe

A slice of cream cheese pound cake on a plate with a strawberry garnish. There is a mug of tea next to the plate, along with a wooden serving board with the rest of the cream cheese pound cake loaf with some of it sliced up.

I’m constantly tinkering with “classic” recipes, trying to improve them by making the texture or flavor more robust. This is evident in my secret ingredient peanut butter blossom cookies where I add a touch of miso paste to boost the peanut butter flavor, my bakery-style chocolate chip cookies where I give tips and tricks on making the best looking (and tasting) cookies, my tarte tatin apple upside down tart where I give instructions on how to make it with two different pans because it will look better, my oatmeal raisin cookies that use brown butter for extra flavor, and my dark chocolate Texas sheet cake which has espresso powder in it to boost the dark chocolate.

A while ago I had to test stand mixers for Serious Eats and that had me baking up pound cake! After baking over a dozen pound cakes, this cream cheese pound cake became my go-to recipe. Everyone who I gave a loaf to (I had a lot of loaves) agreed that it was the absolutely best texture and flavor for a poundcake.

A loaf of cream cheese pound cake, with slices cut off sitting on a wooden serving board.

What is a pound cake?

The classic pound cake gets its name from the ratio of 1 pound of butter, 1 pound of sugar, 1 pound of flour, and 1 pound of eggs. In the classic version, there’s also rarely any leavener (baking powder or baking soda) included. Instead, the butter and sugar are creamed together until they are fluffy and light, mechanically creating pockets of air in the butter and the subsequent cake. Nowadays a lot of recipes add in a little baking powder to help ensure that the cake isn’t a dense brick of a baked good.

My particular variant that I’m sharing is just barely adapted and simplified from the Velvet Pound cake over at King Arthur’s website. It’s my go-to pound cake recipe and uses cream cheese to create a gorgeous texture and tight crumb that feels ideal for a pound cake. I’ve added a touch of baking powder to prevent it from becoming a dense brick of a cake and make the recipe truly bulletproof. Make sure to bring your eggs to room temperature, as cold eggs don’t incorporate as well into the batter (I have a section below on how to do this quickly). 

A slice of cream cheese pound cake on a plate with a strawberry garnish. There is a mug of tea behind to the plate, along with a wooden serving board with the rest of the cream cheese pound cake loaf with some of it sliced up.

How do you make this pound cake?

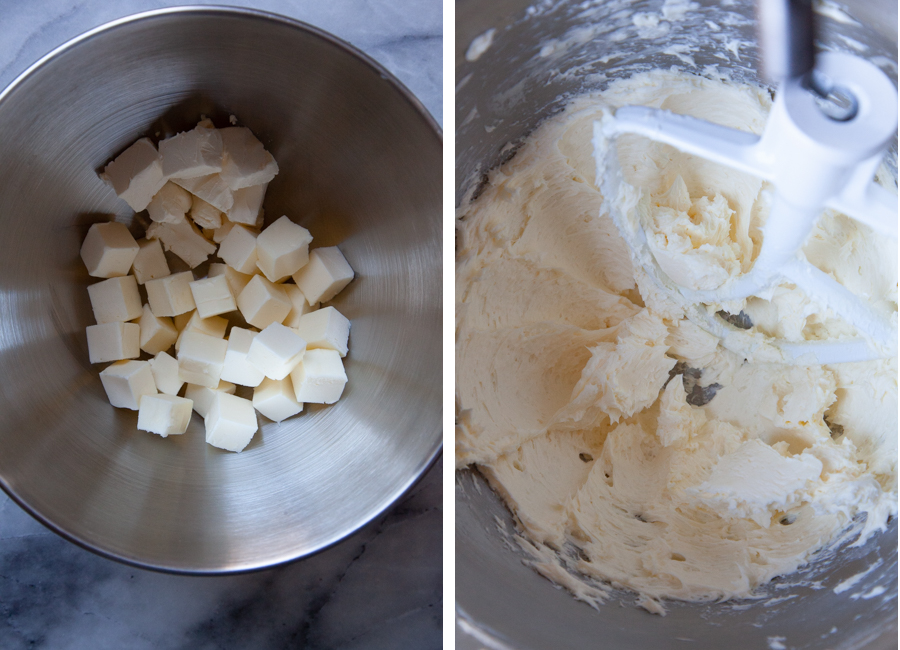
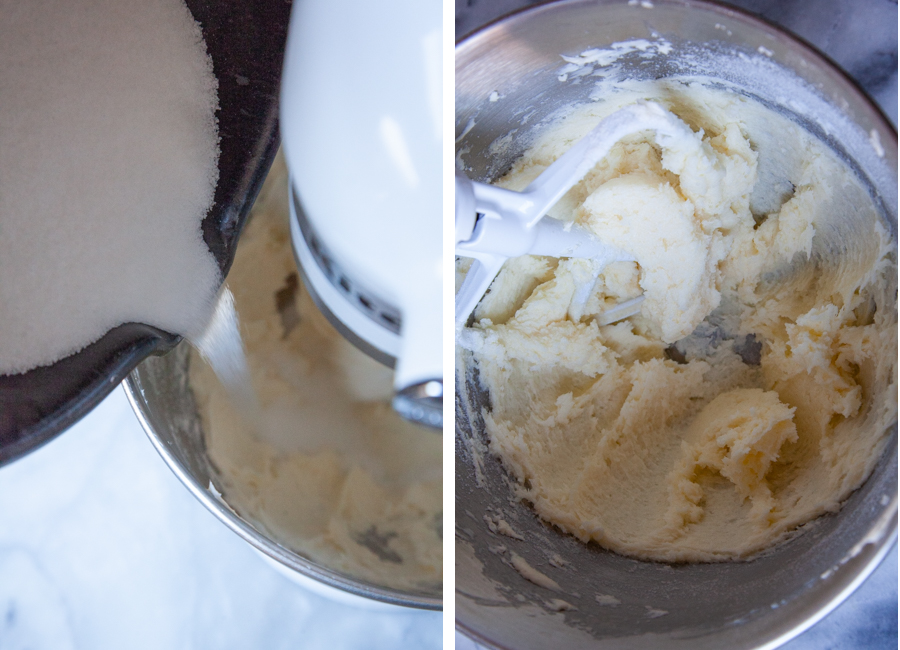
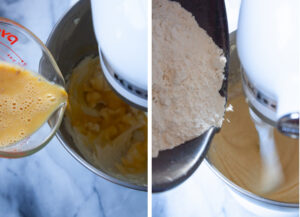
This poundcake is fairly easy to make but ideally requires a stand mixer, though a hand mixer will do. First cube and mix butter and cream cheese with a stand mixer or hand mixer until they are creamy and cling to the side of the bowl. Add in salt and baking powder and mix to incorporate. 

Left image is cubbed butter and cream cheese in mixing bowl. Right image is butter creamed and clinging to the side of the bowl.

Then add in sugar, in a slow stream, trying to cream it to incorporate it into the butter and cream cheese mixture. You want the mixture to become fluffy and light in color.

Left image is sugar being slowly poured into the mixing bowl of a stand mixer with butter and cream cheese well blended. Right image is the sugar mixed into the butter and cream cheese to the point where it is clinging to the side of the bowl and is fluffy and light colored.

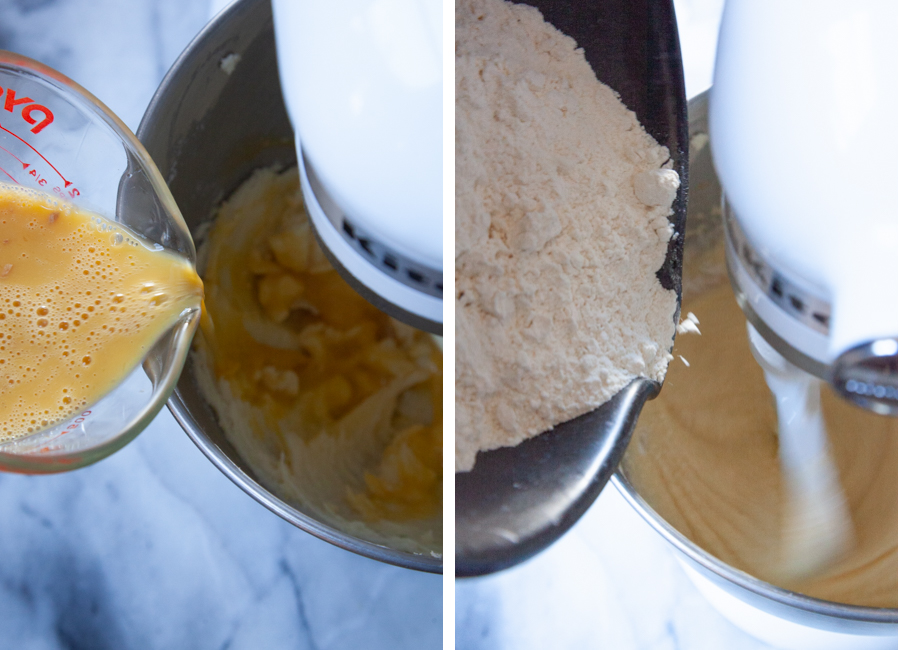
Beat together the eggs, vanilla, and almond extract then drizzle the liquid into the bowl with the mixer on. If you’re using a hand mixer, drizzle a bit in, mix with the hand mixer and repeat. Try to keep the mixture as smooth as possible but if it looks slightly grainy or broken in the end, don’t stress. It’ll be fine. Once the eggs are all incorporated, add the flour and mix until the batter is smooth.

Left image is egg drizzled into the bowl of creamed sugar, butter and cream cheese. Right image is flour being added to the cake batter.

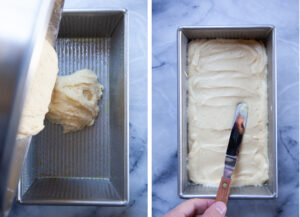
Bake in a greased pan, then let cool for about 5 to 10 minutes and invert and release onto a wire rack to cool completely.

How do you bring eggs to room temperature quickly?

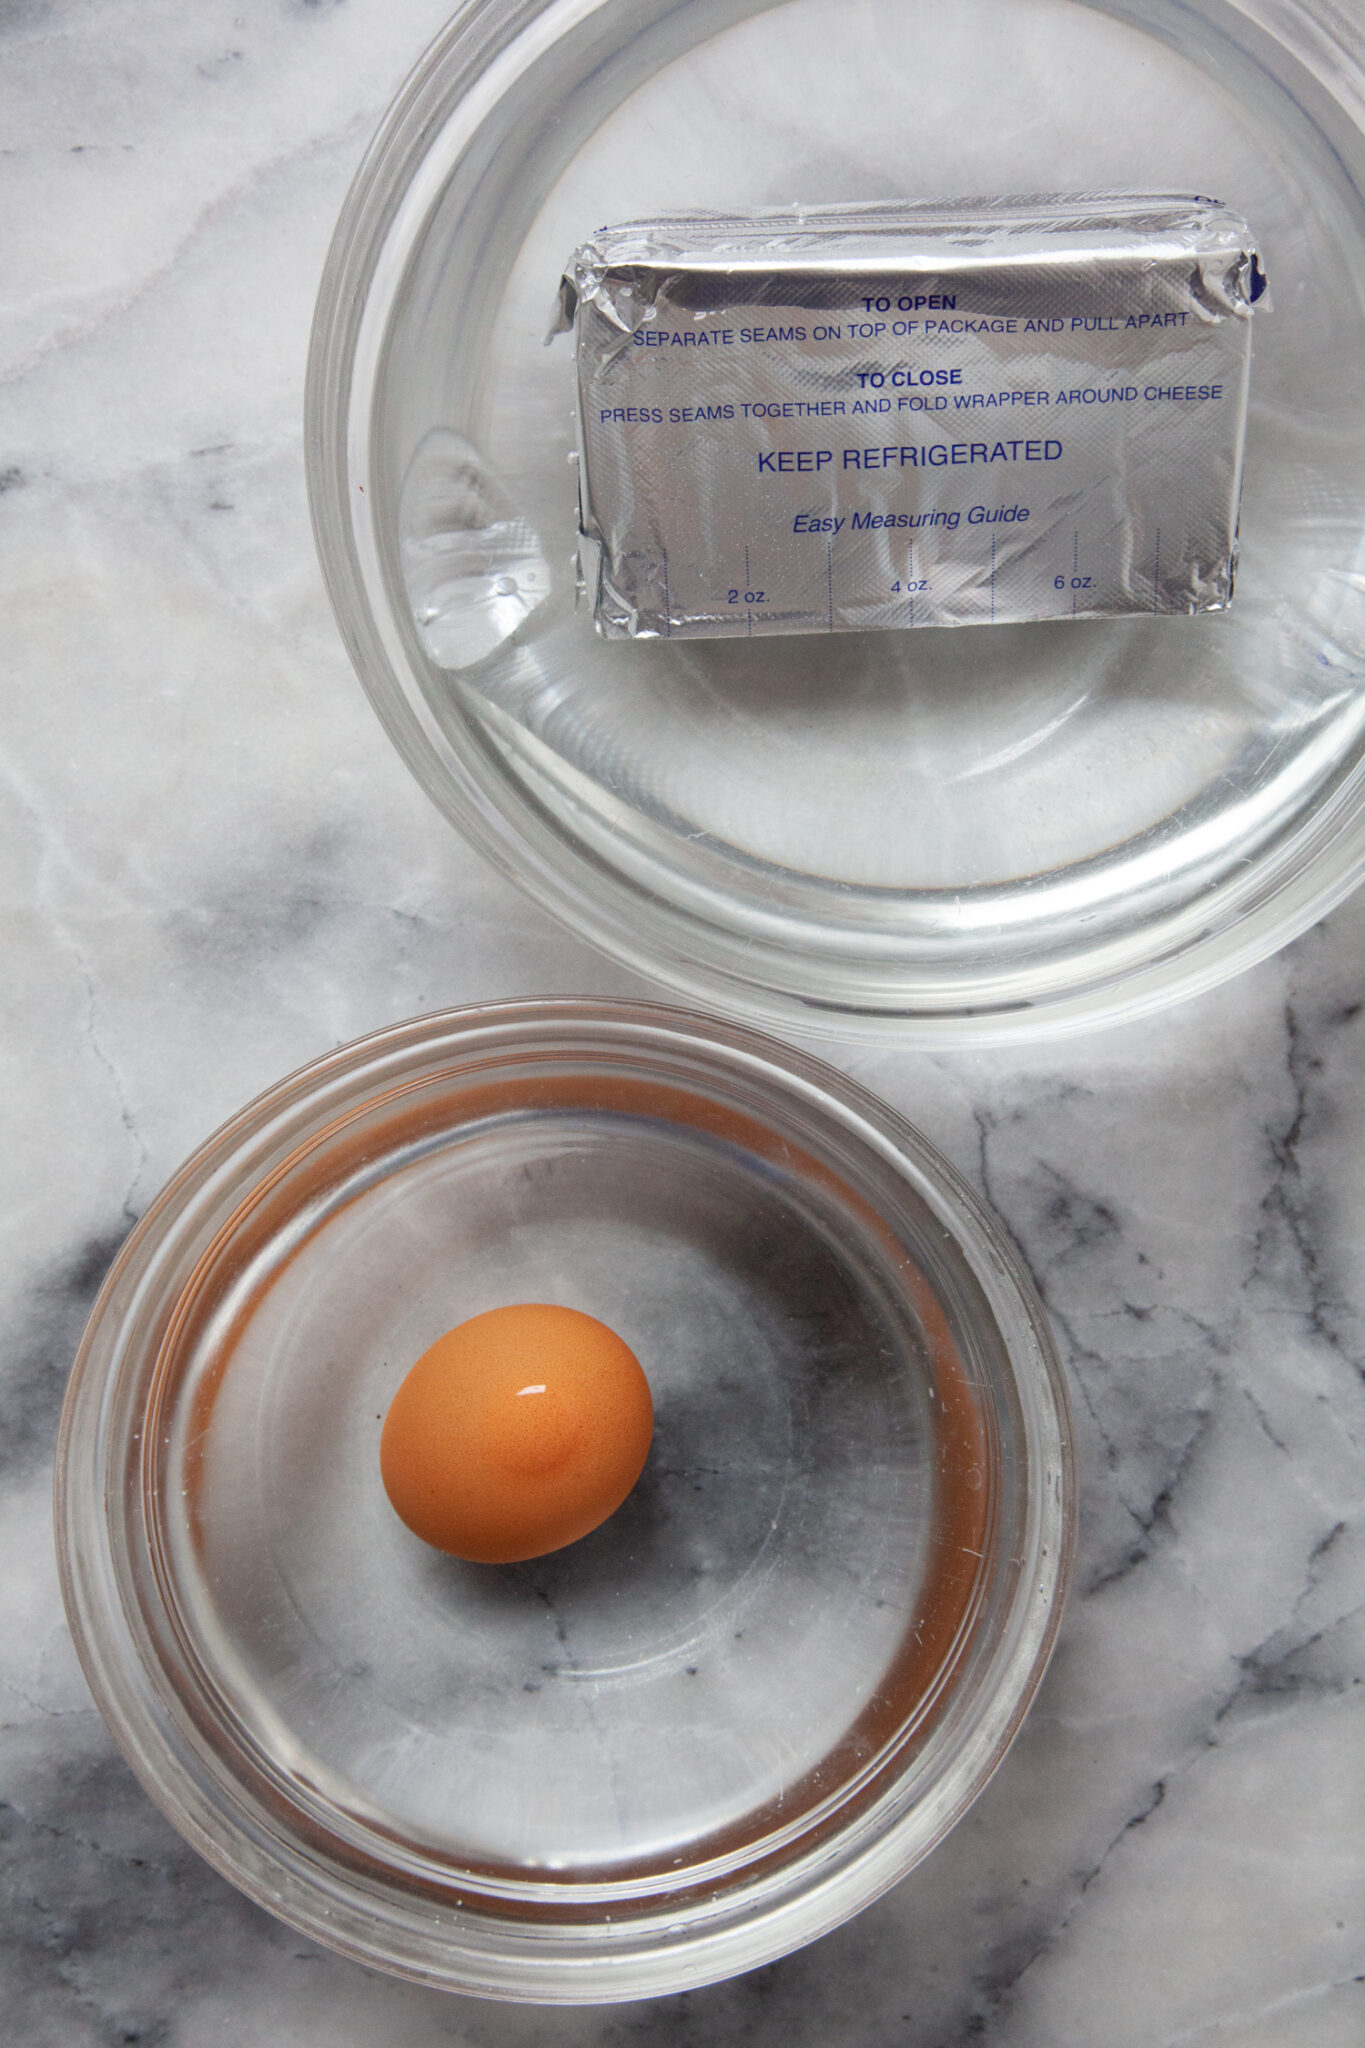
The eggs for this recipe should be at room temperature, as they will incorporate better into the batter. You can take the eggs out of the refrigerator an hour before making the cake batter but most folks (myself included) never remember to do this! So my favorite trick is to fill a bowl of hot water (directly from the tap) and just add the eggs to the water at the beginning of the recipe. By the time you get to adding the eggs, the eggs should be at room temperature. 

A bowl of warm water with a foil wrapped package of cream cheese in it. Next to it is a bowl of warm water with an egg in it.

How do you store this?

This pound cake stores really well. Keep it at room temperature for 3 to 4 days under a cake dome or tightly wrapped in plastic wrap. Keep it in the fridge for 4 to 5 days, tightly wrapped in plastic wrap or in a resealable Ziploc bag. Or freeze the loaf! Freeze the entire loaf, wrapped in plastic wrap and then placed in a resealeable heavy-duty freezer Ziploc bag. Thaw the entire loaf to room temperature before serving by placing it on the counter about 2 hours before serving.

Cream cheese pound cake with half of the loaf sliced and sitting on a wooden serving platter.

If you like this poundcake recipe, check out these other cake recipes:

  • Blueberry Cream Coffee Cheese Cake
  • Raspberry Buttermilk Cake
  • Easy Strawberry Cake
  • Cinnamon Streusel Coffee Cake
  • Rainbow Sheet Cake
  • Pumpkin Layer Cake
  • Upside Down Caramel Peach Cake
  • Guinness Stout Chocolate Bundt Cake
  • Pumpkin Coffee Cake with Pecan Streusel Topping
  • Swedish Blueberry Coffee Cake
A slice of cream cheese pound cake on a plate with a strawberry garnish. There is a mug of tea next to the plate, along with a wooden serving board with the rest of the cream cheese pound cake loaf with some of it sliced up.
Print Pin
5 from 1 vote

Cream Cheese Pound Cake

This easy-to-make cream cheese pound cake has an ideal velvety fine crumb that a friend of mine once called “the ideal poundcake” texture! It is easiest to make with a stand mixer but you can also use a hand mixer if that’s all you have. I have included notes in the recipe using a hand mixer.
One thing to note, make sure to use room temperature butter and cream cheese for this recipe but especially if you are using a hand mixer. The stand mixer is more powerful, and you can use colder butter and cream cheese if you didn’t plan ahead, but it will take a little longer to mix and cream the cold ingredients.
Course Breakfast, brunch, coffee time, Dessert, Snack
Cuisine American
Keyword cake, cream cheese
Prep Time 30 minutes minutes
1 hour hour 30 minutes minutes
Servings 8
Calories 612kcal
Author Irvin

Ingredients

  • 14 tablespoons unsalted butter 2 1/4 sticks or 200 g
  • 3 ounces cream cheese 85 g
  • 3/4 teaspoon kosher salt
  • 1/2 teaspoon baking powder
  • 1 1/2 cups granulated sugar 300 g
  • 5 large eggs at room temperature (see note below)
  • 2 teaspoon vanilla extract
  • 1/8 teaspoon almond extract optional
  • 1 1/2 cups all-purpose flour 210 g

Instructions

  • Preheat oven to 325°F.
    Cube the butter and cream cheese into 1/2-inch chunks. It’s ok if they are both refrigerator cold if you are using a stand mixer, but if you are using a hand mixer, you will want to use room temperature ingredients.
    Place them in the bowl of stand mixer fitted with a paddle attachment and mix on low speed until the ingredients start to blend together, about a 1 to 2 minutes. Increase the speed to medium and mix until the ingredients are creamy looking, homogenized, and cling to the side of the bowl, about another 2 to 3 minutes (this will take longer if you are using a hand mixer).
    Add the salt and baking powder and mix for an additional 30 seconds until absorbed. Scrape down the sides and bottom of the bowl with a silicone spatula.
    Left image is cubbed butter and cream cheese in mixing bowl. Right image is butter creamed and clinging to the side of the bowl.
  • With the mixer on at low speed, add the sugar, pouring it into the bowl at a small stream, trying to “cream” it into the butter slowly. Continue to add all the sugar until it is incorporated and looks fluffy. Again, scrape down the sides and bottom of the bowl with a spatula. If using a hand mixer, add a little sugar at a time, then mix to incorporate and repeat the process.
    Left image is sugar being slowly poured into the mixing bowl of a stand mixer with butter and cream cheese well blended. Right image is the sugar mixed into the butter and cream cheese to the point where it is clinging to the side of the bowl and is fluffy and light colored.
  • Beat the eggs, vanilla, and almond extract (if using) together into a glass measuring cup with a spout.
    With the mixer on low speed, drizzle the egg into bowl, stopping to make sure the egg mixture has been absorbed before adding more. You want to try and keep the batter as smooth as possible, but in the end the batter might still look a little broken and grainy. That’s typical so don’t stress too much about it. If you’re using a hand mixer, repeat the same process you did with the sugar, by adding a little egg mixture at a time, mixing, and then repeating.
    Scrape down the sides and bottom, then on low speed, sprinkle and add the flour, mixing until the flour is absorbed and the batter is smooth.
    Left image is egg drizzled into the bowl of creamed sugar, butter and cream cheese. Right image is flour being added to the cake batter.
  • Do a couple more scrapes of the bottom and side to make sure everything is well mixed. Then lightly butter or coat a 9 x 5-inch loaf pan with cooking oil. You want to oil the pan right before you add the batter, otherwise the oil will just fall down the sides and pool into the bottom.
    Pour the batter into the prepared loaf pan. Bake for 85 to 90 minutes, or until the top has cracked open, the center looks dry (not wet) and a skewer inserted comes out clean. If you have an instant read thermometer, the internal center temperature should be somewhere between 200° and 205°F.
    Let cool for 5 minutes in the pan, then invert onto a wire rack, flipping it right side up and letting it cool completely before serving.
    Left images is pound cake batter being poured into a loaf pan. Right image is a small offset spatula smoothing out the batter on top.

Notes

If you have forgotten to bring your eggs to room temperature, take them out of the fridge when you start the recipe and place them in a bowl of hot water directly from your tap. Let the eggs sit in the hot water. The hot water will bring the eggs to room temperature in about the time it takes to get to the part where you add them to the batter, about 10 minutes.
Adapted from King Arthur Flour’s Velvet Pound Cake recipe

Nutrition

Calories: 612kcal | Carbohydrates: 40.6g | Protein: 12.7g | Fat: 38.8g | Saturated Fat: 24.2g | Cholesterol: 326mg | Sodium: 3842mg | Potassium: 817mg | Fiber: 0.7g | Sugar: 22.5g | Calcium: 342mg | Iron: 3mg

Pin It For Later!

Top image is a cream cheese pound cake with half of the loaf sliced and sitting on a wooden serving board. Bottom image is a slice of cream cheese pound cake on a plate with a strawberry garnish and a mug of tea next to the plate, along with a wooden serving board with the rest of the cream cheese pound cake loaf with some of it sliced up. The text in the center of the image says Cream Cheese Pound Cake.

Filed Under: cake Tagged With: cake, cream cheese

Reader Interactions

Comments

  1. Ella Brick says

    July 23, 2025 at 12:46 am

    I just baked a cream cheese pound cake for the first time, and it turned out delicious! My husband and two sons devoured it in just two days. Thank you for making your recipes so easy to follow! I love eating it while playing basketball superstars which is awesome.

    Reply
  2. Abbott says

    January 19, 2026 at 9:38 pm

    Just like baking requires patience and the right steps, students also need to carefully track their application progress. You can easily UP Scholarship Status CheckUP Scholarship Status Checkonline to know whether your application is approved, pending, or paid.

    Reply
  3. Abbott says

    January 20, 2026 at 10:02 pm

    Baking really does teach patience and attention to detail — following each step carefully makes all the difference in the final result.

    In a similar way, students in Uttar Pradesh need to regularly check each stage of their scholarship application to stay informed about verification and payment updates.

    Reply
5 from 1 vote

Leave a Reply Cancel reply

Your email address will not be published. Required fields are marked *

Recipe Rating


Primary Sidebar

Follow Me On

Twitter-Link-to-Eat-the=Love Facebook-Link-to-Eat-the-Love Pinterest-Link-Eat-The-Love Instagram-Link-Eat-The-Love RSS-Feed-Link-Eat-The-Love
on Mastodon

Available Now: Marbled, Swirled and Layered
Available Now: Marbled, Swirled and Layered Available Now: Marbled, Swirled and Layered Available Now: Marbled, Swirled and Layered

"Mr. Lin, a graphic designer in San Francisco who writes the food blog Eat the Love, takes risks in nearly every one of the 150 elaborate recipes in his book. He doesn’t just paint the lily; he bejewels and shellacs it, too."
–MELISSA CLARK for the New York Times

“My goodness, this cookbook! It’s filled to the brim with recipes for the most splendidly beautiful cakes, cookies, breads, and tarts I think I’ve ever seen. My eyes kept getting wider and wider as I turned every page—both the flavor combinations and the photos are out of this world. Irvin Lin has most definitely outdone himself. This book is a triumph!”
—REE DRUMMOND, New York Times best-selling author of The Pioneer Woman Cooks

“Irvin Lin gives home-baked treats a twist, ramping them up with a range of contemporary flavors that are sure to surprise and delight. From beer-battered brownies to smoky butterscotch taking a classic cake to the next level, I can’t wait to mix, stir, and bake my way through Marbled, Swirled, and Layered!”
—DAVID LEBOVITZ, author of My Paris Kitchen

Search

Subscribe via Email

The Writer, The Baker, The Recipe Maker

Hey there! Thanks for visiting my blog. I'm Irvin Lin, a critically acclaimed cookbook author, IACP-Award winning photographer, IACP-nominated blogger, award winning baker, award winning former graphic designer, storyteller, recipe developer, writer and average joe bon vivant. I currently reside in San Francisco a block from Dolores Park and right near Tartine Bakery, Bi Rite Market & Creamery, and Delfina.

Feel free to contact me by clicking on that picture of me up above or emailing me eatthelove {at} gmail {dot} com.

IACP Photography Contest Best in Show WinnerIACP Photography Contest Best in Show Winner

“Irvin Lin is the creative mind behind his Eat the Love food blog. Lin’s impressive photography skills support his training in graphic design on the site, and you would never believe that is food blogger is a self-taught baker.” - PBS Food

“We love Eat the Love because Irvin's beautiful sweets look as good as they taste — his art director's eye appreciates the ruby sparkle of a pile of pomegranate seeds against the matte canvas of chocolate ganache.” - Saveur.com, Sites We Love

Popular Posts

Brookie Recipe (brownie and cookie) with potato chips, pretzels and double chocolate chips. Photo and recipe by Irvin Lin of Eat the Love.

Brookie Recipe with Salty Sweet Snack Treats

Perfect Soft Boiled Egg. Recipe and Photo by Irvin Lin of Eat the Love. www.eatthelove.com

Perfect Soft Boiled Egg

Korean Fried Chicken Recipe. Photo and recipe by Irvin Lin of Eat the Love. www.eatthelove.com

Korean Fried Chicken Recipe – insanely easy, super addictive

Personal Posts

Mexican Chocolate Corn Coffee Cake by Irvin Lin of Eat the Love.

Mexican Chocolate Corn Coffee Cake (and how AJ and I get engaged)

Grape and Blueberry Pie by Irvin Lin of Eat the Love.

Grape and Blueberry Pie

Crispy Oven Roasted Potatoes by Irvin Lin of Eat the Love.

Crispy Oven-Roasted Potatoes (and remembering a childhood friend)

Marbled, Swirled, and Layered.

My cookbook MARBLED, SWIRLED, and LAYERED

Recent Travel & Events

San Francisco Meals on Wheels Star Chefs and Vintners Gala 2019

Photo Essay: Meals on Wheels Gala 2019, part 2

Meals on Wheels Gala 2019

Photo Essay: Meals on Wheels Gala 2019, part 1

More Travel & Events

Wordless Recipes

EatTheLove Wordless Recipes #1 How to make your own ice cream "magic" chocolate hard shell

WORDLESS RECIPE #1: How to Make Your Own Ice Cream “Magic” Chocolate Hard Shell

Eat the Love presents: WORDLESS RECIPES #2 Halloween Edition - Haunted Honey Caramel Popcorn

WORDLESS RECIPE #2 Halloween Edition – Haunted Honey Caramel Popcorn

Molten-Lava-Chocolate-Cake-Wordless-Recipes-Valentines-Day-Eat-The-Love-Irvin-Lin-cover

WORDLESS RECIPES #3 Valentine’s Day Edition – Molten Chocolate Lava Cake

Bluth's Original Frozen Banana Copycat Wordless Recipe by Irvin Lin of Eat the Love. www.eatthelove.com

Wordless Recipe #4: Arrested Development’s Bluth’s Original Frozen Banana “Copycat” Recipe

Disclaimer

This blog currently has a partnership with Amazon.com in their affiliate program, which gives me a small percentage of sales if you buy a product through a link on my blog. I only recommend products (usually cookbooks, but sometimes ingredients or equipment) that I use and love, not for any compensation unless otherwise noted in the blog post. If you are uncomfortable with this, feel free to go directly to Amazon.com and search for the book or item of your choice.

Copyright © 2010–2026. Eat the Love. All rights reserved. | Privacy Policy

Rate This Recipe

Your vote:


A rating is required
A name is required
An email is required

Recipe Ratings without Comment

Something went wrong. Please try again.