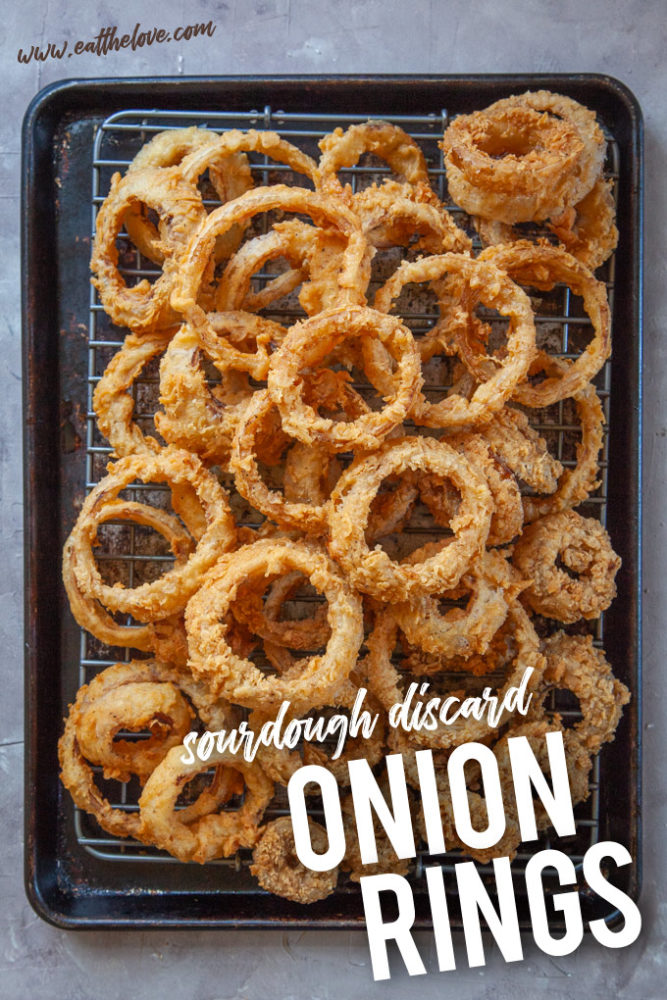
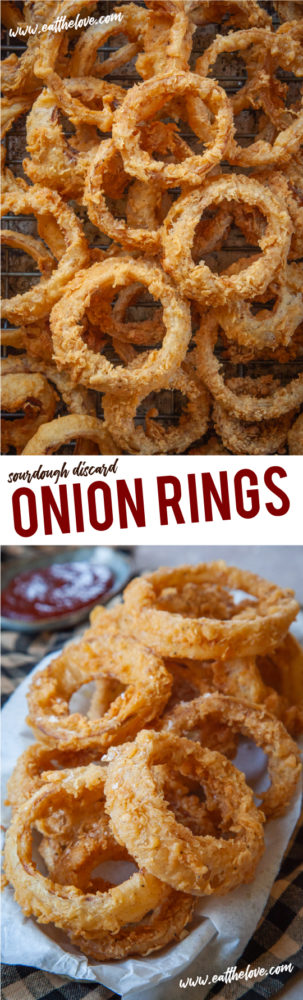
Make the crispiest, crunchiest, tastiest onion rings you’ve ever had, with the perfect amount of coating, by using sourdough starter discard!
If you’ve gone down the rabbit hole of sourdough baking, you know that the one thing that is a guarantee reliable fact in a world of inconsistent and occasionally unreliable sourdough baking is you will have sourdough starter discard. A LOT of sourdough discard. And that often means you are trying to figure out what to do with it. Sure, you could make my sourdough banana bread or sourdough crackers. But when you’re tired of baking, and you want something to serve next to your cheeseburger on pretzel buns (that isn’t my super crispy oven roasted potato wedges) you should make the best, crispest, crunchiest sourdough onion rings you’ve ever had with the discard!
What makes this recipe different and better?
Most onion rings have you dipping the raw onion into milk, buttermilk, egg or some combination to create a batter or coating. But this recipe uses the sourdough discard that naturally occurs when maintaining a starter.
A starter is a mixture of fermented flour and water. And if you’ve ever poured or scooped out sourdough starter from the container, you know it gets crusty pretty fast where the starter drips. This ability to get crusty is an advantage in making onion rings. The hot frying in the oil immediately crisps the batter up around onion, creating a flavorful coating, one that stays crisp, not soggy, even as it cools.

On top of that, the starter discard is thicker and more viscous than buttermilk or beaten egg. This means the discard will cling more to the onion. Clingy liquid equals an even outer coating that doesn’t fall off the onion ring when you fry it or bite it!
How do you make sourdough onion rings?
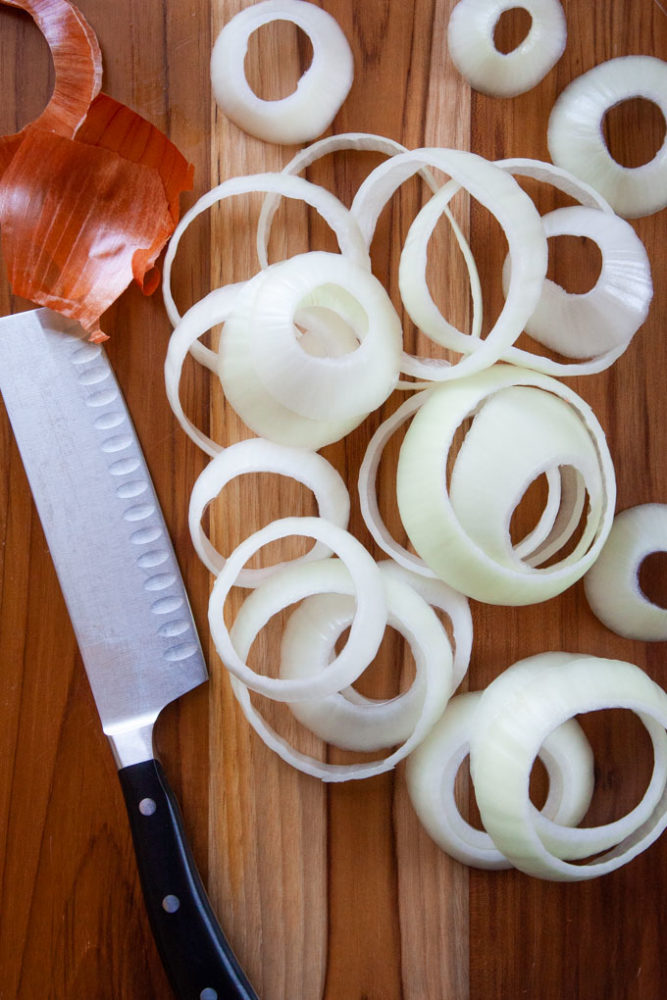
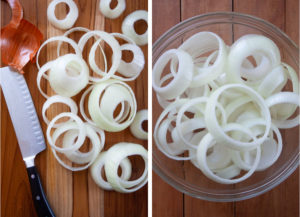
Making the onion rings is easier than it looks. First slice two onions into 3/4-inch rings. Feel free to go thinner or fatter as per your preference, but keep in mind thicker rings might take a little bit longer to cook and thinner ones cook faster.
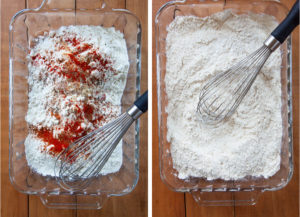
Then dip the onion rings in the sourdough starter discard, and then in a dry flour mixture made of flour, salt, pepper and some spices.
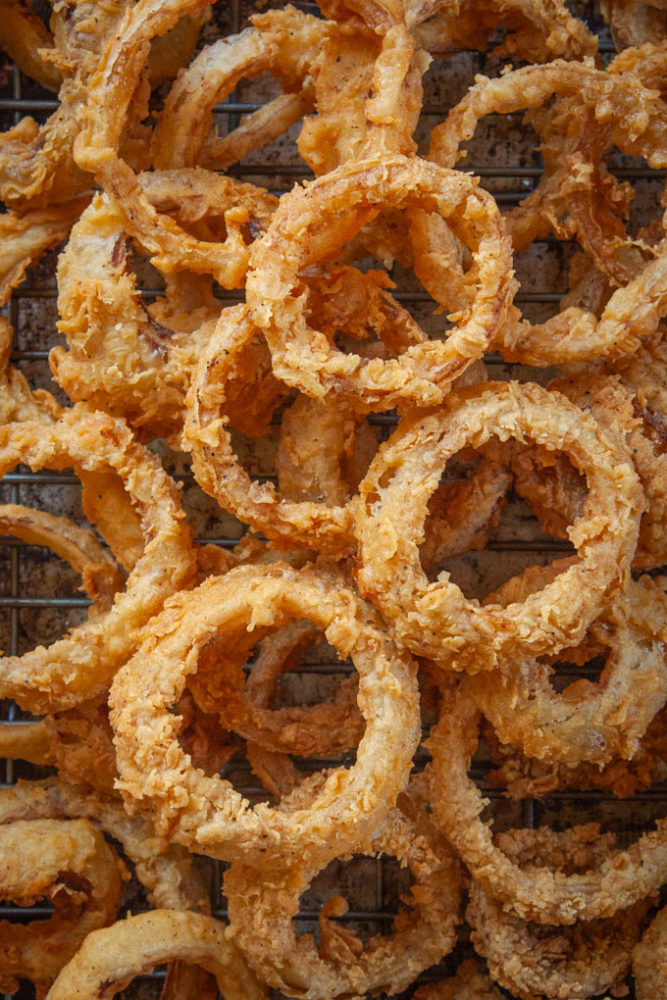
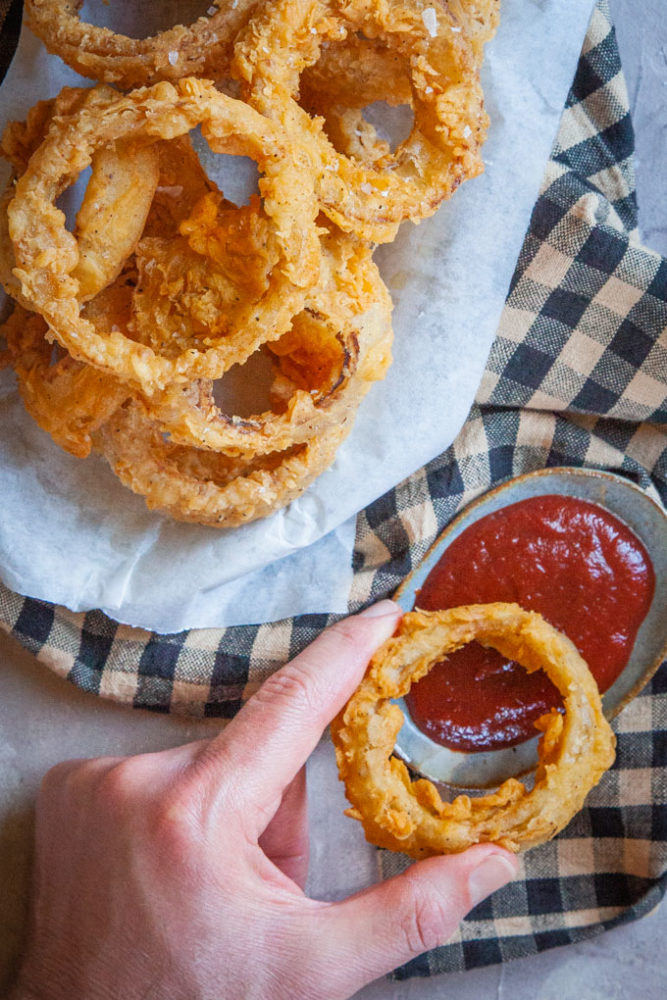
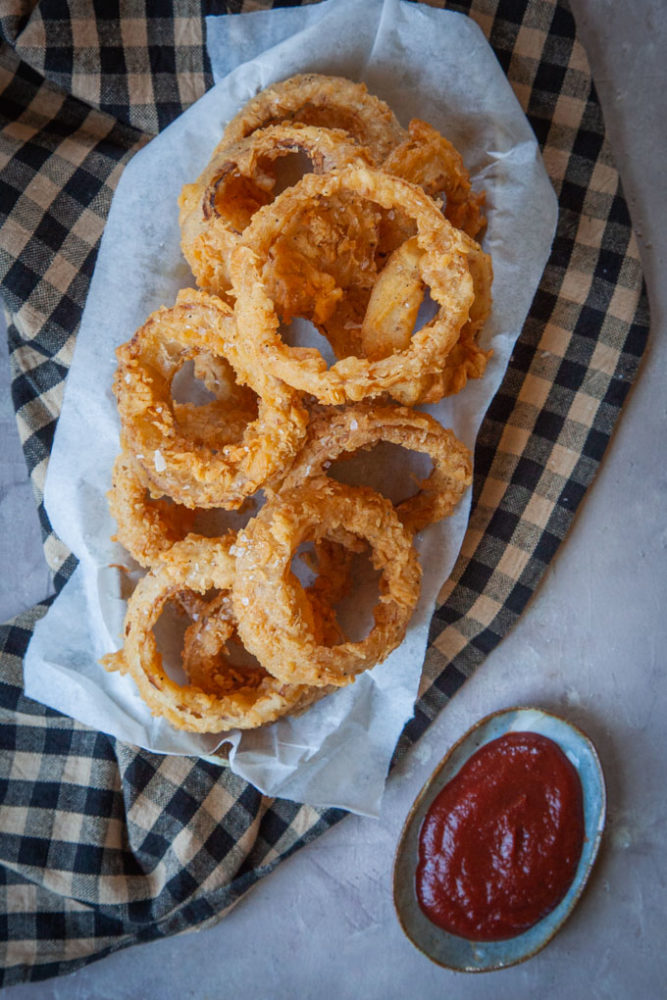
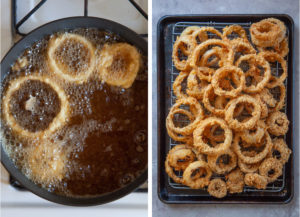
Fry the coated onions in hot oil for 3 or 4 minutes, or until they are golden brown and then allow them to drain a bit on a wire rack fitted over a rimmed baking sheet. Once you’ve fried all the onions, sprinkle them with extra salt (if you want) and serve them hot with the condiment of your choice, like ketchup, BBQ sauce or ranch dressing!

Where can I get a sourdough starter?
There are numerous online tutorials on how to make a sourdough starter on your own. My favorites include The Perfect Loaf, The Kitchn and King Arthur flour. The instructions are fairly simple, you just combine flour and water and then let it sit around (anywhere from 4 to 9 days) until it starts to bubble, discarding some of the starter and feeding it with more water and flour on a daily or twice daily basis!
But if you don’t want to go through the process of making a starter, you can ask around to see if your friends or neighbors have one. Facebook and Nextdoor are both great places to ask for sourdough starter. Because you have to feed and discard part of the starter every day, most folks have leftover starter that they are more than happy to share.
Of course, you can also just purchase a starter. King Arthur flour sells starter online for those folks who don’t want to make one or can’t obtain one from friends.
How do I get that much sourdough starter discard? What should the discard be like?
This recipe uses 2 1/2 cups of sourdough starter, which seems like a lot. Most starter discard is only about 1/2 to 1 cup per day.
But you can easily just store the sourdough starter discard in a container, either on the counter or in the fridge until you have enough starter to use for this recipe. Once you have enough starter, you can make this recipe!
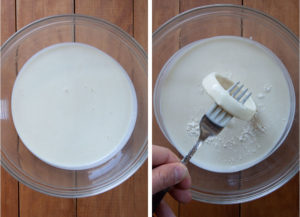
Personally, I prefer just leaving a container on my kitchen counter to pour the starter discard into. As the starter sits, it gets a little more sour which lends more flavor. Keep in mind you want the starter to be roughly the thickness of melted ice cream, a little more thick than heavy cream. If your starter is too thick, just thin it down a bit with water.
What do I if the flour mixture starts to clumps up?
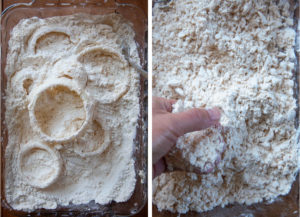
You’ll notice, as you coat more and more of the onion rings, that chunks of dry bits will start to form. This is because the sourdough starter discard will naturally drip off the onion rings and starts to clump together in the flour mixture.

Unlike a regular buttermilk or egg-based onion ring, the sourdough starter discard dries fairly fast. Just rub the large clumps of flour mixture between your fingers and break the clumps into smaller bits.
Once the mixture is the size of small pebbles, just continue with the coating as instructed, breaking up the clumps as necessary! Keep in mind these clumps fry up to be even more crispy (tiny clumps = more surface area = extra crunchiness) so a little bit of clumping isn’t a bad thing!
What kind of onions make the best onion rings?
I personally prefer yellow onions for my onion rings but I’ve made onion rings with all sorts of onions. That said, you can use whatever onion you have on hand, including red onions, white onions, and sweet onions like Maui or Vidalia onions.
How do you store and reheat onion rings?
These onions rings stay crispy even when they have cooled down! So you can make them ahead of time if you want, and then warm them up when you are ready to serve them.
Store them in an airtight container, in the fridge for up to 2 days. Reheat them in a toaster oven or in the oven at 350°F for 5 to 10 minutes, or until they are heated through.
If you like these sourdough onions rings, check out these other fried recipes:
- Fried Mac & Cheese Bites
- Fried Char-Sui Chicken Dumplings
- Arancini, fried risotto balls
- Potato Chip Zucchini Sticks
- Taiwanese Popcorn Chicken
- Fried Apple Pie

Sourdough Onion Rings
Equipment
- candy thermometer (optional but recommended)
Ingredients
- 2 large yellow onions
- 2 1/2 cups sourdough starter discard
- 2 cups all-purpose flour 280 g
- 1 1/2 teaspoons kosher salt
- 1 teaspoon garlic powder
- 1/2 teaspoon black pepper
- 1/2 teaspoon paprika smoked preferred
- 1/2 teaspoon cayenne pepper
- Cooking oil for frying like peanut, avocado, or rice bran
To serve
- Extra salt for finish
- Condiment of your choice like ketchup, BBQ sauce, blue cheese or ranch dressing
Instructions
- Peel and slice the yellow onions into 3/4-inch thick slices. If you prefer your onion ring thinner or thicker, feel free to slice it the size of your preference. Keep in mind that thinner rings will cook faster and thicker rings will take longer to cook. Separate the slices into rings, saving the smaller inner rings for a different use.

- Place the sourdough starter discard in a large bowl.
- Place the flour, garlic powder, pepper, paprika and cayenne pepper in a large shallow bowl or baking dish. Use a balloon whisk and stir the dry ingredients together until well blended.
- Pour enough oil into a deep Dutch oven or a 3-inch deep sauté pan so it is about 1 1/2 inches deep. Keep in mind the oil will bubble up a lot, so if you aren’t familiar with deep frying, a Dutch oven is your best option. Place a wire rack on a rimmed baking sheet.
- Heat the oil until it reaches 375°F. If you don’t have a candy/deep frying thermometer or a quick read thermometer, place a 1-inch cube of bread in the oil. The cube should turn golden brown in 60 seconds.
- Once the oil has reach temperature, dip an onion ring in the sourdough starter discard until it is coated.
- Move the ring with a fork to the flour mixture and toss to coat. Do this with three or four onion rings. As the flour mixture starts to clump up because of starter liquid drippings, just rub the clumps between your fingers to break them up into smaller bits.
- Fry the rings in the oil by placing a ring partially in the oil, then letting go. The onion ring will slide into the oil without splashing. Do not drop the ring into the oil from the air! This will cause the oil to splash up and splatter, potentially burning you. Don’t over crowd the pan, just fry in batches. This will make sure the oil doesn’t drop in temperature too fast.
- Fry the rings for about 1 1/2 to 2 minutes, then flip the rings over with tongs and continue to fry until the rings are golden brown, an additional 1 1/2 to 2 minutes. Move the fried onion rings to the wire rack, and repeat with the remaining onions rings, coating first with the sourdough starter, then the flour, then frying.
- Once all the onions rings are fried, sprinkle with extra salt and serve warm with your favorite condiment.
Shy says
WOW amazing recipe!
I made them for my brother and he never compliments on my cooking..
He pretty much gave me 3 Michelin stars for this recipe.
emz says
Is there a way to do these in oven instead of frying?
Joy says
Wondering if anyone knows if these would turn out in an air fryer?
Gina says
Me too, did you try them,?
Katoe says
This doesn’t work well on an air fryer 🙁
They came out crispy (more hard than crispy) but very chalky/floury. To save them I put them in a bowl, added oil to semi coat them and then put them back in the air fryer. They worked but not well. I think with all of the flour, they need some fat to cook well in an air fryer.
www.Gmail.com says
Really want to try this! Thank you so much for the nice recipe!
Vera Moore says
These were very good and definitely will do again and again, but it dirtied up my oil pretty quick.
Scott Davis says
I used peanut oil and it worked beautifully. I forgot how well that oil does for frying. It’s been years since I bought it.
Scott Davis says
These are awesome. I had to thin my starter and used water. Next time I’ll use beer.
They reheat crispy too!
I have shared this recipe with several people since making it about a week ago.
fireboy and watergirl says
Great for the knowledge you share with us, I will always follow your blog and will share your blog with my friends.
Amy W says
Best onion rings we have ever had! The crust stuck to the onion so when you bit into it, the onion didn’t pull away from the coating. Very crunchy and stayed that way even when they cooled off. I used 90% sprouted wheat flour and 10% white flour. I’m sure it would work equally well using all sprouted wheat flour. Great recipe, thanks for sharing!
Diana says
These were really easy to make. I’m so glad I found this recipe. I needed a way to use up some discard in a pinch and stumbled upon this. We have milk and egg allergies in our house, so that makes the recipe even more awesome. Thank you for sharing. They were delicious!
Marlene says
I have a question. Can you put the spices in the discard and omit dipping in the flour? Or is there a reason for the extra coating of flour?
Annette Hansen says
This recipe is absolutely delicious. We made onion petals instead of onion rings, they are so crunchy. They stayed crunchy through the entire meal. I will add a little more cayenne pepper next time because we like things a bit more spicy. This is a keeper. My only question is whether or not these can be frozen and fried later? Please let us know if you try it.
Irvin says
Hi! I don’t know how these will fare if you freeze them. I know I’ve kept leftover in the refrigerator, and then warmed them up in the toaster oven and they come out crispy! So I imagine they will freeze fine? But if you try it, please come back and let me know!
Mille says
Sooo good! This was the first time I’ve tried making onion rings and I love trying new sourdough discard recipes. I’m so glad I found this! I only had 1 cup of discard but instead of waiting like you suggested….I just used what I had! After I was out of batter, I used an egg and some milk for the rest of the onion rings. I enjoyed both batches BUT the one with the sourdough discard held together SO much better and felt lighter to eat, like it didn’t get weighed down by so much oil. We mixed up some “onion ring sauce” using mayo, ketchup, paprika, mustard seed, and ginger (since I didn’t have horseradish) and munched away till the plate was empty. Honestly, the only downside about this recipe is that I ate way too many of onion rings. Five hundred star rating. Thank you for this!
Pam R says
The best onion rings I have ever made! So light and crispy. One of our favorite fast food onion rings has a bit of sweetness to it so I think next time I’ll add just a tad bit of sugar and there will be a next time! They were so good! Thank you for this recipe.