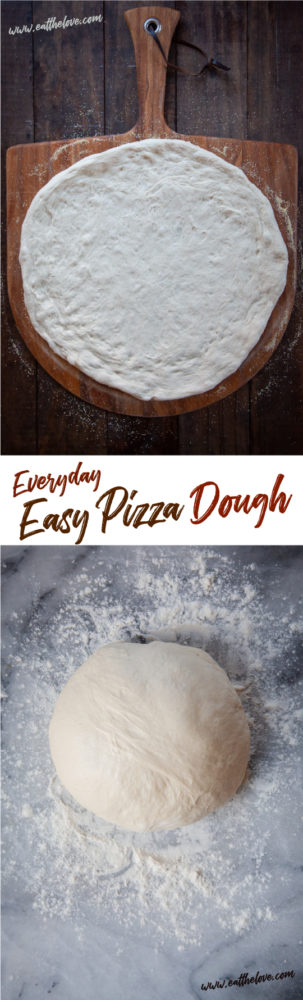
This easy pizza dough recipe makes enough dough for 2 pizzas and can be ready in just over an hour using common pantry ingredients.

I have time-intensive pizza doughs that I often make when I am planning ahead. But those doughs, like my pizzeria-style pizza dough or my sourdough pizza dough take more time as they have a pre-fermented dough or a sour dough starter, as well as a slow delay proof in the fridge. Sometimes I JUST DON’T THINK AHEAD and really want to make pizza TODAY, not three days from now. So my solution is this everyday easy pizza dough! I can use it to make my double olive pizza or really any pizza I want. Make the dough, then prep the sauce and ingredients while it rises. By the time everything is ready, I can stretch out the dough and bake away. Pizza from scratch has never been easier.
How to make this easy pizza dough recipe
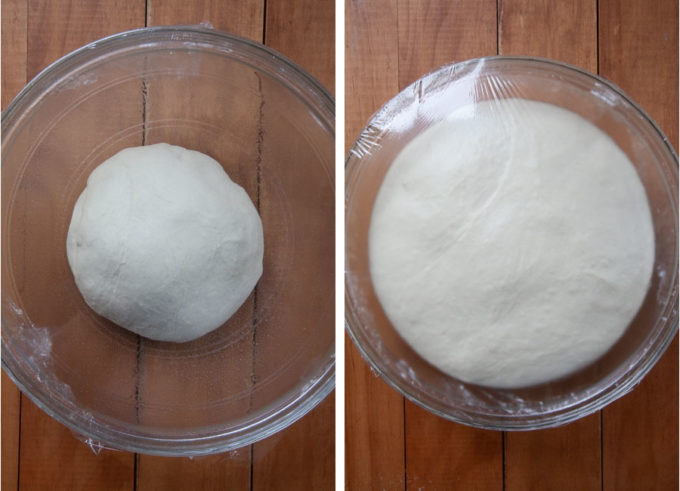
Dissolve a little bit of brown sugar in warm water than stir in a package of yeast. Let it sit for about 4 or 5 minutes until it starts to foam. Then add in flour, salt and olive oil. Knead the dough (by hand or with a stand mixer) until elastic and smooth. Let rise until double in size, about an hour in a warm environment, then you’re ready to make pizza!
How do shape the pizza dough?
Yeah, I’m not gonna tell you to throw that dough up in the air like you just don’t care. I can’t do that. And if you CAN do that, my guess is you already have a good pizza dough recipe that you use.
But I will tell you that I prefer to stretch my dough out instead of roll it out with a rolling pin. But that’s totally a personal preference.

To roll the dough out with a rolling pin, place the dough on a baking sheet or pizza peel that is dusted with equal parts cornmeal and all-purpose flour. I find that 1 tablespoon of flour and 1 tablespoon cornmeal is usually enough. The flour keeps the dough from sticking and the cornmeal not only adds some crunch and texture, but acts like “ball bearings” allowing the pizza to slide around. Then use a rolling pin to roll the dough out into a rough circle. Don’t worry if your pizza dough ends up more…organic in shape. You’re making homemade pizza! It’s not suppose to look perfect.
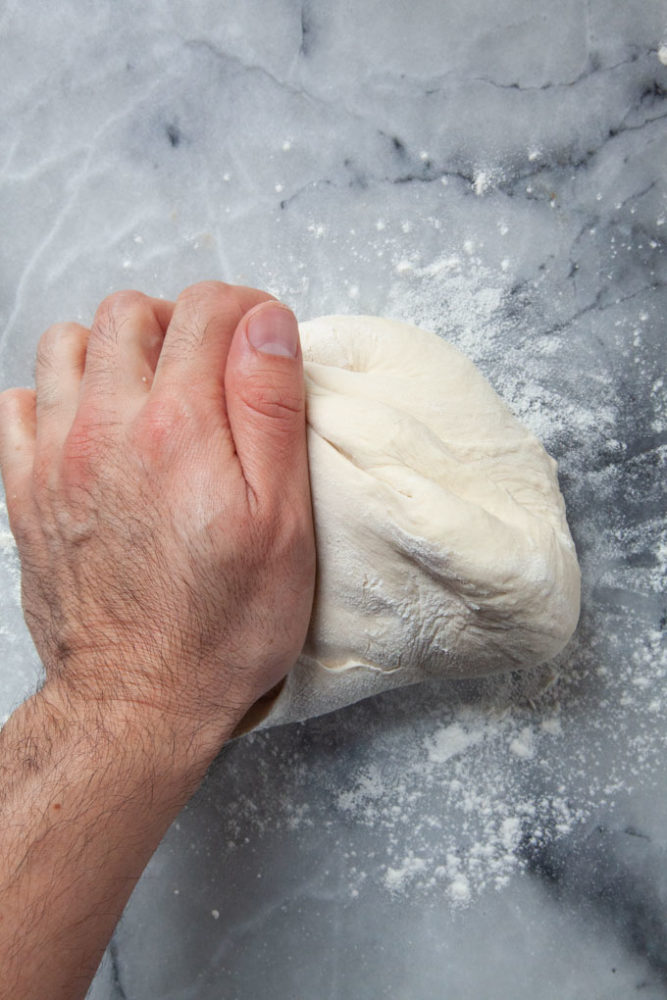
To stretch the dough out (my preferred method), you can place the dough on the baking sheet or pizza peel dusted with equal parts cornmeal and all-purpose flour (about 1 tablespoon of each is enough). Then use your fingers to push from the center of the dough to the edge, rotating the dough slightly every time you push out. Continue to do this, to form a pizza round. A natural edge should form around the pizza round when you do this. And because you are rotating the dough, it should naturally form a circle.
How to store the pizza dough.
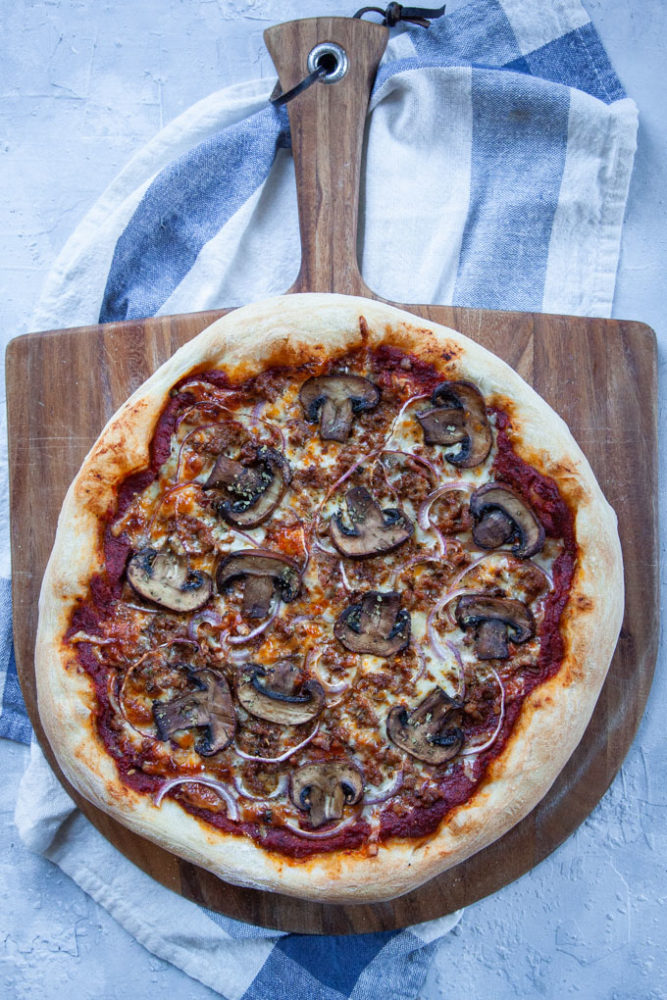
This dough makes enough for two 12-inch pizzas. I usually bake off two pizza at a time because it doesn’t take that much longer to prep and bake off two pizza than just one. Plus leftover pizza is the best thing ever in our household!
But if you want to only use half the dough for 1 pizza or if you want to make the dough ahead of time you can easily refrigerate the dough for up to 48 hours. Wrap the dough in a plastic wrap, then place it in a resealable Ziploc bag before refrigerating it. Let the dough come to room temperature (about 1 to 2 hours) by setting it out on the counter before using.
The unbaked raw pizza dough also freezes well. Again, wrap the dough in plastic wrap and place it in a resealable freezer bag. Store in the freezer for up to 1 month. Thaw it out in the fridge overnight, then let it come to room temperature (about 1 to 2 hours depending on how warm your kitchen is) before using.
Why make so much dough? Can you cut this recipe in half?
You can definitely cut this dough in recipe in half, but most stand mixers do better when they are kneading larger amounts of dough. That is why the recipe yields enough dough for two pizza crusts.
If you only want to bake one pizza, you can save the other half of the dough as described above, either by freezing it or saving it in the refrigerator.
If you do cut the recipe in half, you might want to knead the dough by hand, instead of using a stand mixer. Just follow the instructions in the recipe for hand kneading.

How do you bake this dough?
Most pizza recipes will give you directions on how to bake homemade pizza. I like bake my pizza on a baking steel or a pizza stone, but if you don’t have either, you can bake it on a regular baking pan or baking sheet. Just follow the instructions for your favorite homemade pizza recipe.
But if you want to free form the pizza, use your favorite pizza sauce, add cooked toppings and cheese, then bake in a 500°F for 14 to 16 minutes, or until the cheese has melted and the crust is golden brown!
Can I use bread flour instead of all-purpose?
This recipe uses all-purpose flour, which has a lower gluten content than bread flour and is more commonly found in most folks homes. But if you’re like me and have bread flour in the house you can easily swap out bread flour for the all-purpose!
Just use 3 cups (450 g) of bread flour in place of the all-purpose flour. Bread flour leads to a slightly chewier pizza dough that I actually prefer. The all-purpose flour will be a little less chewier is all!

What happens if my dough looks to dry or is too sticky wet?
Your finished dough should smooth, elastic, and slightly tacky. If your dough doesn’t seen quite right, most likely you are using measuring cups to measure out your flour, and not a scale. A kitchen scale is the most accurate way to measure in baking, especially with flour. But don’t worry! Here’s how to fix your dough.
If your dough looks too wet, just knead in a little more flour, 1 tablespoon at a time. It’s better to start off with a little less flour and then knead in more if you feel like the dough is too sticky.
If the dough seems too dry, add a little water and knead it in. If you have a clean spray bottle, this is an ideal way to add water. Just spritz water over the dough and then knead it in. Continuing to spray and knead do this until the dough consistency evens out and becomes slightly tacky overall. If you don’t have a spray bottle, make a little well in the middle of the dough, drizzle a little water into it, and then knead away. The dough might look soggy in parts and stay dry in parts, but keep working the water in, until it evens out. Repeat if necessary.
Tips on working with yeast
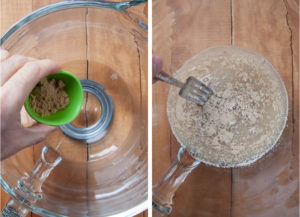
Pizza dough requires yeast to rise and I’ve been told by folks that yeast is scary! But I’m here to tell you that yeast is just another ingredient, like flour or olive oil. One of the first steps you see in recipes that call for yeast is to sprinkle the yeast over warm water and stir it in to dissolve it. Then you let it sit for about 5 minutes for it to foam. This is calling proofing and it basically is an added insurance to make sure your yeast is alive.
WHAT? Yep, yeast alive! It’s actually a fungus (like mushrooms) and when you dissolve it in the water, it is activated (sort of like waking up from a deep sleep) and starts to feed on the little bit of sugar in the water. If you don’t see that “foam” form on the top of the surface, that means the yeast is dead. And you should discard the water and get more yeast.
As long as you proof the yeast, you’re good to go! But honestly, most grocery store yeast that you buy should be alive and active. Unless you are using some really old yeast, or have stored your yeast in less than optimum conditions (I recommend storing it in the refrigerator or freezer), you’re probably going to be OK with the yeast that comes in packages. Really.
How do I make the pizza dough rise faster?
The yeast needs time to grow and breathe. So you should place the dough in a warm environment. Here are few suggestions for that exact environment to help is rise.
- If your oven has a “proofing” setting, this is the time to use it! If it doesn’t you can still use it! Just turn the oven on to 200°F, or the lowest setting it goes to. Once the oven starts to warm up, immediately turn the oven off. Then place the dough in the warm oven. Make sure to turn the oven off though! You don’t want the oven to get too warm.
- Another option is to place the bowl of dough on the top shelf of the oven. Then place a bowl or shallow pan of boiling water underneath it. This will warm up the oven.
- Finally, place the bowl on the top shelf of the oven. Take a heavy pan, like a cast iron skillet, and heat it up on the stovetop until you can feel it radiating heat. Move the hot pan to the bottom shelf of the oven. The hot pan will warm the inside of the oven.
If you like this easy pizza dough recipe, check out some of my other yeasted dough recipes:
- Bialy, the cousin to the bagel
- Parker House Rolls
- Easy Pretzel Buns
- Lemon Scented Crumpets
- Potato Rolls
- Homemade Soft Pretzels

Easy Pizza Dough Recipe
Ingredients
- 1 1/3 cups warm water about 90 to 100°F
- 2 teaspoon brown sugar or white granulated sugar
- 2 1/4 teaspoon active dry yeast 7 g or 1 package
- 3 1/4 cups all-purpose flour 455 g, or use 3 cups (450 g) bread flour (see section above)
- 1 tablespoon olive oil
- 3/4 teaspoon kosher salt
Instructions
- In the bowl of a stand mixer fitted with the dough hook, dissolve the sugar in the warm water. Sprinkle the yeast over the water and stir with a fork until the yeast has dissolved. Set aside for 4 to 5 minutes. The top of the water should be foamy. If it isn’t, discard the liquid and start again with fresh yeast.

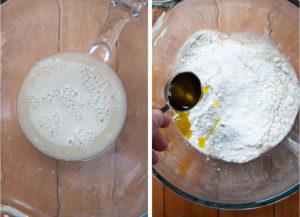
- Once the yeast has been proofed, add the flour, olive oil and salt. If you are adding the flour with weight, add all of it, then turn the mixer on slow and stir until the flour has been absorbed into the liquid and there are no dry ingredients on the side of the bowl (you may need to scrape down the sides occasionally). If you are adding the flour using measuring cups, add in 3 cups of all-purpose flour or 2 3/4 cups bread flour and mix in. Add the remaining 1/4 cup of flour slowly, about a tablespoon at a time, until the flour is roughly the right consistency, neither too wet, nor too dry. It’s better to error on the wet side, as you can always knead in more flour later.
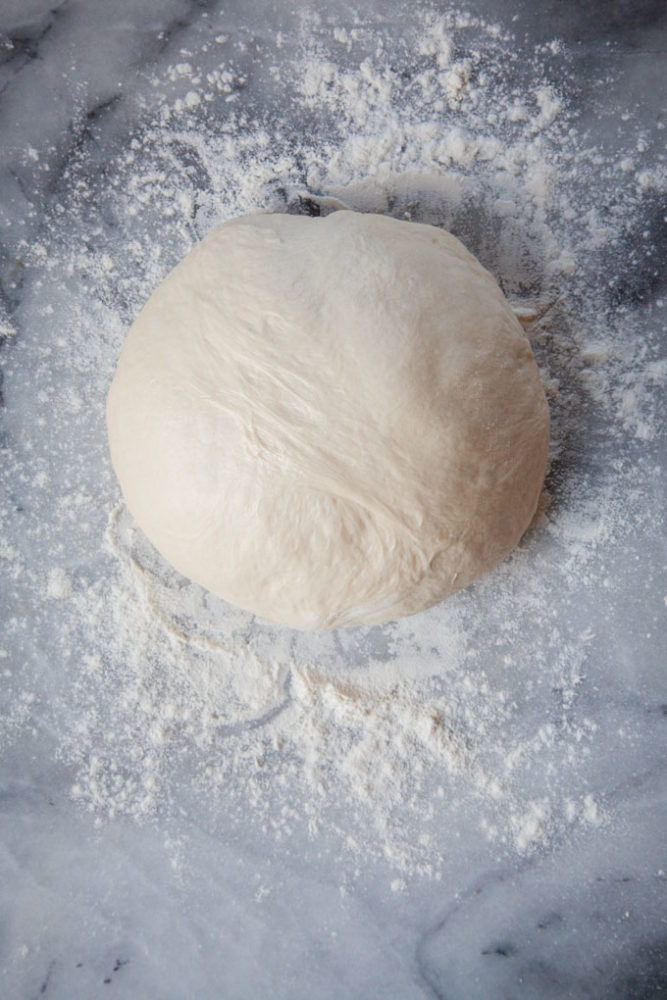
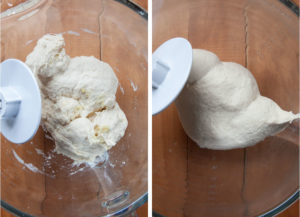
- Increase the speed and knead the dough for 4 minutes or until the dough is smooth and elastic.
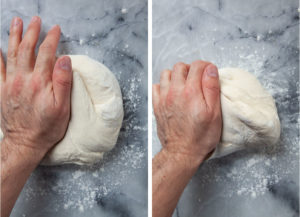
- If you are kneading by hand, combined the ingredients in a bowl until a rough dough forms. Place the dough it on a clean, lightly floured, surface, and pressing down with the heel of your hand into the dough. Fold the dough over, rotate the dough 90º then repeat pressing down with your heel on the folded dough. Continue this process, for 5 to 6 minutes, or until the dough is smooth and elastic.
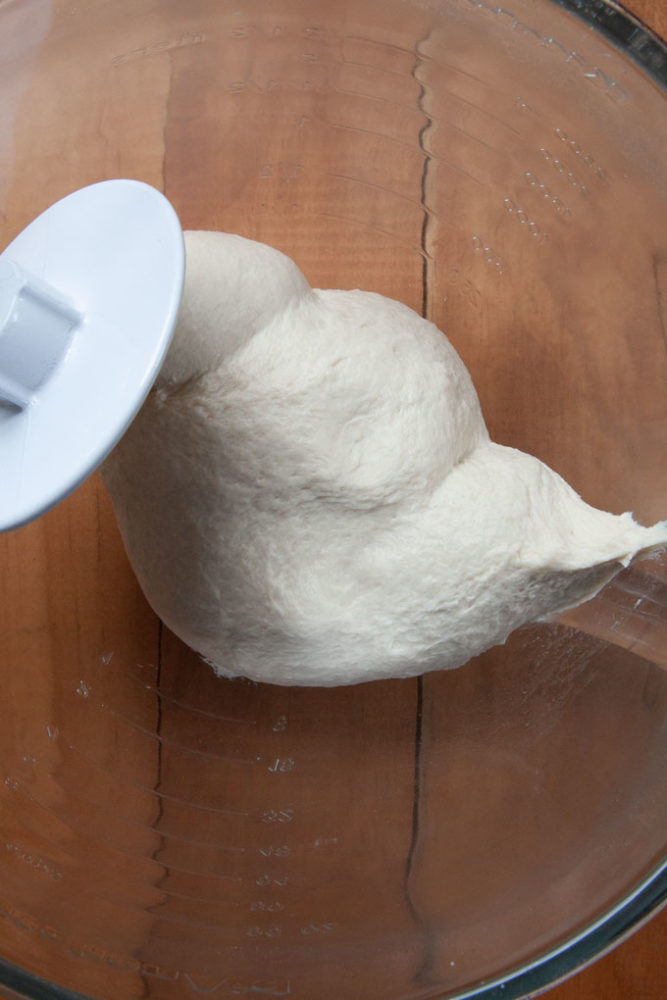
- Grease a bowl with cooking oil. Pull and stretch the dough until it forms a smooth ball. Place the ball, rough side down into the greased bowl and cover with plastic wrap. Place in a warm environment and let rise about 60 or until double in size.
- Divide in two and use in your favorite homemade pizza recipe.

Claudia says
Hi, Irvin! You’re right! There’s a lot of pizza happening these days. I’m wondering about the difference between hand stretching and rolling out the dough. Any change in texture, or do you just prefer the mechanics of hand stretching? All the best to you and AJ. Be well!
Lee Rosenthal says
If I wanted to use all or most white whole wheat or whole wheat flour, what adjustments would I need to make? How much more liquid?