If you’ve been reading my blog at all, you’ll remember that last month that I had posted a little blog entry about my first Daring Baker’s Challenge. I had joined them out of fear that I would run out of things to blog about (definitely not an issue) but instead have found wonderful community of supportive bakers! Well, the May 2010 Daring Bakers’ challenge was hosted by Cat of Little Miss Cupcake who challenged everyone to make a piece montée, or croquembouche, based on recipes from Peter Kump’s Baking School in Manhattan and Nick Malgieri.

Now if you remember correctly, I wasn’t super enthusiastic about my first challenge, but it turned out great. This one, however, I was THRILLED to do! I have always wanted to make a croquembouche, but I just have never really had a good excuse to make one! I guess some would argue that I don’t need an excuse to bake, but when you are making something this elaborate and time consuming I needed an excuse.
An aside, I internally scoffed at the suggested time that should be allotted for the challenge – 10 minutes to prepare the puff pastry, 10 minutes to pipe and 30 minutes to bake, with an additional 10 minutes to cook the pastry cream and 10 minutes for the glaze. If you added that all together that’s an hour and 10 minutes to make an entire croquembouche, and maybe an accomplished pastry chef could do it in that time, but I knew there was NO way I could do that….
First let me tell you that not only was I SUPER excited about the challenge, but I’m a fan of Nick Malgieri who’s recipe we were using. I have several of his books (he’s the former Executive Pastry Chef at Windows on the World) and though I don’t use his recipes all that often (he has fondness for nuts in his baked goods, which I usually don’t care for) his latest book The Modern Baker is excellent. The fact that the challenge was going to be based on his recipe meant I could totally feel confident in it.
Which was a good thing, because before I could second guess myself, I sent an mass email out to some of my friends to see if any of them were available to come over for my “mystery dessert”. I needed people to eat the crouqembouche! As per the challenge requirements that I don’t reveal what my baked item is before the 27th of the month, I didn’t tell any of them what the dessert was beforehand (all I told them was that it was going to be “elaborate”) and that they couldn’t tell anyone else what it was either once they found out.
I contemplated having them sign non-disclosure forms beforehand, but then I thought that might be going too far.
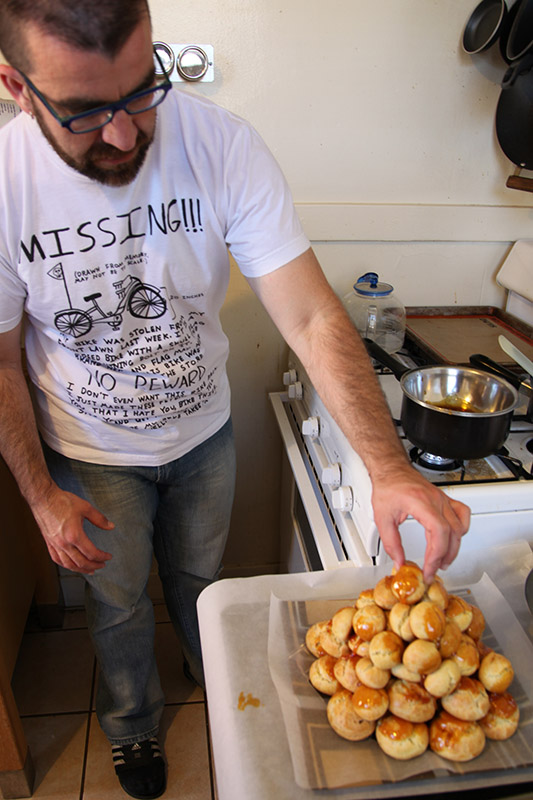 That’s AJ on the left, putting the final one on top!
Did I mention that I was excited about this challenge? So excited that I ended up chatting about it with Nora Tong at Nora’s Patisserie at the Meals on Wheels Gala that I attended a few weeks ago! I’ll be posting an exhaustively comprehensive review of the Gala on this blog in the near future, just as soon as I finish processing all the photos!
Nora, who by the way is totally awesome, approachable, and makes the most astounding European-style petit-fours and tea cookies, seemed genuinely amused by my enthusiasm in making a croquembouche. She humored me when I told her how much I was looking forward to making it, and then related a story of one of the first croquembouches that she made for a client. She had built it in her kitchen and was driving it to the client’s event, and the humidity of the day started to melt the caramel that bound the crouchembouche together. Along with the pastry filling which started to make the bottom creampuffs get soggy, her crouchembouche was nearly destroyed by the time she delivered it to her client!
She told me (in a conspiratorial whisper to me) that she now makes her crouchembouche with a Styrofoam mold on the inside to ensure integrity. I hope she doesn’t get too mad at me for leaking her secret! Of course, I don’t know how anyone could make a really tall one without a mold. The weight of the creampuffs filled with pastry cream along with the humidity in the air would just make ANY large mounted piece disintegrate.
I wanted to go and find a Styrofoam mold but I couldn’t get down to Michaels in time (it would have required me borrowing AJ’s car to go there anyway as there isn’t one in the city). They might have had a mold at Sur la Table in the city, but I didn’t think to check when I went there to get some cookie cutters. I did leave with a several cookie cutters, a couple of cupcake paper liners that were too cute to pass up (stripes! polka dots!) and two books from the clearance section, including an autographed copy of Martha Stewart’s Cooking School (for only $9!).

But back to the croquembouche. I took an idea from Martha Stewart and made some sugar cookie with royal icing and sanding sugar beforehand and used them as decoration for the croquembouche. And someone else on the Daring Baker’s forum had a link to how to make caramel corkscrews, which were SO much fun to make as mini decorations!
I had a blast. I love making caramel, but had never really made any spun sugar creations before. SO. MUCH. FUN. I got to explain what I was doing to my friends as well, as I was putting the finishing touches on the crochembouche….
Also, ouch. Spun sugar and caramel can be slightly painful, as I burned myself a few times. But I have tough skin and it was totally worth it.
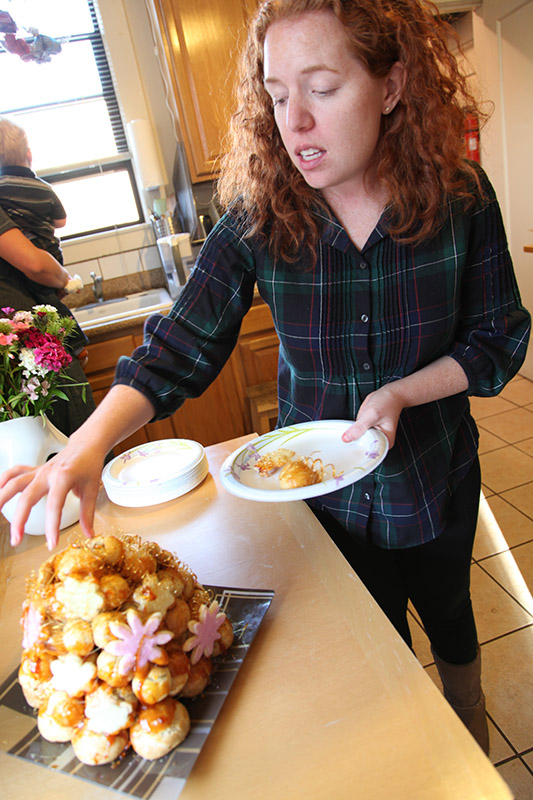
 I decided to fill the cream puffs with a caramel pastry cream and a chocolate pastry cream. Held together with the burnt sugar caramel, and then with spun sugar wrapped around the croquembouche, my guests were duly impressed. We ordered some pizza, hung out and then, with some slight hesitation on my guests end (“It’s so pretty! I feel bad eating it!”) we dove right in!
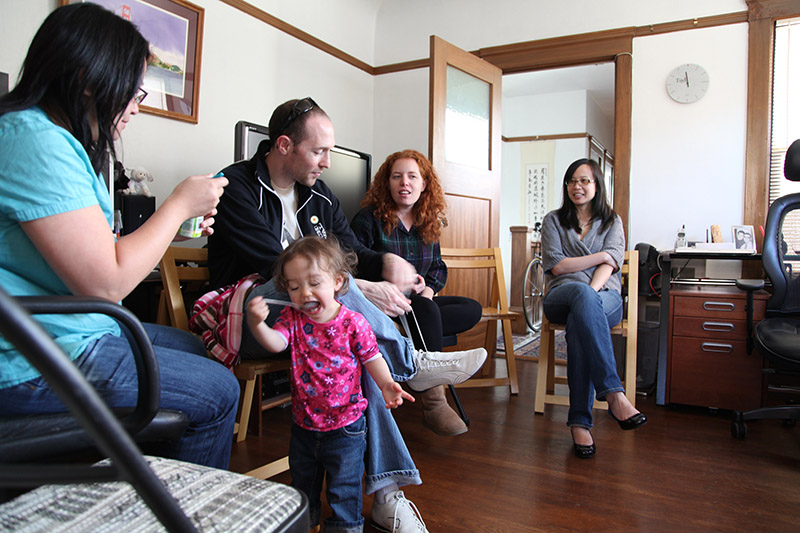
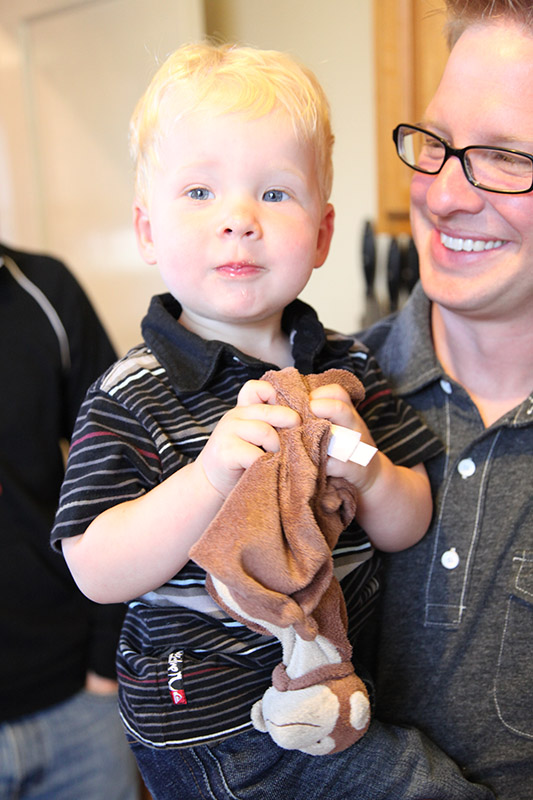
Two of our guests were under the age of 2 years old. Having eaten a couple of sugar cookies and a creampuff each, they then proceeded to jump up and down on our couch – much to the amusement of the rest of us. Ah…the sugar rush. They then they got a bit flirty with each other, which was utterly adorable.


The party ended early, due to the fact that the 2 year olds needed to get to bed, and also because a few guests wanted to rush home to watch the Lost finale. Ah… how television rules our lives.


The rest of the crochembouche went to AJ’s students. They polished them off immediately (no leftovers!) which pleased me. They kept on asking AJ where he got them, and AJ kept on telling them that I made it. Ha!
I hope I have a chance to make another one again real soon, or at least to make something with spun sugar again. It was so much fun, though I’ll remember to put newspaper down on the ground first off. Our floor and table got a little sticky from the caramel…
Yay! I can’t wait for the next Daring Baker’s Challenge!
Whilst baking, I decided to be thematic and listen to the French band Autour de Lucie’s first album L’échapé Belle (It was released here in the US under an eponymous CD). Think of an early 90’s jangly guitar alt pop band like The Sundays, but with a French singer. Breezy and perfect for baking an elaborate confectionary dessert.
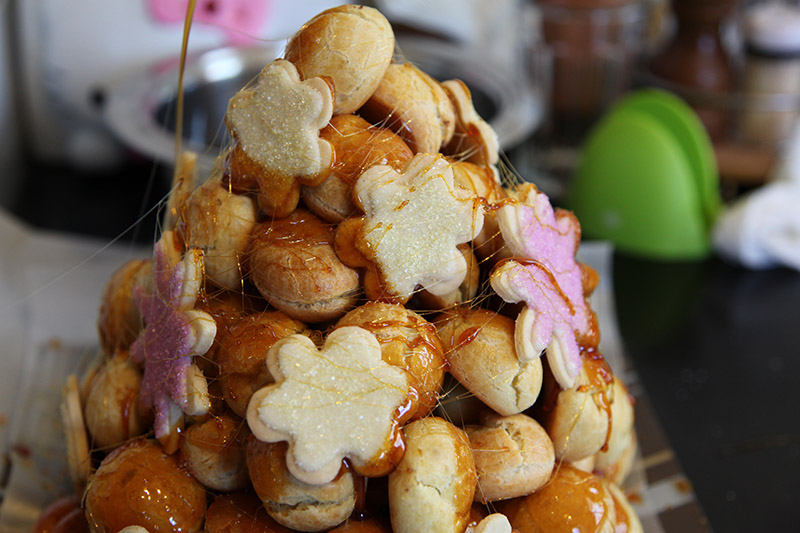
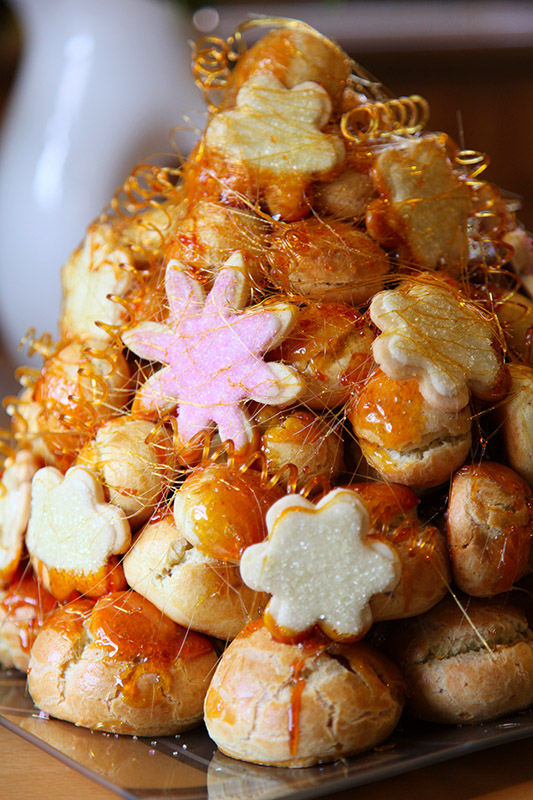
Crochembouche with spun sugar and caramel pastry cream or chocolate pastry cream and decorative sugar cookies.
Based on a recipe from Peter Kump’s Baking School in Manhattan and Nick Malgieri
A crochembouche is a tall pyramid (or cone) shaped dessert often served at French weddings, baptisms or first communions. It consists of profiteroles (small creampuffs) stacked and glued together with caramel or chocolate and often decorated with spun sugar.
This recipe seems really long and elaborate. Just keep in mind, it’s much less difficult than it sounds. You need to make the profiteroles, the pastry cream and the “glue” which can be chocolate or caramel. That’s it.
To make the profiteroles you’ll need to make the pastry cream first and let it chill overnight. I filled half my profiteroles with caramel pastry cream and half with chocolate pastry cream. Here’s the recipe for both:
Caramel Pastry Cream
Adapted from Hungry Cravings
2/3 cup plus 2 Tbsp sugar
1/4 cup water
1 cup whole milk
1 cup heavy cream
4 Tbsp cornstarch
1 large egg
2 large egg yolks
1 Tbsp unsalted butter
1 tsp vanilla extract
1. Combine 2/3 cups sugar with the water in a medium heavy pan. Bring to a boil, swirling it around until the sugar starts to melt and begins to turn brown. Watch it carefully and as it reaches the point of dark amber (be careful not to burn it, if it goes black and smell burnt, start over), remove it from the heat (or turn the stove off if you have a gas stove) and CAREFULLY pour the milk and the heavy cream into the pan. The caramel will steam and bubble so you’ll want to be careful about this. This is also why you want a medium pan and not a small pan. You don’t want the caramel bubbling over onto the counter or the stove (it’s a pain to clean up).
2. The caramel will seize up and harden, so return the pan to the stove and turn the heat up to low and whisk the mixture until all the caramel dissolves into the milk. Bring the mixture to boil and then turn off the heat.
3. Whisk the cornstarch, the remaining 2 Tbsp sugar, egg and egg yolks together into a smooth paste. Pour a thin stream of the caramel milk into the paste while whisking to help loosen up the paste. Once you’ve incorporated all the milk, pour the entire mixture BACK into the medium pan.
4. Cook the entire caramel custard on medium heat for 2 or 3 minutes until it thickens and comes to a boil. Immediately strain through a fine mesh sieve into a clean bowl and mix in the butter and the vanilla. Put plastic wrap directly on the surface of the custard to prevent a skin from forming and refrigerate overnight.
Note 1. This recipe makes about 2 1/2 cups of pastry cream.
Note 2. When making caramel, try to use a regular pan and not a nonstick pan. You can tell the color of the sugar as it carmelizes better in a pan with a silver bottom. That doesn’t mean you can’t make it in nonstick pan, you just have to watch it more carefully. If you take the caramel too far and burn it, you’ll have to start all over.
Note 3. You might want to ask someone to help you while you pour the hot caramel milk into the cornstarch. If not, put a damp towel or silicon hotpad underneath the bowl to keep it from sliding around. You don’t want to pour hot caramel milk on the table or worse on to you.
Note 4. Don’t use organic sugar when making the caramel. The impurities in organic sugar make it nearly impossible to caramelize (I learned this the wrong way). You want refined white granulated sugar (vegan granulated sugar is fine).
Note 5. The custard is actually quite dense. If you want to lighten it (and stretch it out further), you could fold in some whipped cream to the mixture. You’ll get quite an arm workout doing it, but the pastry cream will be much lighter with more volume for your effort.
Note 6. Here’s a little trick I learned from Sherry Yard (awesome Executive Pastry Chef for Spago) If you are pressed for time, and can’t refrigerate the pastry cream overnight, spread the pastry cream on a baking sheet lined with plastic wrap and put another sheet of plastic wrap directly on the surface to keep a skin from forming. The thin layer of pastry cream will cool much faster than it will sitting in a bowl and can be used within the hour.
Chocolate Pastry Cream
Adapted from About.com
1 cup whole milk
1/4 cup heavy cream
2 oz bittersweet chocolate, chopped
3 egg yolks
1/4 cup granulated sugar
1Tbsp all purpose flour
1 1/2 tsp cocoa flour
2 Tbsp plus 2 tsp cornstarch
1 tsp pure vanilla
1. Whisk together the egg yolks, sugar, flour, cocoa powder and cornstarch until it’s a paste.
2. In medium pan, heat the milk and cream until it steams (but don’t boil it).
3. Take the milk and add the chopped chocolate and stir until it melts.
4. Pour about half of the chocolate milk in a thin stream, into the the egg mixture while whisking it. Once the paste has been loosened and thinned down, pour it back into the pan with the chocolate milk.
5. Heat the entire chocolate custard for a minute or two until it starts to get very thick (170˚ on a digital themometer if you want to double check, I just eyeball it).
6. Pull it off the heat, transfer to a bowl and mix in the vanilla. Put plastic wrap directly on the surface of the pastry cream to prevent a skin from forming and refrigerate overnight.
Note 1. Most of the notes for caramel pastry cream are also applicable to this pastry cream. This recipe makes about 2 cups, a little bit less than the caramel recipe, so keep that in mind.
Pate a Choux
To make the crochebouche that I did, I tripled the recipe. However, I made the recipe one batch at time. So while the first batch was baking, I started making the second batch.
Base Pate a Choux recipe
3/4 cup water
6 Tbsp unsalted butter
1/4 Tsp. salt
1 Tbsp sugar
1 cup all-purpose flour
4 large eggs
1 large egg yolk lightly beaten with 1 Tbsp of water for the egg wash
1. Pre-heat oven to 425˚F degrees. Line two baking sheets with parchment paper or silpats.
2. Put the water, butter, salt and sugar in a pan over medium heat and bring to a boil, stirring to melt the butter. Once it is boiling, remove from heat or turn off your gas burner and sift in the flour and stir to combine completely.
3. Put the pan back on the stove on medium heat and stir the batter until it dries out slightly, darkens (just a shade darker) and starts to pull away from the sides of the pan (if you are using a nonstick pan, then the batter will immediately pull away from the sides already, and you’ll just have to keep a closer eye on the batter to see how it dries out a little and darkens ever so slightly).
4. Put the batter in a standing mixer, and turn the mixer (with the paddle attached) for about 30 seconds to cool the mixture. Add 1 egg and mix on medium. The batter will at first look loose and shiny, but the egg will absorb and start to look dried out.
5. Once the egg is absorbed into the batter and the batter sort of has the consistency of mashed potatoes, add another egg and repeat the process.
6. Once all four eggs are incorporated, transfer the batter to a pastry bag fitted with a large open circular tip. Pipe about 1 1/2” wide by 1” tall pate choux about 1 inch apart on the baking sheet.
7. With a clean finger dipped in water, pat down the tips of the batter, so it is smooth on top, but still retaining their ball shape. Brush each of the profiteroles with the egg wash and bake in the oven for 10 minutes or until they are puffed up and turning golden. Switch the pans around
(to help mitigate any hot spots in your oven) and reduce the temperature to 350˚ and bake them for another 20-30 minutes until they are well colored and dry (the time varies so much because of how big your pipe your profiteroles).
8. Cool the profiteroles to room temperature and fill them with your choice of pastry cream.
Note 1. You can make your profiteroles the day before, stored in an airtight box overnight, or freeze them. If you do, they will soften, and you will want to crisp them up again in the oven for 10 minutes or so on 350˚ before filling and assembling.
Filling the profiteroles
1. Put your pastry cream into a pastry bag fitted with a medium star tip.
2. Take a cooled profiterole and stick the pastry bag tip in the bottom and pipe the custard into the puff pastry until it is full.
3. Repeat until all the profiteroles are full or until you run out of pastry cream.
Assembling the Croquembouche
The hard caramel glaze
1 cup sugar
1/2 tsp lemon juice.
1. Fit a double boiler or a clean metal bowl over a pot of water, letting the water touch the bottom of the bowl. Turn the heat on and let the water come to simmer.
2. Put the sugar in a small heavy pan with the lemon juice and turn the heat on to medium low. Swirl the sugar in the pan until it starts to melt. Paying careful attention, melt the sugar and watch it as it caramelizes. When it turns a dark amber color, take the pan and carefully pour the caramel into the double boiler/metal bowl over pot of water. The caramel will be very thin but will thicken as it cools.
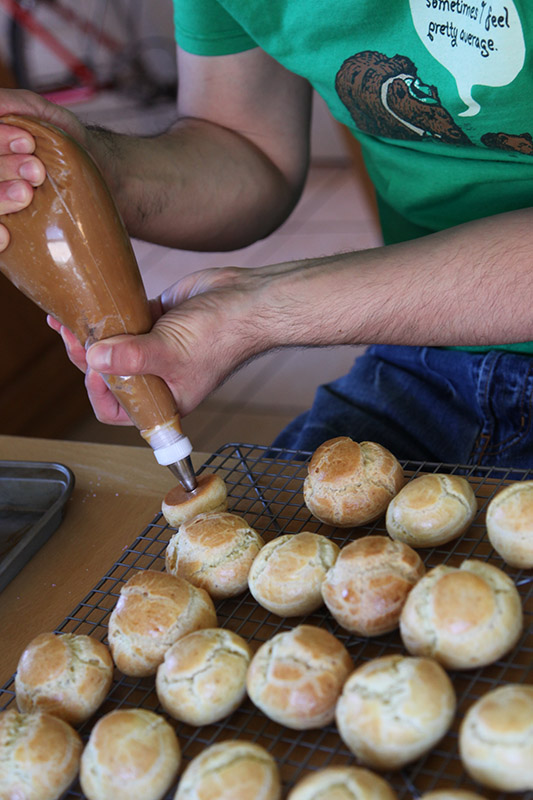
3. Carefully dip the top of one of the larger profiteroles into the caramel and place it on the plate. Dip a second large one and start to make a ring for the base. Once you’ve finished the ring, continue dipping and glazing the profiteroles using the glaze to glue the pyramid cone together.
4. Once you’ve used up all the profiteroles and formed the pyramid, decorate the crouchembouche with spun sugar, caramel spirals, caramel stars, decorative sugar cookies, ribbons, edible flowers, berries or whatever you desire.
Note 1. As I stated in the instructions, you’ll want to sort your profiteroles by size, the larger ones on the bottom the smaller ones on top. I actually intentionally made two different size profiteroles, one smaller and one bigger for this reason. You’ll might also want to sort of stack some of the profiteroles, make a practice one by stacking them before you make the glaze to see how they fit together best.
Note 2. I found that I had to make three batches of the caramel glaze to create the entire crouquembouche. I like making the caramel glaze in smaller batches, as I used it up, so I don’t have to worry about having a huge amount of leftover caramel glaze hardening before I used it up. As you make the second and subsequent batches, just pour the glaze into the bowl with the old hardened glaze. The heated caramel will melt any residual glaze, making it useable again.
Note 3. Be really careful with the caramel glaze. It’s WILL burn you. That stuff is hot! I highly recommend having a bowl of ice water next to you in case you get hot caramel on yourself. That way you can stick your hand in it immediately if there is an accident.
Spun sugar
Take leftover glaze from the caramel glaze and, while it is still thin and workable, stick two forks in it and just swirl the forks with the caramel around the crouchembouche to create fine threads of caramel. Once you start working with the caramel you get a feel for how cool you need the caramel to be to create the threads. Too cool and it won’t fall properly. Too warm and it will just drop and not form threads.
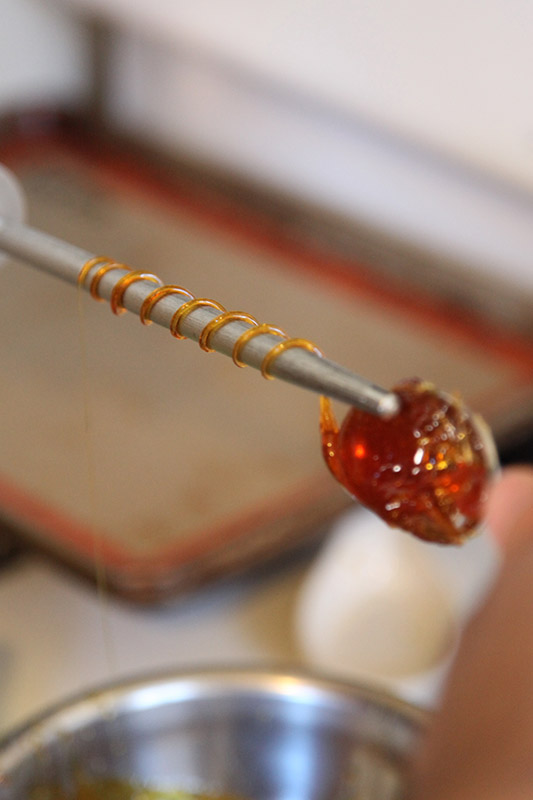
Caramel Spirals
Oil a clean knife steel and spoon warm barely pliable caramel and drizzle a thread of the caramel, wrapping it around the steel. Pull off and use as caramel spirals. Again you will get a feel for the caramel as you make these. The caramel has to be cool enough (nearly too cool to work with) to wrap around the steel. Any warmer and it will just slip right off the steel.
ap269 says
Really enjoyed reading your long story. And I absolutely love the caramel corkscrews. Good job on the challenge!
bcswerit says
that is truly beautiful! well done!
chef_d says
Your piece montee is beautiful! Very nicely done!
Karen @ Citrus and Candy says
Your croquembouche is beautiful! I love the idea of using sugar cookies as decorations and yay to spun sugar fun 🙂
sweetdiscovery says
Gorgeous! I love your decorated cookie additions too. Well done!!!
maybelle's mom says
enjoyable blog. and, i also fed mine to a toddler, but we ate ours outside so she could run the sugar energy off outside.
Poires au Chocolat says
Looks lovely – the sugar cookies are a great idea. I enjoyed your whole story, too.
shelley c. says
Really beautifully done. Chocolate and caramel pastry cream both sound delicious! And your spun sugar is so impressive. Truly beautiful job.
kudzu says
Fabulous job! Can't believe it's your first go, considering how professional it looks.
Loved the small photo where you're carrying the finished product and the design on your tee looks like a flag flying atop the tower!
….and how nice to have such supportive, appreciative and lovely friends (esp. the affectionate babies).
Emily says
OMG this is gorge Ivin!
Basht says
It's so pretty and the flowers make it perfect for spring!
HIpGayChemistryTeacher says
It was amazing! Caramel & more caramel (with some chocolate)! I loved it!
Rita says
Utterly beautiful. The spun sugar looks magical, and those cookies are pretty enough to design a whole Web page around! Absolutely stunning, congratulations!!
Ruth H. says
I love the combination of the cookies and the spun sugar! It really makes your croquembouche a work of art! Great job!
fulltimefoodie says
Your piece montee looks beautiful!!!!!! I love the flowers!!!
fulltimefoodie says
Your piece montee looks beautiful!!!!!! I love the flowers!!!
Mr. Jackhonky says
so much love! Thanks everyone! I had the best time making it!
Now I want to make more spun sugar creations… so much fun!
petoke says
holy moly, that is some fancy stuff you are doing. FANCY. I love the pink cookies; so pretty.
also dig those photos of cute Lily & her blonde boyfriend.
I'm also really excited to find out what "piece montee" is. I have a jacket, and "piece montee" is the brand name. have always wondered what it meant.
Baking Addict says
Wow what a beautiful creation. Love the sugar cookies. Very Martha Stewart 🙂 Great job on the spun sugar – amazing!
Laura says
Wow, you really went the extra mile, making the cookies and the caramel corkscrews! Very nice! Well done. It looks beautiful.
Tara says
Beautiful! (And delicious, I'm sure.) Nick Malgieri's recipes really are fool-proof. (Full disclosure: I'm an alumnus of ICE, so I'm practically required to like Chef Malgieri.) Spun sugar is such fun, isn't it? At a restaurant I used to work at, we'd make spun sugar "nests" for one of our desserts. Crazy-messy to make, but the end product looked like spun gold – just don't try it in a humid kitchen! Anyway, I have no reason to make a croquembouche in the near future, but you're making me want to anyway . . . evil, 😉
Mr. Jackhonky says
@petoke. Thanks. Lily and Brady were adorable! They entertained us with their antics for most of the evening.
And I love that you have a jacket with the brand name "piece montee." Fancy!
@Baking Addict & Laura. Thanks! The spun sugar was crazy fun. I DID feel very Martha Stewart making the cookies and everything.
@Tara. I didn't know you went to ICE! I have long dreamed of going to culinary school, but I can't really justify the cost, as I have no real desire to work at a restaurant on a day to day basis.
The next time I have a fancy dinner, I'm totally going to make something with spun sugar. it was too much fun…
And yes, I'm SO glad I had an excuse to make a croquembouche. I've always wanted to make one! But no real reason to!
Renata says
Very beautiful Croquembouche! Lovely decoration with spun sugar and the cookies are so delicate!
aol says
OMG! I want to move to San Fran just so I can come over for your mystery parties darling. I miss you.
Anna
Tracy says
I used only 3 eggs for the choux. The first time I used 4 and it turned into a sloppy mess. Aside from this, it's a good recipe.
Délices says
Beautiful and delicious,congratulations!!
Bozenka says
All I can say is … WOW, totally and completely amazingly impressive. Stunning and beautiful. You are sooooo clever and your lucky friends and family get to share.
essaypro.com review says
According to their adverts, they are the only they are the only ones that offer editing assistance. The company claims that they have good referencing techniques that enable their writers to put most convenient references to their essays, yet comments that the customers make about their services confirms otherwise.