• Skip to primary navigation
  • Skip to main content
  • Skip to primary sidebar
  • My Cookbook: Marbled, Swirled, and Layered
  • Recipes
  • Travel & Events
  • About this Blog
  • Bio
  • FAQ
  • Work with Me

Eat The Love

Recipes, Photographs and Stories about Desserts, Baked Goods and Food in general, with a healthy dose of humor and happiness for the food obsessed

You are here: Home / Kitchen Tips / Peeling Carrots: I’ve Been Doing it All Wrong!

Published: April 9, 2014 45 Comments

Peeling Carrots: I’ve Been Doing it All Wrong!

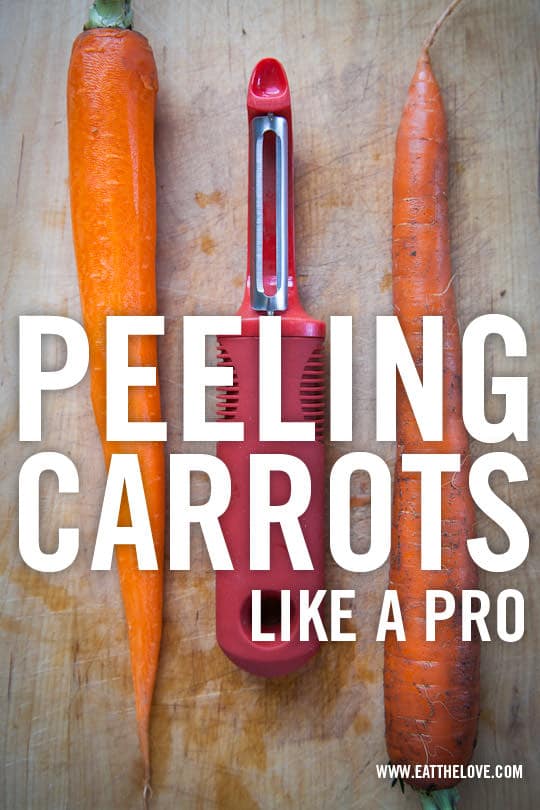
This quick tutorial on peeling carrots like a pro will save you time in the kitchen.

Peeling Carrots like Pro. Photo and technique by Irvin Lin of Eat the Love. www.eatthelove.com

When you attend culinary school, one of the main things they teach you is efficiency. Efficiency of time, efficiency of ingredients (no wasted ingredients in a professional kitchens!) and efficiency of tasks at hand. I like to think I’m relatively efficient when it comes to cooking (I always set up a mise en place beforehand) but little basic tasks like peeling carrots seem like a no brainer. Turns out I’ve been peeling my carrots ALL. WRONG. Taking the Techniques I class at Le Cordon Bleu showed me the error of my ways.

How to Peel a Carrot. Photo and technique by Irvin Lin of Eat the Love. www.eatthelove.com

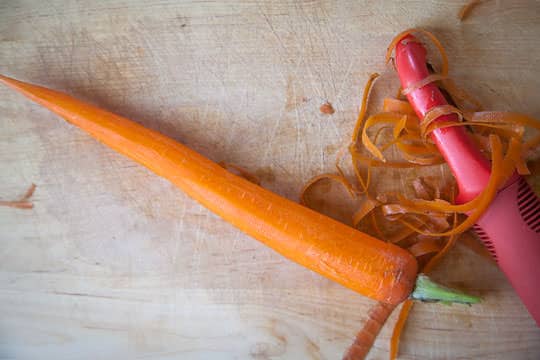
Here’s the thing. Most people (most being me included) peel carrots over a trash can so the peels go directly into the trash (or compost bin if you do that sort of hippie thing). But there are two problems with that. The first is the clumsiness factor. I’ve been known to drop a carrot in the trash when I do this and that’s just kind of gross because I have to fish it out and wash it. But the second is that vegetable peelers have TWO blades. Which means if you’re peeling the carrot over the trashcan, you’re probably peeling it in on direction (pulling the peeler downward, lifting it up and peeling it downward again after you’ve turned the carrot slightly). That means you’re doing twice the work with only one side of the peeler!

Most carrot peelers have two blades! Photo by Irvin Lin of Eat the Love. www.eatthelove.com

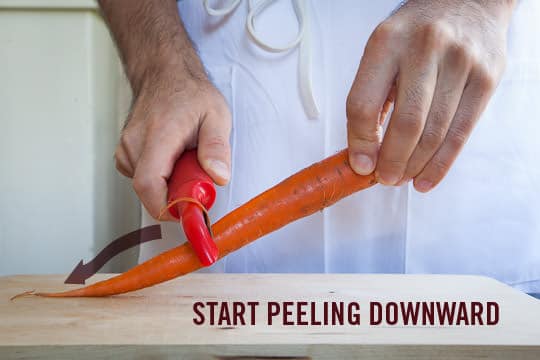
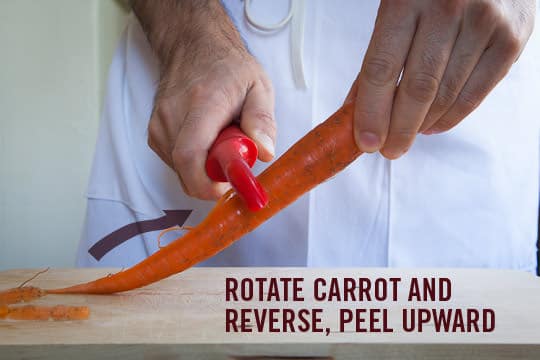
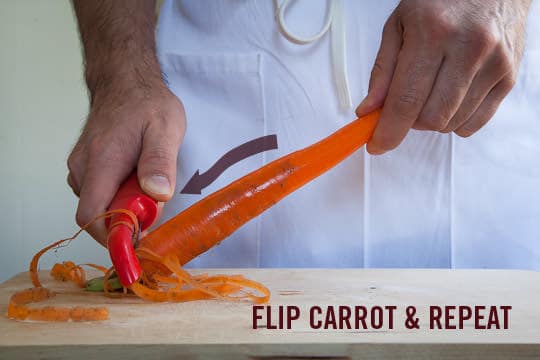
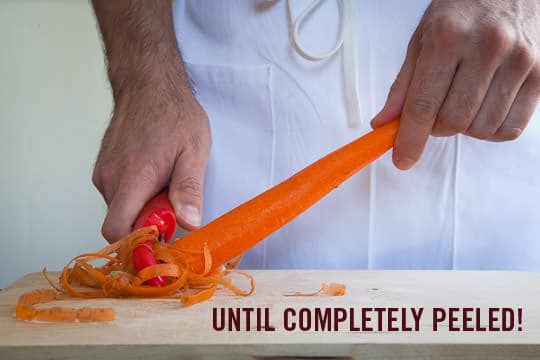
The professional method for peeling carrots is easy and fast. Though it won’t make a huge difference in time when you are only peeling one carrot (though it might save you from accidentally dropping it in the trash), if you have a bunch of carrots to prep (say for a stew or stock) it will be a total time save for you. All you need to do is place the carrot with the point side down on a cutting board and lift it up in a 45 degree angle. Start peeling the carrot from the middle, going back and forth up and down the carrot, rotating it as you go, stopping in the middle. Then flip the carrot over and do the other side and you’re done.

Peeling carrots starts with holding the carrot at 45˚ and peeling downward. Photo and technique by Irvin Lin of Eat the Love. www.eatthelove.com

Rotate the carrot and peel upward using the other blade. Photo and technique by Irvin Lin of Eat the Love. www.eatthelove.com

Flip the Carrot and repeat the peeling. Photo and technique by Irvin Lin of Eat the Love. www.eatthelove.com

Until your carrot is completely peeled! Photo by Irvin Lin of Eat the Love. www.eatthelove.com

Because describing this simple task isn’t the easiest to describe (even with the photos above), I’ve also included a video here that shows you exactly what I’m talking about. Now you too can peel carrots like a pro!

I’m sharing recipes and tips I learned from the Le Cordon Bleu Techniques I class all this week. Be sure to come and check them all out!

Filed Under: Kitchen Tips, Odds and Ends Tagged With: carrots, kitchen tip, le cordon bleu, peeling carrots, video

Reader Interactions

Comments

  1. Erin | The Law Student's Wife says

    April 9, 2014 at 6:26 am

    WHAT? How am I just seeing this! I will never bake carrot cake the same way again. Great tip!

    Reply
  2. Maggie @ A Bitchin' Kitchen says

    April 9, 2014 at 6:47 am

    I am soooo trying this! I cut up a crapton of veggies at the beginning of every week for snacking purposes, and peeling carrots is my least favorite part of the process.

    Reply
  3. Christine from Cook the Story says

    April 9, 2014 at 7:21 am

    You just added 25.2 seconds onto my day! You’re my hero!

    Reply
  4. Sarah | The Cyclist's Wife says

    April 9, 2014 at 8:27 am

    Whoah! Mind. Blown.

    Reply
  5. The Suzzzz says

    April 9, 2014 at 8:38 am

    At first I thought this was How To Boil Water: Redux…now I feel sheepish…and I want to run to the grocery store after work to get some carrots to try this out on.

    Reply
  6. Eileen says

    April 9, 2014 at 10:47 am

    Such a simple idea, but such a great result! And it lets you save the peels for stock instead of just chucking them too.

    But I also have to mention my carrot-peeling method: I don’t do it at all. A quick scrub under running water is my normal routine. Super effective! 🙂

    Reply
    • Irvin says

      April 9, 2014 at 11:58 am

      That works too! But I’m old school and peel, especially when I’m making carrot sticks (I make a TON of carrot sticks to snack on). But when I’m snacking on a whole carrot, I don’t bother to peel. I just wash and scrub and bite away.

      Reply
  7. Pat Sayer Fusco says

    April 9, 2014 at 11:42 am

    Yes, you did teach an old dog a new trick.

    Reply
    • Irvin says

      April 9, 2014 at 12:00 pm

      Right?! And it wasn’t even a “taught” thing in the class. I saw a fellow classmate struggling with a vegetable (she was peeling over the compost bin and dropped it in) and ANOTHER instructor was walking through the class and saw her do that. He told her how to peel the “proper” way on the cutting board. I just saw it from the corner of my eye…

      Reply
  8. Keri says

    April 9, 2014 at 11:44 am

    Now we are going to look to you for lessons on peeling potatoes and prepping green beans. If carrots can be faster, maybe these chores can be as well!

    Reply
    • Irvin says

      April 9, 2014 at 12:02 pm

      Actually you can use the same method with potatoes, but it’s not quite as fast as the carrot (because of the bulkiness of the potato). But it will work and will still be faster than the regular method of peeling in one direction over a trash can.

      Sadly no tricks on speeding up prepping of green beans though!

      Reply
      • Katie Gibbs says

        April 10, 2014 at 4:16 pm

        I have found that the quickest way to prep green beans (and by “prep” I just mean cut the little ends off, although I think that some people also pull the “string” out, so this does NOT accomplish that…) is to put the green beans on the cutting board, roughly lined up (side-by-side, not end-to-end), then take the knife (a long-bladed chef’s knife) and sort of “push” them so that their ends are lined up. Then take the knife and chop off the ends of the beans. Then I push them from the other end, lining up the still-uncut ends, and use the knife to chop off all THOSE ends. Does that make sense?

        Reply
  9. Miss Kim @ behgopa says

    April 9, 2014 at 12:00 pm

    Haha is that you in the photos and video? Looks like you are learning a lot in the class!

    Reply
    • Irvin says

      April 9, 2014 at 12:02 pm

      It is. I set the camera on a pile of books and did those photos and video with the timer!

      Reply
      • Miss Kim @ behgopa says

        April 9, 2014 at 12:20 pm

        Oh cool! You sound a lot like how I imagined hehe. You know how some people sound nothing like the way you pictured them to sound when you finally do hear their voice (if that makes any sense)? I hope you post more videos. It’s pretty cool!

        Reply
  10. Liren says

    April 9, 2014 at 2:19 pm

    Who knew? I’ve been doing it all wrong, too!

    Reply
  11. Belinda @zomppa says

    April 9, 2014 at 2:52 pm

    Well there you go!! No excuse for no carrots!

    Reply
  12. Katrina @ In Katrina's Kitchen says

    April 9, 2014 at 3:46 pm

    I am such a nerd. I can’t wait to try this.

    Reply
  13. Laura @ My Friend's Bakery says

    April 9, 2014 at 8:09 pm

    I’ve been doing it all wrong too! Such a simple thing and yet you have to go to culinary school to learn it! Thanks for the sharing the great tip!

    Reply
  14. Debbie D says

    April 10, 2014 at 2:52 am

    Used to peel a carrot that way until I peeled my finger tips! OUCH! Went back to the other way of doing it.

    Reply
    • Irvin says

      April 10, 2014 at 12:57 pm

      Ouch! I haven’t had an issue with it, and I’ve actually nicked myself the other way a few times (I mentioned I was clumsy right?). But whatever method you’re comfortable with works!

      Reply
      • Katie Gibbs says

        April 10, 2014 at 4:19 pm

        What’s funny to me about this is that I *clearly* remember being about 7 years old, attending a summer camp, and learning *always* to peel AWAY from your hand/fingers, never TOWARD. I am 45 now, and I can still picture that lesson clearly. So I always peel away. However, I just hold the carrot at a 45° angle on a cutting board next to the sink, which holds a compost container, and quickly peel away from the hand that holds the carrot while rotating it. I think it’s just as fast.

        Reply
  15. Joanie @ Zagleft says

    April 10, 2014 at 4:31 am

    Wow! I’ve been doing it wrong all this time. They peel so quickly this way – it makes sense. I’m loving all these tips this week – thank you.

    Reply
  16. Barbara @ Barbara Bakes says

    April 10, 2014 at 4:58 am

    I’m definitely trying this out next time I peel a carrot. Who knew!

    Reply
  17. Robin @ Simply Southern Baking says

    April 10, 2014 at 6:57 am

    Oh my! I’ve been peeling carrots with one side of the blade for all these years. Thanks for the tip…I’ll do this next time!

    Reply
  18. Melissa Lee says

    April 10, 2014 at 7:30 am

    I learned this in culinary school too. Sadly I forgot all about it because I don’t ever peel carrots. Lol! Deconstructing a chicken was a learning curve for especially the thighs. I still hate it.

    Reply
  19. Laura says

    April 10, 2014 at 7:43 am

    I’m in the no-peel camp. Scrub and go.

    Reply
  20. Mary says

    April 10, 2014 at 8:01 am

    Does that mean you can do the same thing to potatos??

    Reply
  21. Mary says

    April 10, 2014 at 8:02 am

    Oh, well I could have answered my own question if I’d read all of the comments! VERY cool. Definately following this blog from now on.

    Reply
  22. michelle says

    April 10, 2014 at 8:08 am

    Really? I never peel toward my fingers. Yikes.

    Reply
    • Irvin says

      April 10, 2014 at 12:54 pm

      It’s true that the peeler could slip, but since I start the peeling in the middle of the carrot, it’s unlikely that it will slip high enough to cut me. And honestly, I tend to hold the peeler fairly firmly as I peel so I have a lot of control over it. I’ve never had an issues!

      Reply
  23. Sarah says

    April 10, 2014 at 8:18 am

    I always thought the double blade was so that lefties could peel things too! I’m a lefty so I notice things like that.

    Reply
  24. Lori @ RecipeGirl says

    April 10, 2014 at 9:20 am

    You’re awesome- I’ve never really thought much about peeling carrots, but I totally have one of those peelers and have never done it that way. Will do so from now on!!!

    Reply
  25. Patrick says

    April 10, 2014 at 9:21 am

    Michelle, thanks gor the video. This is another one you should share. How to peel a garlic clove in 10 seconds

    http://www.saveur.com/article/Video/video-How-to-Peel-a-Head-of-Garlic-in-Less-Than-10-Seconds

    Reply
    • Irvin says

      April 10, 2014 at 12:56 pm

      I’ve done that method before but with varying success. It’s a big messy too, as the garlic oil gets on the bowls and the garlic peel sticks to it. I usually just use the flat of the knife and smash the garlic. But if you have two or three heads of garlic or you want peeled garlic cloves that aren’t smashed, it’s a good method!

      Reply
  26. Faraqh says

    April 11, 2014 at 10:20 pm

    Where can I one?

    Reply
  27. Faraqh says

    April 11, 2014 at 10:21 pm

    Where can get one?

    Reply
  28. Chelsea says

    April 12, 2014 at 8:26 am

    As so often is the case with things like this, now I’m wondering why I never wondered about the two blades before! Thanks for the tip, Irvin, my mind is totally blown.
    Carrot peels never go straight into the garbage at my house – my dog loves carrots, and seeing her snacking on the carrot peels, sticking out like little whiskers while she chomps away, is hilarious.

    Reply
  29. ChefDave says

    April 13, 2014 at 7:00 pm

    A pro makes longer strokes and does not have to reverse the carrot. Two second saved.

    Reply
  30. Sandymg says

    May 8, 2014 at 3:59 pm

    Thanks, must say I’ve not bothered with the 2nd blade, just assumed it was for left handers! However, I shove a bamboo skewer in the end (where the greenery would be) and peel that way, very effective. Particularly useful if you’re using the kind of peeler that juliennes as well for salads.

    Reply
  31. A says

    May 31, 2014 at 10:16 pm

    This is terrific. I’ll be snacking on many more carrots with hummus dip.

    Reply
  32. Hillary says

    July 14, 2014 at 5:04 pm

    Okay, that is officially COOL!

    Reply
  33. Dale says

    October 4, 2014 at 3:05 pm

    You are way off on your dissing composting. If you like food you need to learn that real, good food needs healthy soil full of organic matter and composting is a great way to create healthy soils. And no, I am not a hippie.

    Reply
  34. Barb | Creative Culinary says

    October 23, 2014 at 7:27 pm

    Ah the things I learned from my mom that I always took for granted! I actually find I peel faster if I just go from top to bottom; I cut out that middle business completely.

    Reply
  35. Anamika @ Supplement Crunch says

    September 20, 2019 at 4:07 am

    Wow, this is amazing! I can’t wait to try this peeling carrots………..

    Reply

Leave a Reply Cancel reply

Your email address will not be published. Required fields are marked *

Recipe Rating


This site uses Akismet to reduce spam. Learn how your comment data is processed.

Primary Sidebar

Follow Me On

Twitter-Link-to-Eat-the=Love Facebook-Link-to-Eat-the-Love Pinterest-Link-Eat-The-Love Instagram-Link-Eat-The-Love RSS-Feed-Link-Eat-The-Love
on Mastodon

Available Now: Marbled, Swirled and Layered
Available Now: Marbled, Swirled and Layered Available Now: Marbled, Swirled and Layered Available Now: Marbled, Swirled and Layered

"Mr. Lin, a graphic designer in San Francisco who writes the food blog Eat the Love, takes risks in nearly every one of the 150 elaborate recipes in his book. He doesn’t just paint the lily; he bejewels and shellacs it, too."
–MELISSA CLARK for the New York Times

“My goodness, this cookbook! It’s filled to the brim with recipes for the most splendidly beautiful cakes, cookies, breads, and tarts I think I’ve ever seen. My eyes kept getting wider and wider as I turned every page—both the flavor combinations and the photos are out of this world. Irvin Lin has most definitely outdone himself. This book is a triumph!”
—REE DRUMMOND, New York Times best-selling author of The Pioneer Woman Cooks

“Irvin Lin gives home-baked treats a twist, ramping them up with a range of contemporary flavors that are sure to surprise and delight. From beer-battered brownies to smoky butterscotch taking a classic cake to the next level, I can’t wait to mix, stir, and bake my way through Marbled, Swirled, and Layered!”
—DAVID LEBOVITZ, author of My Paris Kitchen

Search

Subscribe via Email

The Writer, The Baker, The Recipe Maker

Hey there! Thanks for visiting my blog. I'm Irvin Lin, a critically acclaimed cookbook author, IACP-Award winning photographer, IACP-nominated blogger, award winning baker, award winning former graphic designer, storyteller, recipe developer, writer and average joe bon vivant. I currently reside in San Francisco a block from Dolores Park and right near Tartine Bakery, Bi Rite Market & Creamery, and Delfina.

Feel free to contact me by clicking on that picture of me up above or emailing me eatthelove {at} gmail {dot} com.

IACP Photography Contest Best in Show WinnerIACP Photography Contest Best in Show Winner

“Irvin Lin is the creative mind behind his Eat the Love food blog. Lin’s impressive photography skills support his training in graphic design on the site, and you would never believe that is food blogger is a self-taught baker.” - PBS Food

“We love Eat the Love because Irvin's beautiful sweets look as good as they taste — his art director's eye appreciates the ruby sparkle of a pile of pomegranate seeds against the matte canvas of chocolate ganache.” - Saveur.com, Sites We Love

Popular Posts

Brookie Recipe (brownie and cookie) with potato chips, pretzels and double chocolate chips. Photo and recipe by Irvin Lin of Eat the Love.

Brookie Recipe with Salty Sweet Snack Treats

Perfect Soft Boiled Egg. Recipe and Photo by Irvin Lin of Eat the Love. www.eatthelove.com

Perfect Soft Boiled Egg

Korean Fried Chicken Recipe. Photo and recipe by Irvin Lin of Eat the Love. www.eatthelove.com

Korean Fried Chicken Recipe – insanely easy, super addictive

Personal Posts

Mexican Chocolate Corn Coffee Cake by Irvin Lin of Eat the Love.

Mexican Chocolate Corn Coffee Cake (and how AJ and I get engaged)

Grape and Blueberry Pie by Irvin Lin of Eat the Love.

Grape and Blueberry Pie

Crispy Oven Roasted Potatoes by Irvin Lin of Eat the Love.

Crispy Oven-Roasted Potatoes (and remembering a childhood friend)

Marbled, Swirled, and Layered.

My cookbook MARBLED, SWIRLED, and LAYERED

Recent Travel & Events

San Francisco Meals on Wheels Star Chefs and Vintners Gala 2019

Photo Essay: Meals on Wheels Gala 2019, part 2

Meals on Wheels Gala 2019

Photo Essay: Meals on Wheels Gala 2019, part 1

More Travel & Events

Wordless Recipes

EatTheLove Wordless Recipes #1 How to make your own ice cream "magic" chocolate hard shell

WORDLESS RECIPE #1: How to Make Your Own Ice Cream “Magic” Chocolate Hard Shell

Eat the Love presents: WORDLESS RECIPES #2 Halloween Edition - Haunted Honey Caramel Popcorn

WORDLESS RECIPE #2 Halloween Edition – Haunted Honey Caramel Popcorn

Molten-Lava-Chocolate-Cake-Wordless-Recipes-Valentines-Day-Eat-The-Love-Irvin-Lin-cover

WORDLESS RECIPES #3 Valentine’s Day Edition – Molten Chocolate Lava Cake

Bluth's Original Frozen Banana Copycat Wordless Recipe by Irvin Lin of Eat the Love. www.eatthelove.com

Wordless Recipe #4: Arrested Development’s Bluth’s Original Frozen Banana “Copycat” Recipe

Disclaimer

This blog currently has a partnership with Amazon.com in their affiliate program, which gives me a small percentage of sales if you buy a product through a link on my blog. I only recommend products (usually cookbooks, but sometimes ingredients or equipment) that I use and love, not for any compensation unless otherwise noted in the blog post. If you are uncomfortable with this, feel free to go directly to Amazon.com and search for the book or item of your choice.

Copyright © 2010 to 2023. Eat the Love. All rights reserved. | Privacy Policy