There’s a proliferation of lifestyle and food photography that is getting a bit precious. I want to blame hipster food magazines like Kinfolk, Gather Journal and Cereal but the reality is it’s been around since old school color film. Yet, there’s seems to be a renewed interest in cool muted photos with their matte film look and exceedingly pasty white folks all deadpanning for the camera. Isn’t food suppose to be about happiness and joy? Why does everyone seem so serious about their quinoa and summer bean salad? As an Asian, am I suppose to identify with the token Asian girl wearing those oversized heavy black rim glasses? When did high-waisted jeans come back into fashion, because they are really not flattering on anyone’s body type. And why did they put a man with an unkempt beard in the bushes, obfuscating him with leaves? He doesn’t look very happy there.
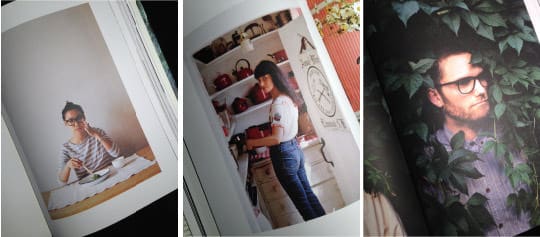
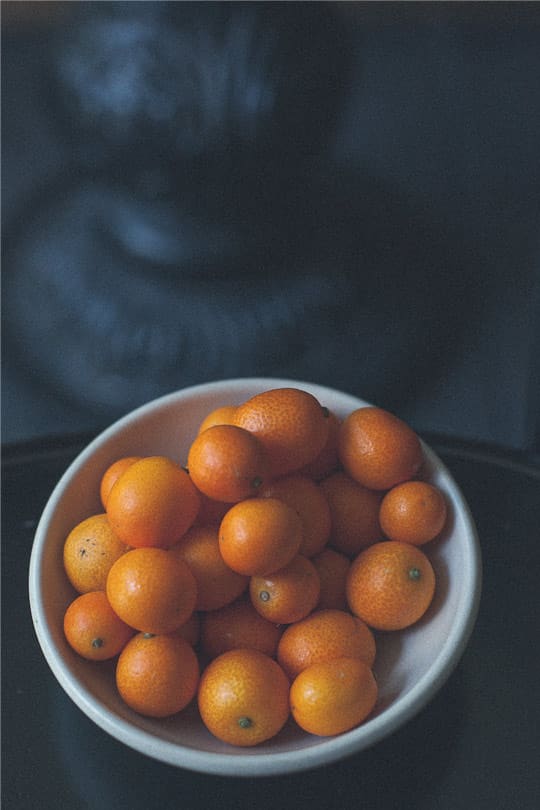
But more importantly, how do they make those photos look so cool and uninviting? Each photograph is blue-gray and looks as if it was printed on uncoated matte paper, as if their lives are constantly awash in a dull slate fog-diffused light. I want my life like that, beautiful and austere, untouchable and unsoiled by humanity. Is it possible to live a life like that, or at least pretend to? Well fear not my fellow readers, because I am here to show you how to create the illusion of matte film photography using Adobe Lightroom.
Now most people who want to create this look just go and buy a preset for it, and certainly there are number of them out there that are lovely. But, if it’s one thing food hipsters are notorious for, is not just their rustic hand thrown bowl full of citrus mint kale salad. It’s that they are always broke. Spending tons of money on heirloom ancient grains means they have less money to spend on buying presets for the computer applications. With that in mind, I create this simple tutorial to show you how to give a photograph a cool matte film look.
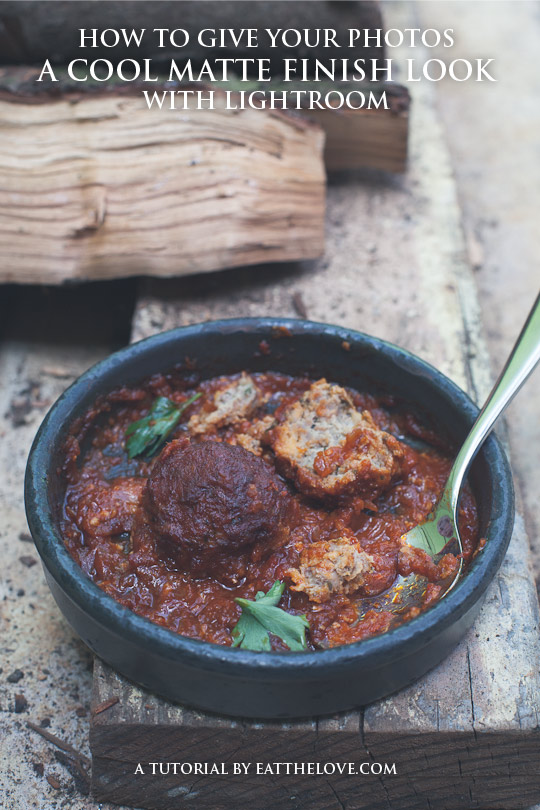
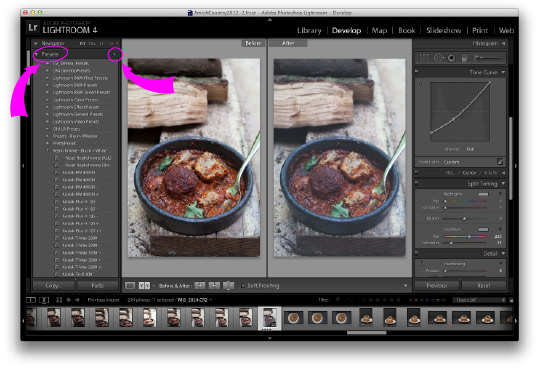
First off, select the photo you want to use. I decided on that my main hero shot was going to be those meatballs that I placed on the ground next to some firewood. It seemed a suitably rustic and utter ridiculous scenario (what, you don’t eat your meatballs off the dirty ground?). Perfect for this look, don’t you think? Select the side-by-side comparison tool so you can see what the image looks like as you change it. In the Develop module, crop the image (if you want to) but don’t do any other changes.
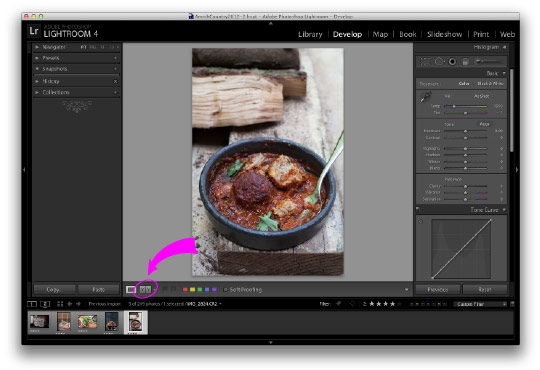
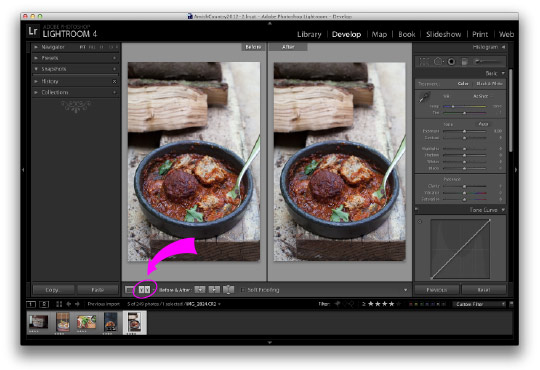
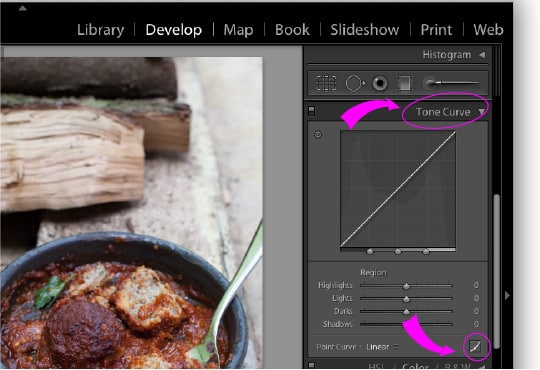
Go down to the Tone Curve section. If you’ve ever used Tone Curves in Photoshop you should be familiar with how it works but if you’ve never touched them before, they can pretty daunting. Don’t worry, I’ll hold you hand through this.Now ignore the Region part of the Tone Curve, and instead click on the little square with the diagonal line in it, the one at the bottom right of the Tone Curve Section. This will allow you to actually modify the entire curve. Once you click on that square the Region section will disappear. Go up to main box with the linear curve and click on the line, somewhere in the first third of the line. You should see some numbers appear at the top left where you clicked. I usually aim for around 35% give or take. No need to be precise, what you are doing is just anchoring the line to that point.
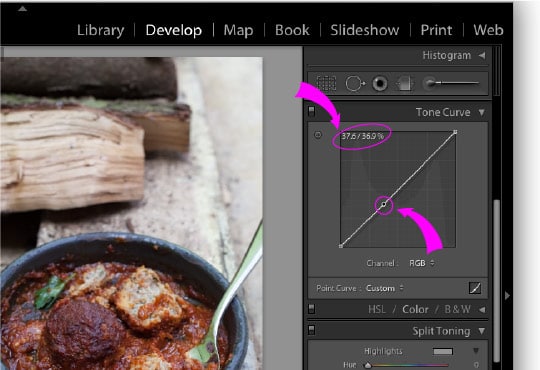
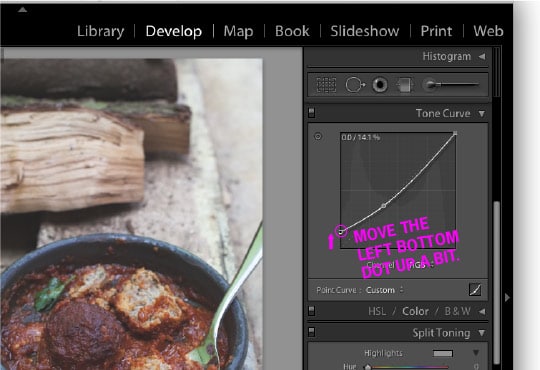
Next go to bottom left corner and pull that point directly up. I usually go to around 13%-ish but how much you want to bring that up is up to you. Some photos will require you bring it up even more, and some less. Basically what you are doing is lightening all the blacks on the photo, to give it a matte look. Easy right?
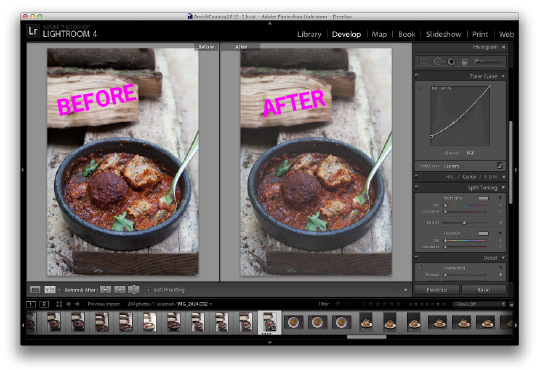
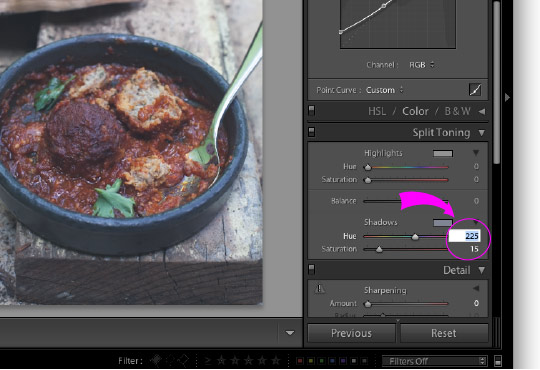
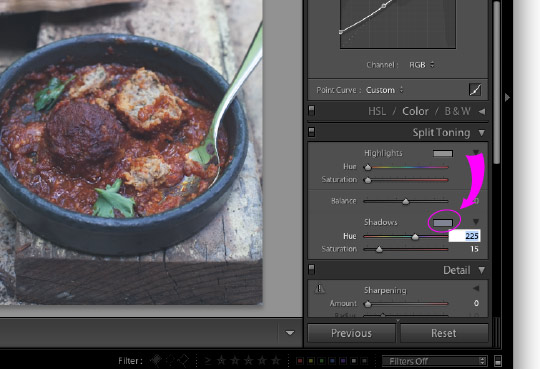
So you have a matte look but you want to give it a bit of cool blue-gray feel to the image as well right? I mean, hipster folks don’t feel warmth. Well it’s just as easy. Go to the Split Toning section and adjust the Shadows so it has a slight blue tone to them. Split Toning adds colors to the shadows or the highlights and is a great way to warm or cool a photo without turning it yellow or blue like the Temperature slider up above has a habit of doing. It’s also how you get funky cross process colors in your photos (if you are going for the upscale cool fashion look). I usually go around 225 for the Hue but you can play around with what sort of blue you like, maybe you want it more green or more purple. If you click the gray rectangle next to the Shadows you can even just use a picker to pick a color. I usually keep the Saturation around 15 (any higher and it starts to feel too artificial) but again feel free to play around with it, as you might want your image very cool blue.
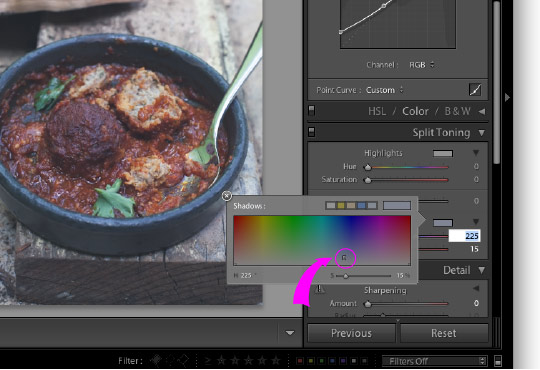
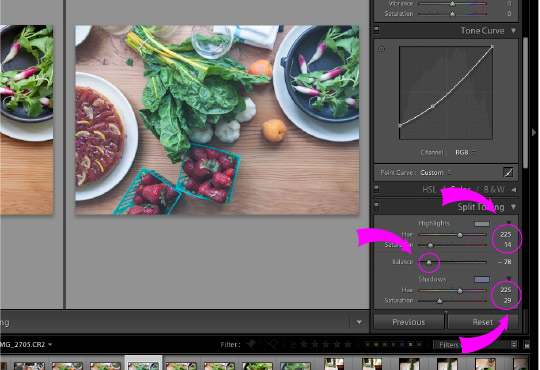
If your image has a lot of highlights in it, you might also want to add some Split Toning to the Highlights but I usually don’t unless the photo is very bright. When I do, I usually use the Balance slider so that the shadows have more color than the highlights. If you slide the Balance to the left, it’s means you’ll get more concentrated Shadow colors, if you slide to the right, you’ll get more concentrated Highlight colors. Play with it a bit to get the feel that you like. Every image is different so not every setting should be exactly the same either.
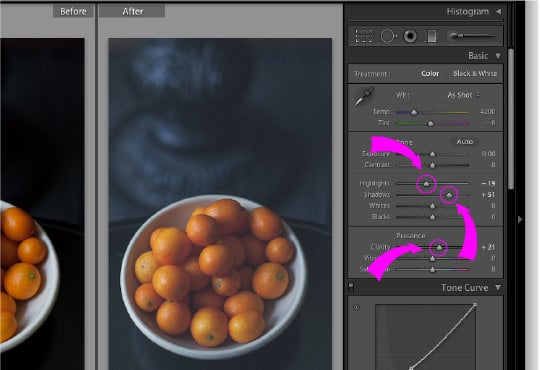
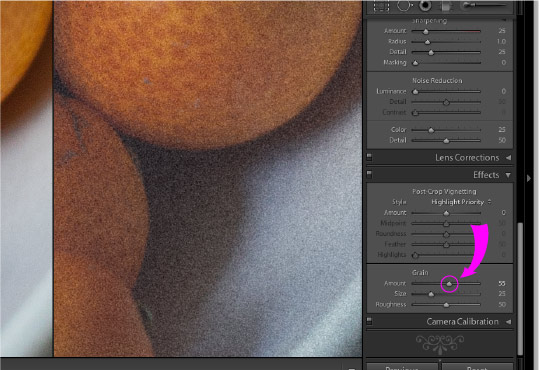
Of course, once you’ve lighten the blacks and added the different Split Toning colors, you should go and do the other adjustments as you see fit. Perhaps you want to bring the shadows up higher, or you want to add a slight vignetting to the image. Do that AFTER you’ve adjusted the Tone Curve and Split Toning to make sure it’s the effect you really want. If you REALLY want to go all out, you can even add Grain under the Effect section to the final image, achieving that much sought after film look that all hipsters love.
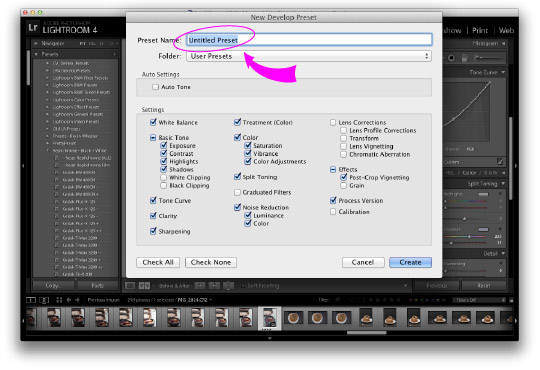
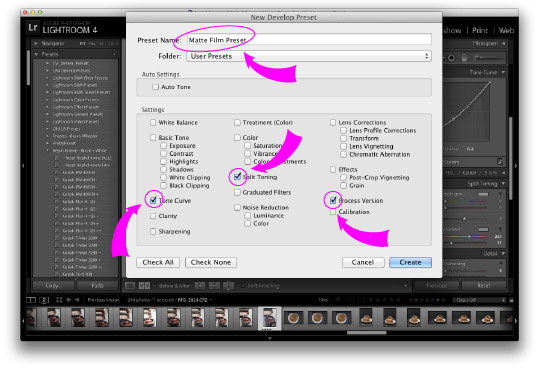
Finally, once you created the image look that you like, go over to the Presets and click on the + button next to it. You can save your settings with it’s own preset, meaning you can apply these changes to any photos you want. Since we’ve only changed the Tone Curve and the Split Toning, be sure to click off of all the rest of the settings. Leave the Process Version checked though (in case you upgrade your Lightroom to a new version this will notify the new Lightroom what version you saved the Preset as). Name the preset whatever you want, and you’re good to go! Precious photos in less time than it takes to iron those acid washed skinny jeans or comb that overgrown beard. Oh wait, they don’t bother to groom them. That explains so much.
The Suzzzz says
I remember a simpler time when all you had to do to get a matte finish was call B&H (as long as it wasn’t on a Jewish or Christian or federal holiday) and order matte paper of your choosing, wait the estimated shipping period, then spend hours in the dark room printing photos, wait for them to dry and then, voila! Matte finish photos…oh wait…your way is TOTALLY simpler, but the technophobe in me is still scared of lightroom.
Carrie @ Bakeaholic Mama says
What a great post. I have been pondering how to create this look with my photos for quite some time. I might have some fun in lightroom tonight!
Renee says
Loving your Lightroom tutorials. Learning so much! I have not tried this effect but I’m going to practice it on a few pictures now.
Lindsey (Cafe Johnsonia) says
Oh, Irvin! You are too funny for your own good. Maybe. I am happy to finally know how to make my photos look hipster. Thank you!
Kristin Nicole says
If you don’t have lightbox do you recommend using another application?
Daniela @ FoodrecipesHQ says
Aahahah the funniest tutorial I’ve ever read!
Thanks, you don’t know how long I’ve been looking for this info. Thanks, thanks, thanks.
Katie @ Butterlust Blog says
Great tutorial! Informative and humorous! I just followed step-by-step and VOILA instant hipster!
Kate@Diethood says
I’ve always obsessed over those rustic photos and I learned how to do it early on because of my interest. I have Photoshop and I love using this little trick.
Winnie says
You crack me up. I actually don’t love this look, but it may be fun to play with sometime. Thanks for the tutorial!
heather says
Irvin, you are hilarious! The guy in the leaves – I’m crying!
I could not love you more. Seriously.
Shanna@ pineapple and coconut says
I named my preset ” too cool for hipsters”
Fernando says
I have been looking for this tutorial for ages now. I just didn’t know how was this technique called. Found you on Pinterest, and I am glad I did.
Thank you very much for sharing.
Love from Brazil.
Irvin says
Glad you found it! Happy to help.
Danuta says
Thanks! This post is great! I’ve been crating this look in Photoshop long time ago but I wasn’t sure how to repeat it in Lightroom. So easy:)
Carlos Rey says
Just, thanks… for share, for teaching, for all, …
Alanna says
Irvin! This is fantastic! I’m so glad to know how to create this look – my mind is blown. Too much fun. How you managed to make such a hilarious and saucy post that was also so informative, I’ll never know. You amaze me. Thank you for this.
Rebecca Barnhill says
thank you for this tutorial! I wanted to share that if you move the dot (in the tone section) up AND over, as to create a horizontal line, that it can create the same effects, in a different way. Very nice touch especially if you combine with the split toning. Thanks again!
Irvin says
Thanks for sharing! I feel like there are always different ways to play around with images in Lightroom. Glad you shared this effect, as it can also give some really interesting looks the photo.
Loving life naturally says
For some reason I’m not able to move my dot on the tone curve up! Please help! 🙂
Irvin says
Under the tone curve box, do you see a box that says Region with four sliders, Highlights, Lights, Darks, Shadows? IF so, you DON’T want that showing.
To turn that off, at the bottom of the right corner of the Tone Curve box, there is a little square next to the “Point Curve: Linear” with a tiny curve (and dot) in it. Click that square once, so that the Region box and sliders go away and all that’s left is a “Channel: RGB”. You should be able to adjust the dot now.
Rich K says
Leave that tone curve dot where it is. It’s happy there.
Christina says
thank you for this incredible post. ps you are also really funny, this made me laugh out loud!!
Alisha says
this was just what I needed! And I’m making presets to use on photos of food, so hey, totally perfect 🙂 Thank you!
The Suzzzz says
I am just learning lightroom and I wanted to do this to a couple photos but I couldn’t find a preset that came with the program that did it and I didn’t want to buy it. It took me a while but I finally remembered your tutorial here. Thank You!
Seema says
This is the best tutorial I’ve seen for this effect thank you so much! Much better then buying a preset any day!
ellie | fit for the soul says
It’s so great to keep up with you again! I met you at Foodbuzz about 3-ish?? years ago and you write exactly how you talk, bahaha. And your tutorial and site overall are amazing! Please keep them coming as you find time, because you have a way with teaching, Irvin!
Irvin says
Oh thank you! One of these days I’ll do more tutorials. They’re a little time consuming to do but super fun!
Nick B says
Thanks so much! Very helpful and just the right amount of hilarious!
Sara ~ Loving Life Naturally says
FINALLY! I got it 😉 Well I just attempted again and it worked! My next blog post of roasted chickpea’s will show the proof! Thank you so much for this tutorial!!!
Mallika says
Thank you so much! Have been looking around for something like this for a while now. 😀
Iris @ Earth Love Skin says
Love how simple your Lightroom tutorial is! I’m years experienced with Photoshop but recently tapped into Lightroom for post-processing my photos. Thank you! I’ll be able to make new Lightroom presets now and do some color lab ones. If you want a copy, let me know!
Iris
http://www.earthloveskin.com
Corinne says
Ha… hilarious and informative. So true. I wish I’d seen this before I spend the dumbest 100+ dollars of my life ever on VSCO. I think it totally sucks and I wish I could return it. All of the filters are way too strong. Is there a way to reduce their opacity? Thanks for the informative post, I’m gonna go give this a try right now!
Chantii says
Thanks so much! I have been searching for a LR tutorial like that for SO long! 🙂
Kip says
Thanks for this! You’re a riot. Off to search your site for tricks on how to capture a meal by scattering half its contents around the plate rather than on.
Balazs says
Wonderful explanation! Clearer than anything I’ve read! Congrats. You really hold the reader’s hand 🙂