“Don’t take this the wrong way, but I will re-plate everything you bring to the party. It’s not you, it’s just a thing I do.” said my friend Sang who was hosting the party. Sang’s a bit particular about how things look, especially when it comes to food. But what else would expect from a commercial food photographer whose client list include Martha Stewart, Bon Appetit, Gourmet and Every Day with Rachel Ray? I shot him back an email and told him that he was welcome to re-plate my layer cake that I was bringing, but he was responsible for any buttercream repairs necessary in the transfer. He relented and responded back that he would make an exception for me. That’s when I started thinking about a gluten free cake recipe to make… resulting in My Gluten Free Ombré Birthday Cake with dark chocolate, butterscotch and vanilla bean cake layers that would go untouched by him – well until it was served that is. (Jump directly to the recipe.)
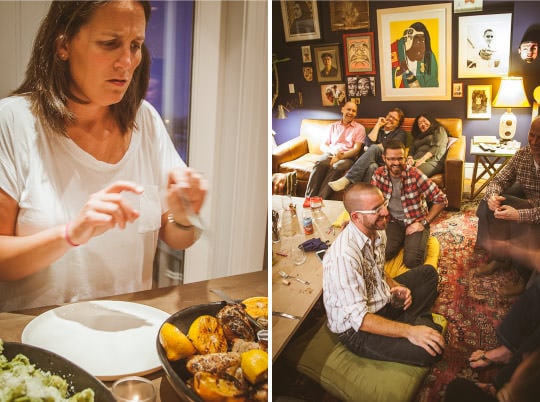
Of course, once I hit the “send” button on that email I realized I better bring my A-game. Not only was I make a cake, I was making a birthday cake for my partner AJ. A cake that I specifically told Sang that was too precious to re-plate. It better be good and, almost as important, it better look pretty. The party wasn’t specifically a birthday party for AJ, but some of his cycling friends were in town and wanted to get together and this was the best date for everyone. So now I had to make sure my cake was something that AJ would approve of, and all his friends. Of course, one of the people at the part was also gluten intolerant so I figured I would make the cake gluten free as well. Good times!
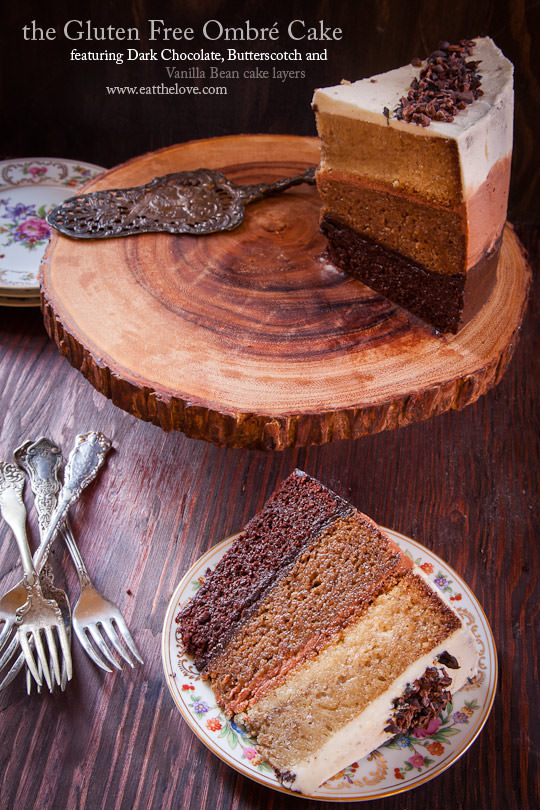
Ombré cakes are fairly popular out there in the blogosphere. Sadly most of them include crazy neon colors filled with food dyes that look beautiful but makes me dubious as to how they taste. I’m not one to avoid food coloring when necessary, but I wanted something a little more natural, something a little more subtle. Thankfully the idea of a dark chocolate, butterscotch and vanilla bean layer cake works perfectly into a graduated ombré cake. Make a batch of frosting and add some chocolate and cocoa to some of it and I was good to go.
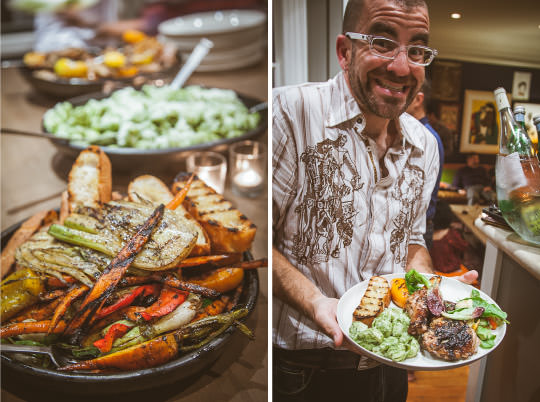
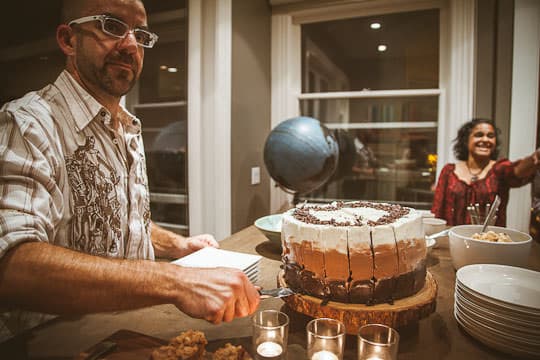
Sang didn’t grumble too much when I arrived with it already plated on a cake stand (actually he was too busy outside grilling up some gorgeous citrus chicken to even notice I had brought in the cake). I tried to pick a cake stand that was contemporary but also organic, a style that I knew would fit his aesthetic. Plus I’ve been dying to use that particular cake stand ever since I found it. I have a bit of cake stand addiction (much to AJ’s consternation as we have no storage space in our apartment). Sang and his partner Bob grilled late summer vegetables, citrus chicken and the group dined in style around the living room. And though I don’t think my cake will be making the cover or Martha Stewart Living anytime soon, everyone seemed to like it. In fact, I believe my friend Eric said it was second favorite thing he’s ever tasted that I’ve made. Or maybe it was his first favorite. I can’t remember. But apparently my friends are now keeping running tabs on my baked goods. I’m not sure if I should be scared or pleased by that.
Gluten Free Dark Chocolate, Butterscotch and Vanilla Bean Ombré Cake
By Irvin Lin
I’m not going to lie to you. This cake is a day-long project. It requires three cake layers, and Swiss buttercream frostings that I adapt into three different flavors. None of the cake making is difficult but it can be time consuming, just by the sheer factor of having to make three different batters. But it’s worth it at the end of the day, a glorious presentation cake, one that will feed a large dinner party. Perfect for a birthday or celebration, especially for someone who is gluten free. And if you don’t want to, or don’t have time, you can certainly pick one of the cake layers, double it, and make a regular double layer cake out of it.
As always, if you are celiac or very gluten sensitive, make sure all your ingredients (like baking powder, powdered sugar and specialty flours) are all certified gluten free. And if gluten isn’t an issue or you don’t want to use all the crazy flours, you can make this cake with regular all purpose flour or your favorite all purpose gluten free flour mix, substituting 1:1 ratio with all the gluten free flours (1 1/4 cups or 175 grams all purpose for the dark chocolate, 2 cups or 280 grams all purpose for the butterscotch and vanilla bean cakes). The frosting uses black onyx cocoa powder, which is an extremely dark Dutch processed cocoa powder. If you can’t find it, you can substitute Hershey’s Special Dark cocoa powder but keep in mind that the resulting frosting won’t be quite as dark in color.

Ingredients
Dark Chocolate Cake Batter
1 1/2 oz (45 g) dark chocolate, chopped
3/4 cup fresh brewed hot coffee
3/4 cup (150 g) white granulated sugar
3/4 cup (165 g) dark brown sugar
3/4 cup (75 g) cocoa powder, natural not Dutch-processed
1/4 cup (45 g) buckwheat flour
1/4 cup (45 g) teff flour
1/4 cup (35 g) sweet rice (sometimes called glutinous rice) flour
1/4 cup (35 g) tapioca flour
3 tablespoons (25 g) mesquite flour
2 tablespoon (20 g) ground chia seeds
1 teaspoon baking soda
1/2 teaspoon baking powder
1/2 teaspoon sea salt
1 large egg
1 large egg yolk
1/4 cup and 2 tablespoons vegetable oil
3/4 cup buttermilk
1 teaspoon vanilla extract
Butterscotch Cake Batter
1/2 cup (90 g) teff flour
1/2 cup (90 g) potato starch
1/2 cup (70 g) sweet rice (sometimes called glutinous rice) flour
1/4 cup (30 g) white rice flour
1/4 cup (30 g) tapioca starch
2 tablespoons (20 g) ground white chia seeds or ground golden flax meal
1 teaspoon sea salt
1 teaspoon baking soda
1/2 teaspoon baking powder
1/2 cup (115 g or 1 stick) unsalted butter
1 1/4 cup (275 g) dark brown sugar
1/2 cup (100 g) white granulated sugar
1/2 cup (100 g) shortening
4 large eggs
1 teaspoon vanilla extract
3/4 cup buttermilk
Vanilla Bean Cake Batter
1/2 cup (90 g) potato starch
1/2 cup (70 g) millet flour
1/2 cup (70 g) sweet rice (sometimes called glutinous rice) flour
1/4 cup (30 g) white rice flour
1/4 cup (30 g) tapioca flour
2 tablespoon (20 g) ground white chia seeds or ground golden flax meal
1 teaspoon sea salt
1 teaspoon baking soda
1/2 teaspoon baking powder
1/2 cup (115 g or 1 stick) unsalted butter at room temperature
1/2 cup (100 g) shortening
1 3/4 cups (350 g) white granulated sugar
4 large eggs
2 teaspoon vanilla extract
1 vanilla bean
3/4 cup buttermilk
Swiss Buttercream Frosting
5 large egg whites
1 cup + 2 tablespoons granulated white sugar
1/4 teaspoon salt
2 cups (1 lb, 460 g or 4 sticks) unsalted butter at room temperature
1 vanilla bean
3 oz (85 g) dark chocolate, melted
3 tablespoon black onyx cocoa powder
Topping for decoration
3 – 4 tablespoons roasted cacao nibs
1/2 – 1 teaspoon flaked finish salt (I used Cypress Black Flake salt, but you can use Maldon, Fleur de Del or another finishing salt of your choice, just don’t use plain table salt as it’s way too harsh)
Directions
1. Make the chocolate cake layer by first preheating the oven to 300˚F. Spray a 9 inch round cake pan with cooking spray and line the bottom of the pan with a parchment paper round. Lightly spray the parchment paper as well.
2. Place the chopped dark chocolate in the hot coffee and stir until melted. Set aside to cool. Place the white sugar, brown sugar, flours, chia seeds, baking soda, baking powder and salt in a large bowl. Using a balloon whisk, vigorously stir the dry ingredients together, breaking up the brown sugar if there are any clumps, until it is uniform in color and the ingredients are evenly distributed.
3. Place the egg and egg yolk in the bowl of a stand mixer fitted with the paddle attachment. Beat the eggs for a minute or two until they lighten in color slightly. With the mixer turned on slow speed, add the vegetable oil, buttermilk and vanilla extract in a small steady stream. Beat to incorporate. Add the chocolate coffee, scraping out any melted chocoalte at the bottom into the mixer bowl and beat to incorporate. Add all the dry ingredients and slowly mix until just incorporated. Pour into the prepared pan and bake in the oven for 40-45 minutes or until a toothpick inserted in the center of the cake comes out clean. Cool on a rack for 15 minutes or so, before inverting on to a wire rack and letting cool completely to room temperature.
4. Make the butterscotch cake batter by first turning the oven up to 325˚ F and spraying another 9 inch baking pan with cooking spray and lining the bottom with parchment paper. Place all the flours, starches, chia seeds/flaxmeal, sea salt, baking soda and baking powder in a large bowl. Using a balloon whisk, vigorously stir the dry ingredients together until it is uniform in color and the ingredients are evenly distributed. Place the butter in a pan and turn the heat to medium. Cook the butter, stirring frequently until it melts, starts to brown and turn fragrant. Once you see the butterfat particles start to turn golden brown, turn the heat off and let the residual heat bring the rest of the butter to the right point. You don’t want to burn the butterfat, you just want it a rich golden brown. Pour the butter into the clean bowl of stand mixer fitted with a paddle attachment. Turn the mixer to medium and mix for 30 seconds to cool the butter.
5. Add both sugars and beat together for 30 seconds. Add the shortening and beat together for 30 more seconds. Add the eggs, one at a time, beating until each egg is incorporated. Add the vanilla and beat to incorporate. Add half the dry ingredients to the sugar butter mix and beat to incorporate. Pour the buttermilk in and mix to incorporate. Add the remaining dry ingredients and beat until just combined. Pour into the baking pan. Set aside.
6. Make the vanilla bean cake batter by first spraying another 9 inch baking pan with cooking spray and lining the bottom with parchment paper. Place all the starches, flours chia seeds/flaxmeal, sea salt, baking soda and baking powder in a large bowl. Using a balloon whisk, vigorously stir the dry ingredients together until it is uniform in color and the ingredients are evenly distributed. Place the butter, shortening and sugar into the clean bowl of stand mixer fitted with a paddle attachment. Turn the mixer to medium and mix for 30 seconds to cream together. Add the eggs, one at a time, beating to incorporate before adding the next one. Add the vanilla and beat to incorporate. Split the vanilla bean in half lengthwise and scrape the seeds out into the batter, reserving the pod for another use. Beat to incorporate. Add half the dry ingredients to the sugar butter mix and beat to incorporate. Pour the buttermilk in and mix to incorporate. Add the remaining dry ingredients and beat until just combined. Pour into the baking pan.
7. Bake both the butterscotch and vanilla bean cake in the oven for 45 to 50 minutes, or until a toothpick inserted in the center of the cake comes out clean. Rotating the cakes after 30 minutes to help even the baking of the layers. Cool on a rack for 15 minutes or so, before inverting on to a wire rack and letting cool completely to room temperature.
8. Once all three layers are cool to room temperature, peel the parchment paper off. Make the frosting by placing the egg whites, sugar and salt in the clean metal bowl of a stand mixer fitted with a wire attachment. Place the bowl in large pot of simmering water and heat the sugary egg whites, occasionally stirring with a whisk, until the sugar has dissolved into the egg whites and it’s warm to the touch, about 160˚F. Stick your fingers in there and feel around. If you feel any grains of sugar, it needs to warm up more. Place the bowl back in the stand mixer, and whip on high until the frosting is white, fluffy and cooled down (about 5 minutes). Reduce the speed to medium high and add the butter, a tablespoon at a time, waiting until the butter additions incorporate before adding more butter. Once all the butter has been added, switch to the paddle attachment and beat for additional minute to smooth out the frosting and remove any air bubbles.
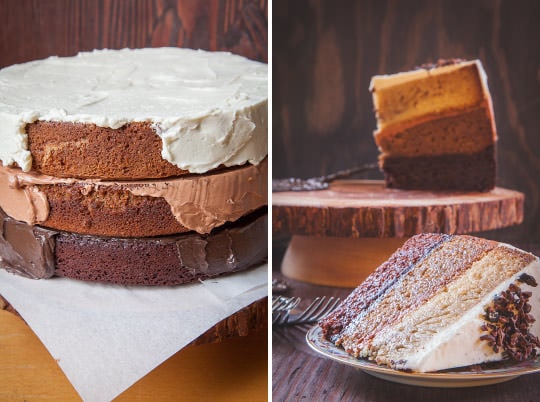
9. Split the vanilla bean lengthwise and scrape the seeds into the frosting, reserving the pod for another use. Beat on medium speed to incorporate the vanilla seeds. Scoop out 1/3 of the frosting and reserve in a bowl. Scrape the melted chocolate into the remaining 2/3 of the frosting and beat until incorporated. Scoop 1/2 of the chocolate frosting out into another bowl. Add the cocoa powder into the remaining frosting in the mixer bowl and beat to incorporate. You should now have three different colored frostings.
10. To assemble the cake, first place the dark chocolate cake layer on the cake stand or whatever platter you are going to serve the cake. Spread half of the cocoa chocolate frosting (the darkest one) over the top of the cake layer and then use the remaining half of the frosting (reserving a few tablespoons) to frost the sides of the cake. Place the butterscotch cake on top of the dark chocolate cake and repeat the frosting with just the medium shade chocolate frosting, again reserving a few tablespoons of the frosting. Finally place the vanilla bean cake as the top layer and frost the top and sides of the cake. Using the reserve frosting, fill in any patches or empty holes between the layers. Then using a spatula or butter knife “blend” different color frosting colors together. If you want to get crafty you can use the leftover reserve frosting to “mix” different shades to use to graduate the colors even more. Sprinkle the cacao nibs and the sea salt in a ring around the top of the cake. Serve immediately.
Makes one 3-layer cake, serve 18-24 people (serve thin slices, it’s a large cake!)
Lauren at Keep It Sweet says
Looks like your cake lived up to its hype! What a gorgeous cake, I really like this version of a natural ombre. It sounds incredibly delicious, too!
Ruthy @ Omeletta says
What a beautiful, beautiful cake! So much classier looking than the rainbow cakes popping up on Pinterest lately. I’m way impressed you made this gluten free, and you’re spot on with that cake stand- where did you get it?
Irvin says
Would you believe I got it at Cost Plus World Market? Yep. Total score.
Belinda @zomppa says
You did what no one could!! Gorgeous , not only do I love that this isn’t full of dyes but the flavors are pretty much my jam. I’m so hungry right now and it’s not fair. Not fair.
Katrina @ Warm Vanilla Sugar says
I love the layers in this cake! Such a fun recipe 🙂
Daniela @ FoodrecipesHQ says
This cake is so beautiful, looks like a piece of art!
Kiran @ KiranTarun.com says
I’ve never attempted an ombre cake before. The layers of flavors here are divine, Irvin 🙂
Heather | Farmgirl Gourmet says
Oh. My. I just drooled. Seriously.
Ryan says
That cake looks unbelievable.
Christina @ The Hungry Australian says
Beautiful cake, Irvin. I agree, I love the look of ombre cakes but all the artificial colours scare me – especially as I have two kids who are already bouncing off the ceilings! Looks like you had a lovely night.
Mary@SiftingFocus says
Spectacular cake Irvin! Love the combination of flavors. A little something for everyone. We share the same addiction to cake plates. Just acquired a few more. I’ve been trying to come up with ingenious ways to store them but nothing yet. They are just scattered throughout the house and garage. Oh well, I guess there are worse things to be addicted to, right?
Irvin says
I actually ended up clearing out a shelf in my closet, got rid of some old clothes and fit most of them there, precariously stacked on top of each other. Probably not the best place for them, living in San Francisco – earthquake central. But what are you going to do?
Ash-foodfashionparty says
Loving the subtle colors of this ombre cake. I’m sure it made a statement especially with the cake stand..love it.
I’m guilty of replating all the time. I generally put out platters, and when the food arrives, I try not to be very obvious but transfer food on to my plates…:)
thanks for the t.
Jenn says
Really cool cake concept, looks like it was a lot of work! Question – why use a completely different GF flour base for each cake layer? From looking at it, it seems like it just complicates the recipe…
Irvin says
Good question. You can certainly use the same flour base for each layer, which would definitely simplify things. But the flours I picked actually add flavor to each layer. The teff and mesquite work really well with chocolate, the teff has a slightly maltiness that compliments the butterscotch and the millet is slightly sweet and nutty, adding a nice touch to the vanilla bean. Those flours also add color to each layer, making them distinct and adding to the “ombre” cake layers without adding artificial dyes.
I person am not one to use a straightforward basic flour mix. I prefer to use flours that add flavor to the baked good (and in this case color) and not just one that mimics bland all purpose wheat flour. But the recipes can certainly be made with whatever all purpose gluten free flour mix you want (I made a note of substituting all purpose flour in the headnote, just follow the same amount for your gluten free flour mix of choice).
Liz @Life Made Sweet says
I think you are one of my new favorite people…simple because that cake stand is SOOO fabulous! Your cake looks delicious too 🙂
Annalise @ Completely Delicious says
Perfect, Irvin!
Trevor says
Had he not relented I would have just brought the ingredients and let him bake it too. Telling Irvin Lin you are going to replate his food seems a bit boorish to me.
Shikha says
This is fantastic! Thank you for being honest about how long this project takes because I can never gauge. Lovely fall cake!
Lora @cakeduchess says
Fabulous! I love every part of this cake. Every layer (I never would have dreamed of all the different combos and the flavors…wow!). It’s so pretty and so moist and AJ is beaming:)) Looks like his part was super fun and delicious (love the art work on the wall:) xx
Jennie @themessybakerblog says
Wow, that is one impressive cake. I bet AJ was quite pleased. The party looked likd good times. Pinned!
Rita says
sigh. I want this. Day-long projects are pretty much out for me right now. maybe I can con someone into making it for me. or maybe I can do the doubling-each-layer-as-its-own-cake thing three times over the coming months, and just imagine them combined . . .
Rita says
And I am in love with that cake stand.
merri says
happy birthday, AJ!
Pamela DuVal says
Can I pay you to make it for me and send to NC?????
Ashley says
I love this cake! I adore the stand and I can not wait to make this as a special birthday surprise for my wonderful sister-in-law. I do have a question about the chocolate cake. Can the cake layer be made without the coffee and use the cream to heat and melt the chocolate instead? I know coffee will make a difference in flavor…
Jo Smith says
I am curious about this too. Did you try it without the coffee? Can you taste the coffee in the end?
ana says
i know this sounds daft but what should we do if we want to us ap flour instead because over here in india all these types of other flours are not available ANYWHERE
Megan | Allergy Free Alaska says
Your cake looks amazing. I love the different colors and flavors, and being gluten-free just makes it gosh darn perfect! My husband’s name is AJ. 😉 I hope your AJ has a great upcoming birthday!
Shelly says
Love your blog. Just discovered it. The cake looks amazing. Thank you for mentioning that it’s a day project. Can’t wait to see your next post 🙂