Last week I gave a tutorial on adding type and watermarks to photos in Lightroom. But did you know that you could also make diptychs, triptychs and collages in Lightroom? The method is not the most obvious, as it’s more geared toward creating printed pictures but you CAN do it, which gives you more creative ways to display images on the web. Plus it saves you from leaving Lightroom and opening up another program (or using a website like PicMonkey) to create collaged images. The process isn’t difficult but it might seem a bit confusing at first. However, once you set it up, I’ll also show you have to save your settings so you can just pull the template up and make the diptych without having to start from scratch all over again every time.
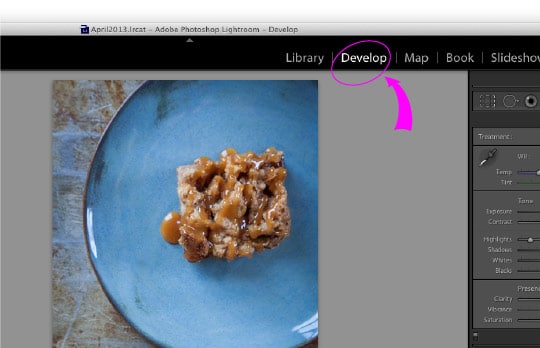
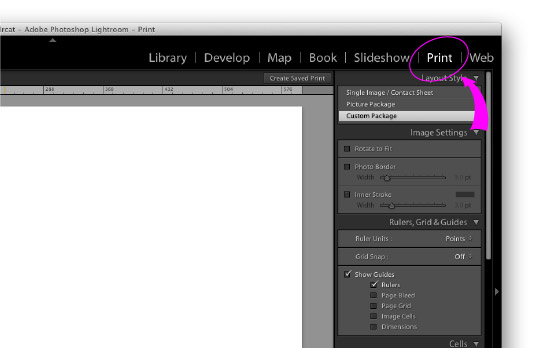
To create a diptych, the first thing you need is edit the photos you want to use in the diptych. Process them like you would any other photos using the Develop module (adjusting exposure, cropping, contrast and whatever else you need to do to make your photo pretty). Then go up to right top corner and click on the Print module.
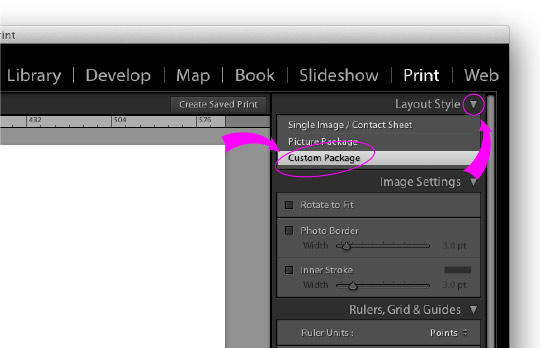
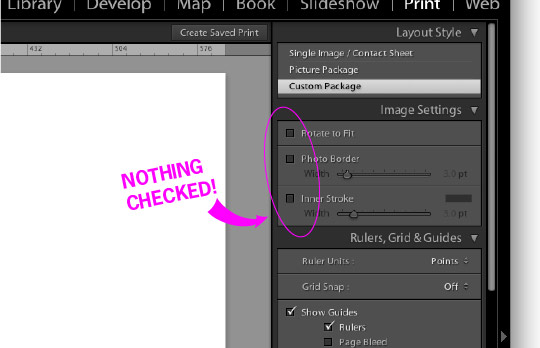
On the right column, at the top, make sure the Layout Style is pulled down (the triangle next to the words Layout Style is pointing down) and select Custom Package. Right underneath is the Image Setting section; make sure none of the selections are checked.
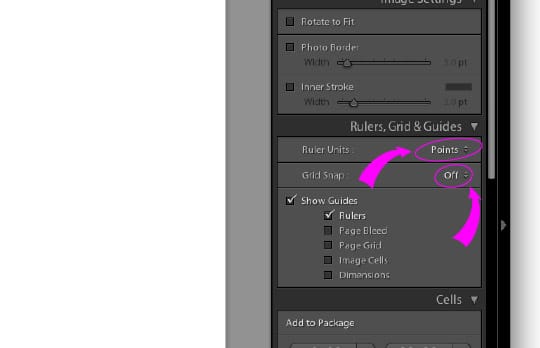
Underneath the Image Setting is the Rulers, Grid & Guides section. Pull down the Ruler Units and select Points (which, for our current purposes, is the same as pixels). Go ahead and select Off for the Grid Snap as well. You can pick whatever you want for the Show Guides, but usually I have the Rulers selected and that’s it.
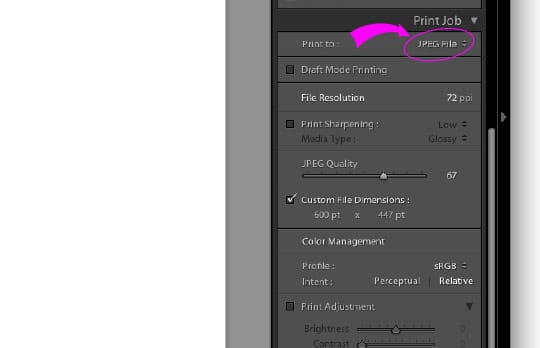
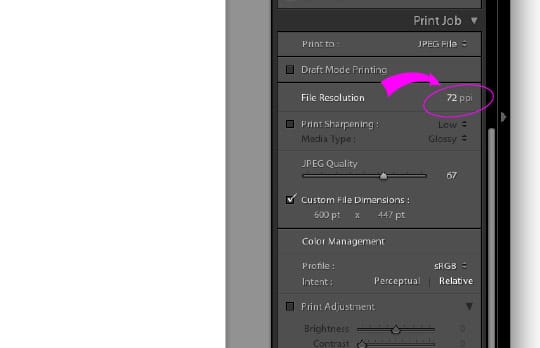
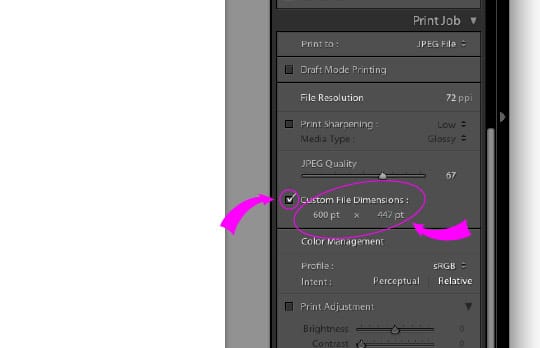
Skip down to the bottom Print Job section next (the last option at the bottom). The first option in that section is for Print to. Use the pull down menu and select JPEG file. Make sure your Draft Mode Printing is not selected and your File Resolution is 72 ppi (the default with usually be 300 because this module is set up for print not web. To change it, just click on the 300 and a box will appear that will let you change the ppi to 72). I don’t bother with adding Print Sharpening so you can leave that selection off as well. Select the JPEG quality you want (I usually go with around 67, keeping in mind the larger the number the larger the file size will be but the better the image will look).
Now the Custom File Dimensions is a bit tricky. You DEFINITELY need to check this on (otherwise it will default to whatever your printer page set up size is, usually 8.5 x 11 in which you don’t want). You need to know the EXACT size that you want the final diptych to be. If you shoot with a dSLR camera, most likely your images are 4 x 6 in proportion. If your photos are 600 pixels wide for your blog you can set your custom dimension to 600 pt to 447 pt. This will give you two photos that are 298 pixels wide by 447 pixels tall, with a 4 pixel gap between them. Now if you’ve shot with an iPhone or another camera with a different proportion (a lot of point and shoot cameras shoot as a different aspect ratio) or you’ve cropped your photo into an oddball shape you’ll have adjust the custom file dimension to fit the size of two side by side images with a little bit of gap between them. You can totally create an algebraic ratio equation to figure this out using the size of the original photos that you have, but since I haven’t taken a math class in about 20+ years, I am SO not the person figure out what that equation is. Instead, go to one of your old diptych photos that you created in photoshop, gimp or picmonkey and look at the pixel dimensions of that photo, then just use those dimensions.
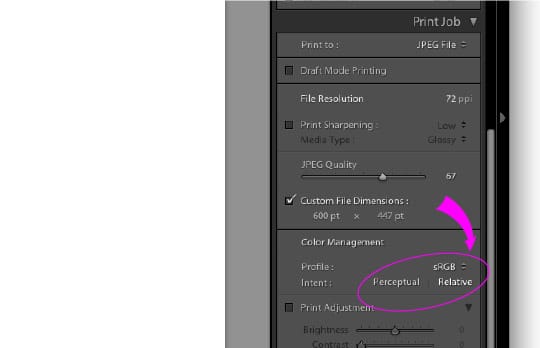
Under that is Color Management. Make sure your profile is sRGB (the main color profile that is used on the web) and pick Relative for Intent. If you want to learn more about color management for the web you can visit this page on color space and color profiles but it’ll probably give you a headache to read it so I’d advise against it. Make sure the Print Adjustment is not checked (remember this module is mostly for print, not for web, that’s why there are these options that you don’t need).
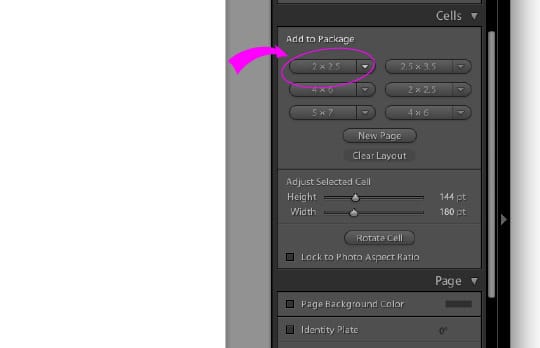
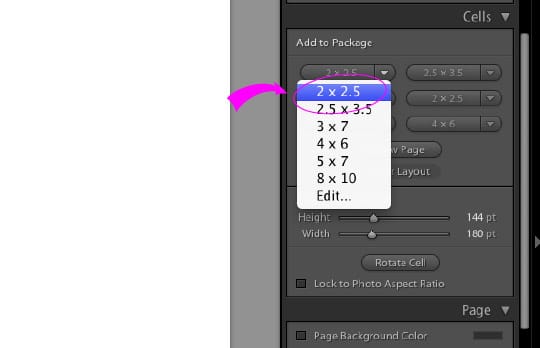
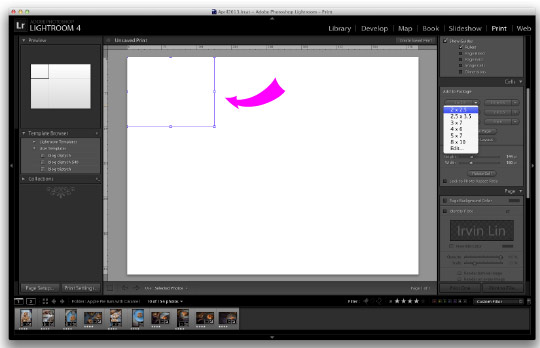
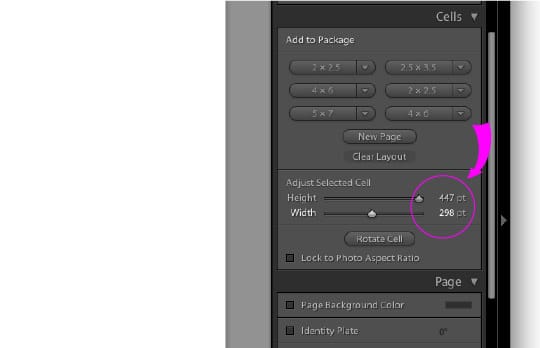
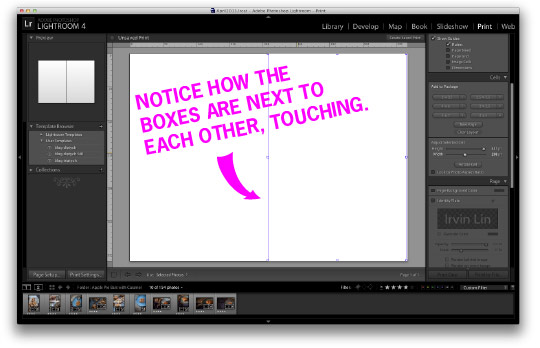
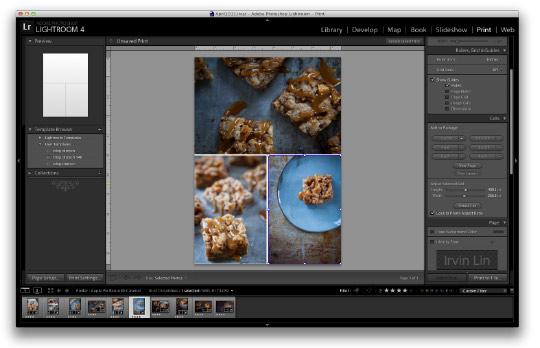
Now go back up to the Cells section (right under the Rulers, Grids & Guides). Under the Add to Package is a bunch of options. Pick the top left one and select any of the options (you’ll be changing it anyway, so it doesn’t matter which one you pick). You’ll notice a box pop up on the white blank page with a blue outline. Underneath the Add to Package are a couple of sliders for Adjust Select Cell. Pull the Height slider all the way to the right (447 pt). Pull the Width one to 298 pt. You’ll notice as you pull the sliders to the size you want, the blue square will also shift in size.
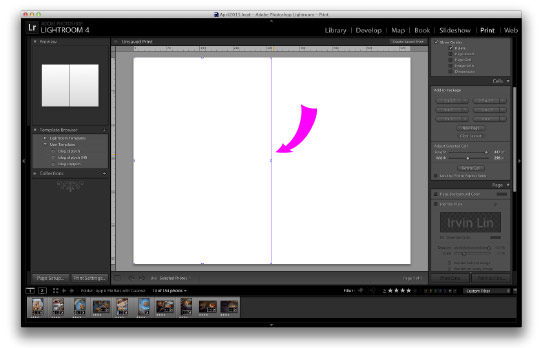
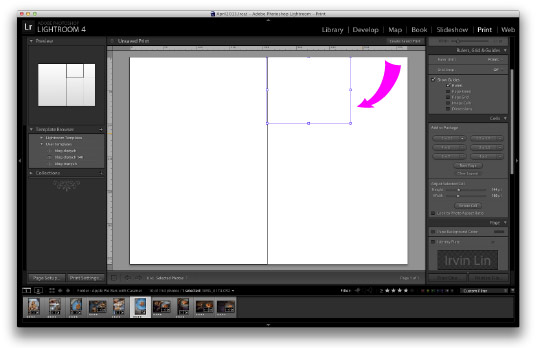
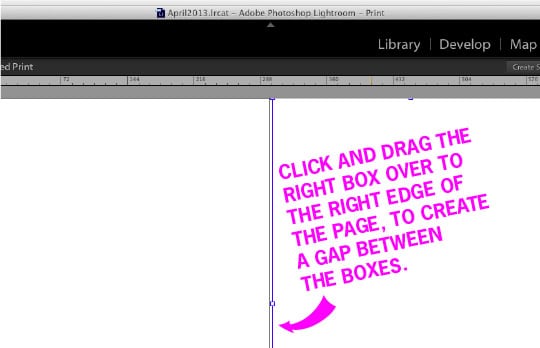
Go back and repeat what you just did again, pulling down on the top left pull down menu under Add to Package and select another size (again it doesn’t matter what size). You’ll notice another box pops up. Adjust Select Cell to Height: 447 pt and Width: 298 pt just like last time. You should now have two boxes butting up next to each other. Go up to the right box, click in the center of it, so it has a blue outline, and then just click and drag on the box to the right, so you have a gap between the boxes .
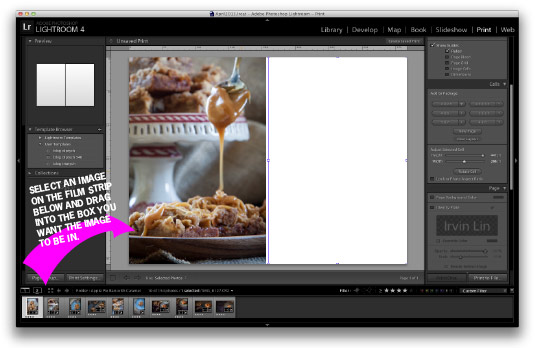
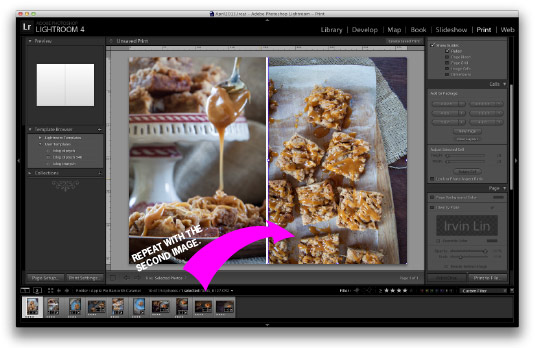
Now go down below to the strip of photos and drag and drop the photos you want into each box. The box should highlight yellow as you drag the photo thumbnail on top of the box. Just let go and the box should have the image you want in it. If you don’t like that image or you change your mind, just drag a different image on top of that image. It should change like magic!
If you want to create a triptych image, the method is pretty much the same. Just figure out what the final image size will be first, and then add the boxes. You can arrange the boxes around by clicking and dragging them to the location on the page. You can even adjust the size of them by dragging the sides of the blue boxes (but it’s not as accurate as the sliders).
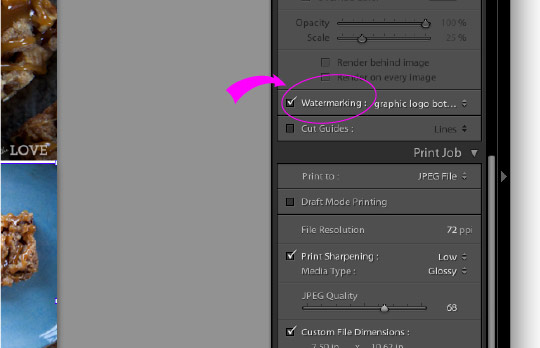
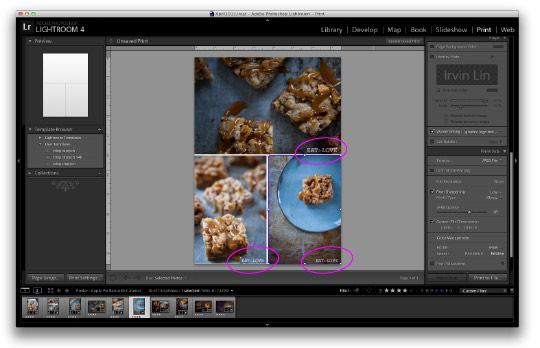
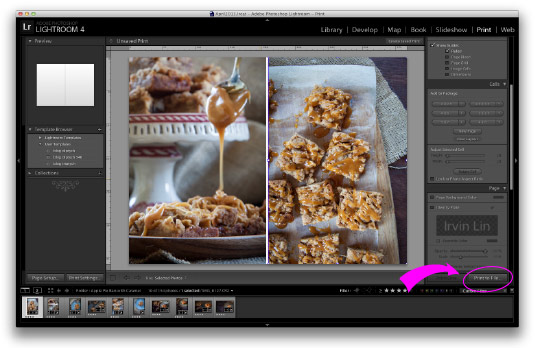
At this point you’re pretty much done, but if you want to get all fancy and add a watermark (like I taught you in my previous How to Add Type to a Photo using Lightroom tutorial) you can click the Watermark button under the Page section. Keep in that any type or graphic image you put on the photos will appear on ALL images at the same location on each photo. Once you’ve got your photo set, click the Print to File… button at the bottom right and save the image with whatever title you want (remember to add the .jpg to the end of the file name as well).
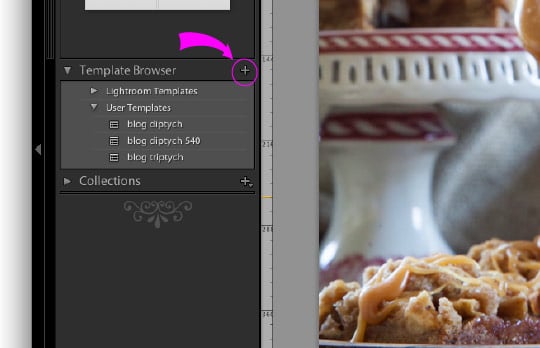
Now once you’ve set this up once, you can save diptych template under User Templates. Go to the left side panel under the preview and click the + button next to Template Browser. Name the template whatever you want and the next time you want to create a diptych, you can just click on that template under User Templates and a blank template will pop up that allows you to drag and drop whatever images you want on to there. Now you’re ready to create all the diptychs and triptychs you want for your blog easy breezy right. Go to it!
Denise says
I discovered this hidden LR gem a few years ago – so easy, and your tutorial makes it seem even simpler.
Nicole says
Thanks for another Lightroom tutorial! I haven’t put a diptych on the blog for years because I am super lazy now, but I’m going to work on a template now.
Jenn says
great post! I haven’t explored much in LR outside of the Library or Develop modules, glad to know this is an easy process that doesn’t need photoshop 🙂
Cinnamon @ eatpraytri says
I have been wanting to know how to do this FOREVER. Thank you so much for this easy to follow tutorial!!
Mary Brock says
Thank you so much! I am looking forward to applying this technique soon!
Renee says
I am forever using PicMonkey- this is great! Who knew! Thank you so much for sharing these tricks! This will be a time saver for sure!
Jeanette | Jeanette's Healthy Living says
Another great post on using Lightroom – thank you for putting these together. Lightroom is not intuitively easy to figure out so this post is truly appreciated.
Martyna says
You made my day! Thanks 🙂
Joshua @ Slim Palate says
Thank you so much for this tutorial Irvin! I wish I had seen it sooner because I have been doing it all manually, which is horrible.
Nik says
Thanks for this tutorial however , is there a way to create the diptych or triptych with a single image, allowing each photo in a diptych to be printed individually.
J.P says
Thanks 🙂 Helped me create this through lightroom 5.
http://www.flickr.com/photos/sixtwomedia/13201859865/in/photostream/
Natalia says
Thank you so much!!! Very nice and simple tutorial. That’s what I was looking for.
Lily says
Did it! Thank you so much for sharing this tutorial. You’re awesome:)
Kasandra Mathieson says
Thanks so much Irvin!! What a wonderful, clear post on how to make diptychs!! Glad to found out how to do it in Lightroom!!
Emily Mitchell says
Thank you!
hannah says
Hello, I am trying to create a diptych from1 horizontal and 1 vertical image to export and not having much luck.
Do you have a step by step for that, by chance?
Thank you.
Irvin says
Hi there. I don’t have a specific step-by-step tutorial for that, but you should be able to build it just like a diptych described here in the post. The only difference is the two boxes aren’t the same size, one should accommodate the horizontal image and be size appropriately for that, and the other box set up for the vertical. Good luck!
Pearl says
Thanks Irvin for your no-nonsense, easy-t0-follow tutorial. I was able to do a 3×3 collage following your instructions for a diptych!
Katherine says
Hello! Firstly, than you for the easy to follow tutorial!
One question, I am having a problem with the quality of the image. I am able to create the collage, but then, when I upload it onto WordPress, it appear grainy. I am shooting with a Canon 60D so the quality of the photos is pretty good. I have tried raising the DPI in Lightroom to 600 – nothing seems to be working. What am I doing wrong?
Would sincerely appreciate any help/advice you could offer! Thank you!
Jessica Ekern says
thanks you!!!!! so easy!
Susan@LunaCafe says
Awesome tutorial, thank you. Will try it later today.
Lucy Aspray says
This just made my life a hundred times easier, thank you SO much!!
Nicky says
This is life changing. Thank you so much! You saved me and others hours of endless pain 🙂
Jessica @ Jessica in the Kitchen says
You are literally the best. THANK YOU SO MUCH!!!