The classic chocolate crackle cookies that everyone loves for the holidays. A simple and easy recipe for everyone! (Jump directly to the recipe.)
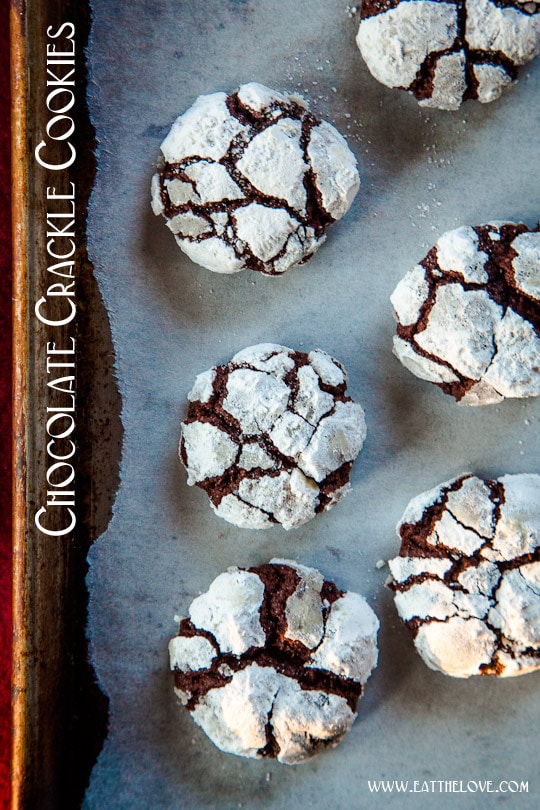
I’m going to be honest with about these here chocolate crackle cookies. They should probably be called chocolate crack cookies. In fact, they are so good I wasn’t sure I’d be able to photograph any of them for this blog because AJ kept on going in and eating one after another. At one point he asked me if he could eat yet One. More. Cookie. and I looked at him and said, “Well only if you can find an ugly one because I need to photograph them.” He looked at them carefully, than poked his finger into one of them and said “This one has a big dent in it…” and proceeded to pop it in his mouth. #Sigh
So here’s the deal with these chocolate crackles, the ones that always show up around the holiday season and are just as cute as they are addictive. And, as much as I love changing them up, and turning them into black forest crackle cookies or reversing them into a white chocolate oreo cocoa powdered cookie, there’s just something to be said about the basic classic chocolate crackle cookie. It’s timeless, it’s simple and it’s a holiday crowd pleaser.
So I tried real hard this time to stick to the basics, which, if you know me, is a tough call. I like to mix things up, make them different, use wacky ingredients, throwing in unexpected flavors. But this time, this time I reigned it in. Because sometimes a classic is a classic for a reason. Make these and you’ll understand what I mean. And don’t be surprised if these crackle cookies disappear faster than…well faster than an illicit drug.
CHOCOLATE CRACKLE COOKIES
Ingredients
Cookie dough
- 8 oz dark chocolate 225 g, preferably between 65-75% cacao
- 1/2 cup unsalted butter 115 g or 1 stick, at room temperature
- 1 1/2 cups dark brown sugar 330 g
- 2 teaspoon baking powder
- 1/2 teaspoon kosher salt
- 2 large eggs
- 1 1/2 teaspoon vanilla extract
- 1 teaspoon flavored extract optional, see headnote above
- 1/2 cup Dutch-processed cocoa powder 70 g
- 1/4 cup whole milk
- 1 1/4 cup all-purpose flour 175 g
for coating
- 1 cup granulated white sugar 200 g
- 1 cup confectioners’ (powdered) sugar 120 g
Instructions
- Chop the chocolate into small 1/2 inch chunks and place in a microwave safe bowl. Cook in the microwave for 30 seconds and stir. Repeat another 2-4 times, microwaving in 30 second intervals and stirring between times, until melted and smooth. Place aside to cool.
- Place the butter, sugar, baking powder and salt in the bowl of a stand mixer fitted with a paddle attachment. Beat together until the butter forms a paste with the brown sugar, baking powder and salt. Add the egg, one at a time, beating until the first one is incorporated before adding the second one. Add the vanilla and flavored extract (if using) and beat to incorporate. Add the melted chocolate to the batter and beat to incorporate.
- Add the cocoa powder to the dough and beat to incorporate. Add the milk and beat to incorporate. Add the flour and beat to incorporate and a sticky dough forms. Divide the dough into 4 parts (about 250 g each if you have scale), flatten and wrap with plastic wrap. Chill in the fridge for at least one hour or overnight.
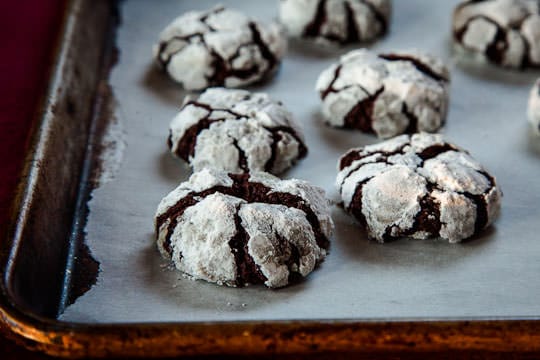
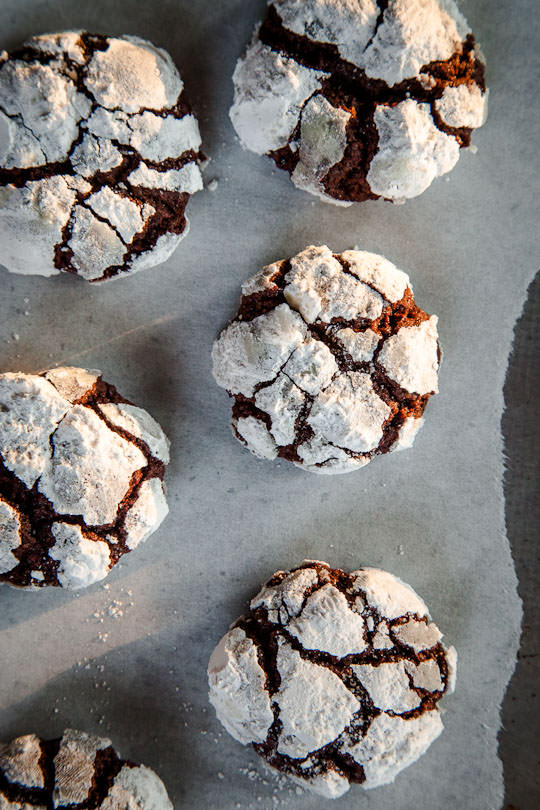
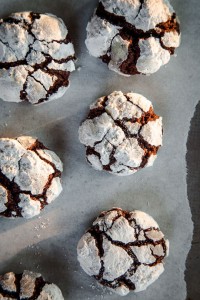
- Once they have chilled, preheat an oven to 350˚F and line a baking sheet with a piece of parchment paper or silpat. Divide one of the dough sections into 16 pieces (cut the dough into quarters than each quarter into quarters again). Roll each piece into a ball (your hands are going to get messy and chocolatey so be prepared and if the dough gets too soft, stick it in the fridge or freezer for a little bit to firm it up). Roll the ball in the granulated white sugar than in the confectioners’ sugar afterwards. Repeat with the remaining dough, placing each cookie about 2 inches apart from each other on the baking sheet. Bake for about 10-12 minutes, or until they are just barely set (don’t overbake). Let cool on the baking sheet for 10 minutes before moving them to a cooling rack to cool completely.
Notes
Nutrition
If you like these chocolate crackle cookies, check out some of my other crackle cookies:
Reverse Crackle Cookies (white chocolate cookie with an dark chocolate outer dusting)
Gluten Free Black Forest Chocolate Crinkle Cookies
And while you’re at it, check out these awesome crackle cookies from around the web!
Simply Scratch’s Dark Chocolate Mint Crackle Cookies
The View from Great Island’s Bourbon Pecan Crackle Cookies
Recipe Girl’s Chocolate Mint Crinkles
Two Peas and Their Pod’s Red Velvet Crinkle Cookies
Pineapple and Coconut’s Gluten Free Chocolate Crinkle Cookies

Katrina @ Warm Vanilla Sugar says
These are my favorite holiday cookie!
Kathy - Panini Happy says
I applaud you in your restraint! 🙂 Sometimes a classic is classic for a reason – these are definitely among my favorites.
Jennie @themessybakerblog says
I think I would have done the exact same thing AJ did to get a cookie. These look wonderful.
Belinda @zomppa says
Me and A&J have the same food brain….
Janice (@KtchnHealsSoul) says
Great tip about rolling the cookies in granulated sugar first before the icing sugar! These are my favourite: so so chocolatey 🙂
claudia says
This was one of my favorite Christmas cookies as a child. We called them Pixies–I think because they are so much like brownies. The recipe got lost over the years. Delighted to have your new and improved version. Thanks so much!
Trent @ Food Assault says
It just makes me feel like a kid again having Choccy Crackles……and coming into the festive season I just love it…….now chocolate crackle cookies? Yes sir!
Kim Beaulieu says
I love these cookies. I need to make the immediately. I like the idea of using chocolate extract. I just happen to have a bottle handy. Off to check off the black forest version.
Aimee @ Simple Bites says
Thank you for testing Martha’s recipe. 😉
I have never made this classic cookie. I know. It is time.
Jane F says
These were new to me. This is evidently a Christmas tradition that has yet to make it across the Atlantic…until now. I made them last night and they went down a storm in my office today. Thanks for a great recipe!
Irvin says
What? They haven’t made it across the big pond? Well you must be the ambassador of them then! I’m glad your office liked them. I think they are one of my favorites!
Maria says
Beautiful cookies! Always a favorite too!
Sue/the view from great island says
I LOVE these photos, you really captured what is so alluring about these cookies…pinning, pining, and pinning!
Laurie {Simply Scratch} says
Thanks for linking-in my recipe Irvin! You are da bomb… and these cookies aren’t lookin’ or soundin’ too shabby either 🙂 Happy Holidays!
Mrs. L says
Love these are basic but I bet oh so good. Must make them in the new year!
Stengel99 says
Thanks for the instructions. I made my first ever batch of crackle cookies (red velvet) and the powdered sugar coating was completely invisible after cooking. I’ll follow your instructions for my next batch.
Brigitta says
This dough was waaayyyy to sticky to work with, even after chilling it a couple of times. I managed to get some cookies but much of the dough was left behind in the bowl and on my fingers. They were good though! Could I add some flour next time or will that change the texture? Btw, I did half the recipe, maybe that made too much of a difference in the measurements?
Sandy says
If you lightly wet your hands before working with the dough it will be easier.
Irvin says
Hi! Sorry I didn’t respond earlier. What Sandy said is right, if you lightly wet your hands it does make rolling the dough out easier. I run my hands under cold water then slightly dry them off with a paper towel when I begin, and every time my hands start to pick up some of the dough onto the palm of my hands, I rinse it off again and start the process over. Usually I have to do that about 8-12 cookies.
I hope this helps!
Natalie says
These are still not heard of on this side of the atlantic, but let me tell you, since discovering them last October I have made them FOUR TIMES. That is how amazing they are. I have also now learned to bring a pile of copies of the recipe with me if I take them somewhere, because EVERYONE’S reaction is ‘oh my god these are so good do you have the recipe’.
Svenja M. says
Hi Irvin! It’s twice now that I made these cookies, once for Christmas and once for my man’s birthday. Although -if I’m being really honest- it’s a pain in the ass to make them with my kitchen getting all messy, it’s absolutely worth it. Everytime I make these, I get tons of compliments and everyone wants the recipe. So I’m here to say thank you for sharing the recipe! 🙂
Irvin says
Right? Your hands get SO messy when you make them. But it’s TOTALLY worth it. A labor of love…
Svenja M. says
Hi again! I’ve made these couple more times since my last comment and I have to say I’m getting really good at making them. The best thing is, they turn out perfect every single time. Funny to think I mess up at every other cookie recipe, most of them much easier to make. I guess I came by to say thanks one more time – these cookies have become a staple in my kitchen. THANK YOU
aida says
Hi Irvin,
I have made these cookies twice but unfortunately they are thin and loose after baking. I mean their shapes are totally different from what I see in the picture. I am wondering know what the problem is?
Irvin says
I’m not sure. Make sure to refrigerate them so they are firm. Depending on your refrigerator and how cold you keep it you, you might need to go longer than 1 hour. To be safe, try chilling the dough overnight.
Billie Miller says
Hi Irvin,
in your recipe you use 1 1/4 cup (175 g) all-purpose flour, but King Author’s AP flour only weights 30g per 1/4 cup, and most of AP flour only weights 125-130g per cup, so maybe you meant to say use 1 1/2 cup of AP flour in your recipe?
thanks
Irvin says
I do the “dip and sweep” method of volume measuring flour and that usually leads to 140 grams of flour per cup. That means I just dip the cup into the bag of flour (without fluffing it up) and then level it off with a knife. I think that’s how most people measure their flour.
However King Arthur’s method is to fluff the flour, then sprinkle it into the cup, then level it off. You can see their method here. That will lead to much less flour in the cup.
The most accurate way to measure flour is weight but if you do use King Arthur’s method, then yes you need 1 1/2 cups of all-purpose flour. But if you measure how most American measure by dipping and sweeping, then 1 1/4 cups is all you need.
(PS. The above explanation is why I always weigh my ingredients! There’s too many variables in measuring with cups. But a lot of folks don’t have scales so I try to include both measurements, using the most common method of using volume cups.)
Dean says
Hello! I made the cookies twice and the first time I made them, they were awesome… But the second time, when I baked them the powdered sugar, I dont know exactly, but I think it melted and the cookies were not white, they were just brown … Do you know why that happened and give me some advice…?
Irvin says
Sorry! I’m not sure why that happened! Did you coat them with granulated sugar first then the powdered sugar?
sally says
Can these be frozen?
Irvin says
You can freeze them but the powdered sugar tends to fall off a bit and fall into the cracks. So it won’t look as nice. But they’ll still taste great.
Tarra says
Wondering if I can make this dough more than a day ahead and store in fridge? They are so good they are going into my CHRISTMAS TREATS this years so I need to make a lot. I would like to spread it out over a few day (3 if possible) Make one batch of dough on day one make batch two on day two and bake on day three 🙂 Thanks again for a fantastic recipe.