I’m a huge advocate of Adobe Lightroom but it took me awhile to get there. As a designer, I’ve been working with Photoshop since version 2.5. This was back in the stone ages, when there were floppy disk drives attached to computers, the internet required a modem with a dial up connection and you still occasionally had to turn over your mouse to clean out the ball full of lint because it had stopped working properly. But, grudgingly, kicking and screaming, I entered the brave new world and became an avid Lightroom fan. Now I do about 95% of my post processing in Lightroom. There are plenty of tutorials out there on the awesomeness of Lightroom, but one thing I get asked about (and people don’t seem to know much about) is adding type on images. Everyone seems to think you need to use Photoshop or Illustrator or InDesign (or a freebie online program like PicMonkey) to add text to pictures but you can totally use Lightroom to add text to photos. After repeatedly telling people this, I decided a tutorial was in order.
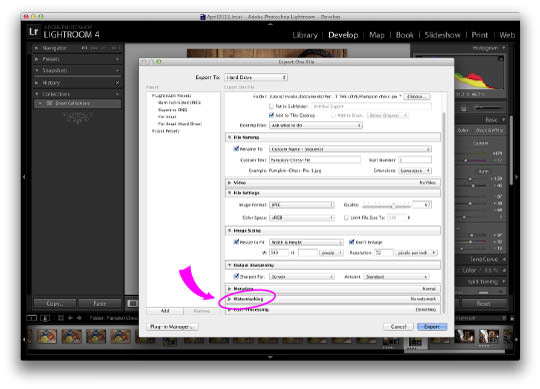
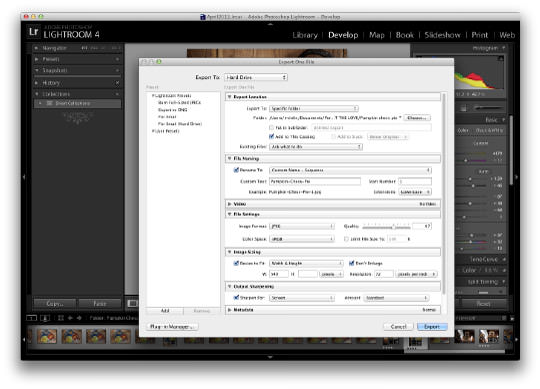
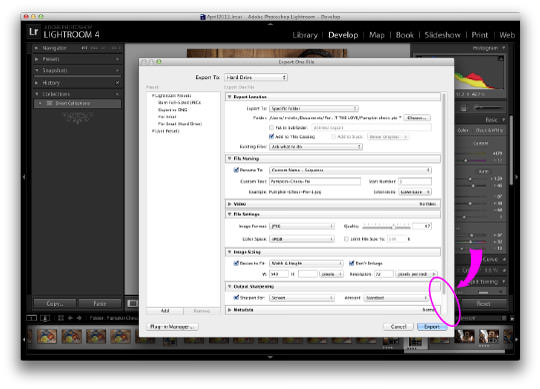
First, select the image that you want to add type to. Make sure it’s selected and then go up to the top of the menu and go to File > Export… which should bring up a dialogue box to export the image images. If you’ve worked at all with Lightroom you should be familiar with this dialogue box as this is how you export all your images to make them web ready. Now the thing about this export box is that there are a few options lower in the box that most people don’t access or even know that are there. Just pull the scroll bar all the way down and you’ll see those options.
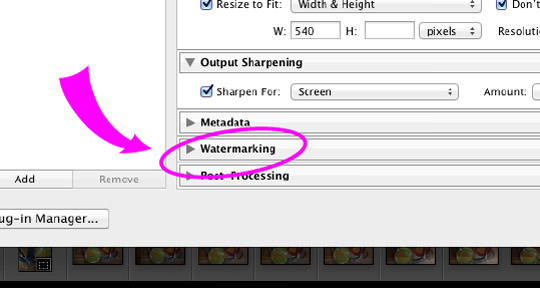
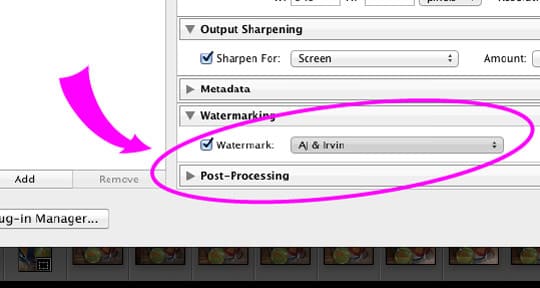
The one you want is called Watermarking – just click the triangle next to it so it points down. There you’ll see a few options. The default (because you’ve probably never used this option before) is to have no watermark. Click the button next to Watermarking and that will allow you to see a pulldown menu. Using the pulldown menu, select Edit Watermark… and you’ll see another dialogue box pop up called Watermark Editor where all the magic happens.
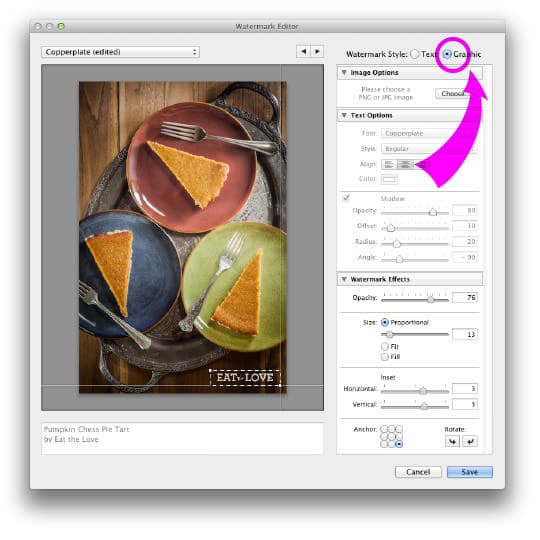
In the Watermark Editor box, on the left side, you’ll see a preview of the image that you selected. Below that will be a blank box. Type the words you want on the image in that text box. This could be your blog name, your URL or it could be the title of the image or subject matter. You can see by my example that I typed in the name of the dish that I photographed, Pumpkin Chess Pie Tart with the name of my blog under it. On the right side there are options for you to use to adjust the type. These include the font you want to use, the alignment, the color, what sort of drop shadow you want and the opacity (how transparent the type is). Most of this is self-explanatory and you can figure that out by yourself by just playing with the sliders and buttons.
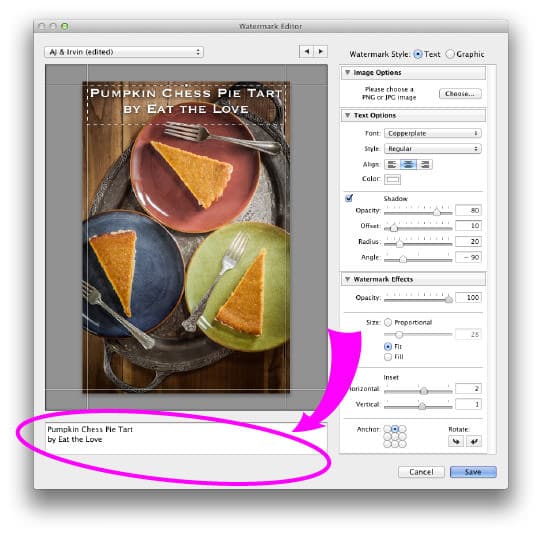
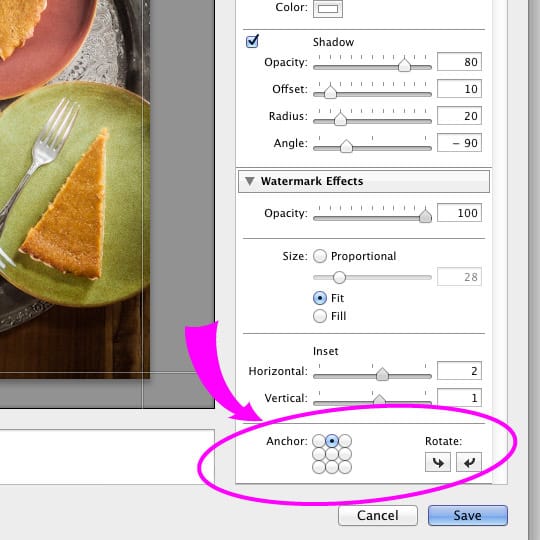
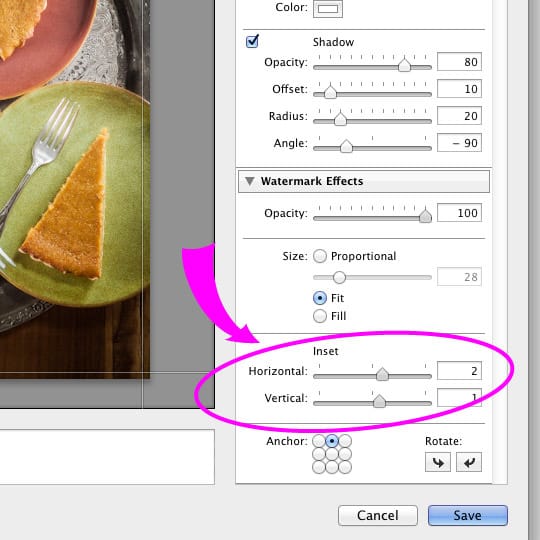
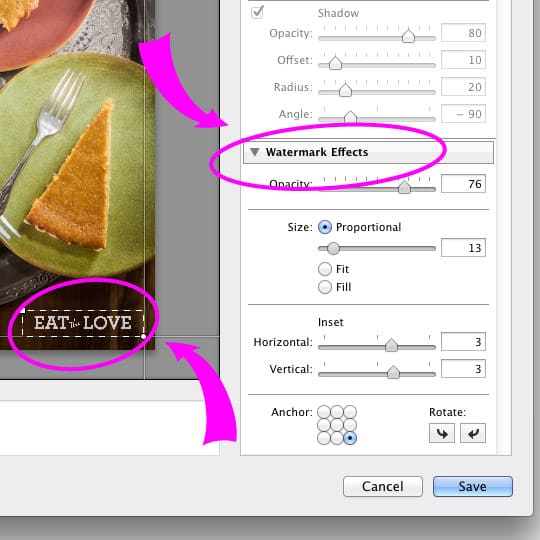
Under the Watermark Effects section there are few options that might be confusing. Look first at the very bottom of the box and select the Anchor point of the text. If you want your text to be center top, than pick the center top button. If you want it dead middle, pick the middle button. Above that is the Inset slider. This allows you to slide the text away from wherever you select is the anchor point. Use these sliders to fine adjust where you want the text to go.
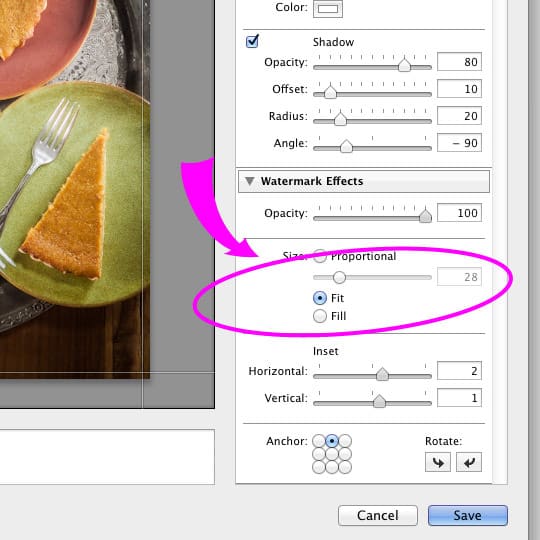
Now if you are batch-processing photos (exporting a lot of images at once) you may want to place a watermark on each of them at the same place use the fit or fill button above the Inset sliders. Fit will size the text across the width of the photo and Fill sizes the text to fill the height AND the width of the photo. Most of the time though, you’ll be adding type to individual images, so I’d suggest picking the Proportional button and use the slider to scale the text to the size you want.
But wait, there’s more! Look to the very top of right corner, above all the other text options. There’s choice for Watermark Style with two buttons, Text and Graphic. If you select the Graphic button you can insert and image (png or jpg) as your watermark! I have my blog logo as a PNG file with a transparent background, both in white and in dark brown. That way I can put it on an image regardless of how light or dark the photo is. And just like the text option you can use the Watermark Effect options to give the watermark opacity (the transparency of the logo or whatever image you are using) as well as figure out where you want to anchor the logo onto the image.
Now click save and you’ll be prompted to save the watermark. Call it whatever you want and export the file. And that’s it! Just remember to either change the watermark the next time you export photos or click the watermark button off in the export window option or else your next photos will have your last watermark on it! Lightroom isn’t the most sophisticated tool for adding text onto images. You can’t do funky designs or mix type on the image (well you can, but it requires you saving the image once, and then adding another watermark on top of the already saved image, but that’s just a pain in the butt). But for people who are looking to add simple titles or watermarks on your photos, Lightroom has you covered.
Nicole says
Thanks so much for this! I do use Lightroom for 99% of my post-processing but I’ve never tried adding text to my photos and just assumed I’d have to use a different program if I ever wanted to learn how. I’ll definitely be playing with this later today when I should be working on a NaBloPoMo post! 😉
Sean says
OMG. Mouse lint. I almost forgot.
Ruthy @ Omeletta says
I had tried to do this before but got frustrated when I couldn’t find the right font or mess with the text easily– you’re right, it’s not as simple as other text-adding options, but it’s an option nonetheless! And since I’ve been getting a little sick f picmonkey lately, it may be my next step 🙂
Irvin says
It’s a fairly rudimentary tool, meant to add watermarks and not full blown text. But it has enough capabilities that for most people (who aren’t designers) it will work!
The font issues is a big one though. Fonts come in a number of different flavors (truetype, postscript, opentype) and Lightroom doesn’t play well with all of them. In theory, any font you have installed on your computer should work in Lightroom, but there are known issues with opentype fonts and LR, which is why they don’t show up. If you have a lot of opentype fonts (the font file ends with .otf) that’s an issue. I know Adobe is aware of this issue and is working on a solution. That said, I haven’t upgraded LR5 yet so I don’ t if it’s been fixed there or not.
Emily @ Jelly Toast says
Thank you so much for this, Irvin! I feel like I’ve just been scratching the surface of Lightroom, so I love learning something new about it. And I totally remember the old days of Photoshop…ugh. I remember in college using negative scanners to get our images on the computer. Makes me feel old!
Wendy Read says
Thank you Irvin!!! You are a doll 🙂 I need lots of remedial help with lightroom…this is a great tutorial and I have bookmarked this for later. XX
Joan Nova says
Genius! I just attend a Scott Kelby workshop on LR 5 and I don’t think they thought of this b/c my impression was text was not an option. Thank you for posting this. I tweeted it to them. 🙂
Irvin says
Yep! Text it definitely an option. Most professional photographers would opt for a watermark logo or graphic because it looks more professional. The ideal is that your watermark enhances the photo (or at the very minimum is unobtrusive) AS WELL as protects your intellectual property. But I know a lot of food bloggers who could use this tool to put titles on their photos and such. So I wrote this tutorial! I doubt a lot of professional photographers use it in this manner though.
Shanna@ pineapple and coconut says
I was messing with this yesterday and I have my own watermark I made and I couldn’t get it centered in the middle of the bottom of the image even with anchoring it in the middle, it wanted to have it about 1/3 of the way up and I couldn’t bring it down any lower. I was getting very frustrated.
Irvin says
Did you try anchoring your text using the center button or the middle bottom button? Use the middle bottom button to anchor your text then use the inset slider bars to bring it up or down.
If you can’t get it higher than you want, go to your text box and put the cursor at the front of the text and hit return, bringing the text down in the text box (and inexplicably bringing the text UP in the image). Keep hitting return until the text is roughly where you want it to be and then use the inset slider to fine tune it.
Shanna@ pineapple and coconut says
Thanks Irvin. Yeah I was using the middle bottom anchor. I could barely see my watermark, is there a way to make the image bigger while working on it? I have been using pic monkey to add watermarks but I know everytime I move a photo around and save it over and over it looses image quality so the less moving around the better. I am thrilled you made this tutorial. I will play with it some more and let you know. I am doing a very basic watermark, nothing fancy, no curved letters, crazy font or squiggles. Just my blog name but I have one font I like so I made it as a transparency and it should work. Thanks again!
Irvin says
Is it a graphic? It might depend on how much blank space you have around the graphic. If you have a large amount of blanks space, than LR will read it as a large graphic and place it accordingly. You might want to crop it in, or conversely, add more blank space under or above it to make it place where you want.
Good luck!
Susan says
I rarely use the watermark function because I don’t always like the look of it on my photos but sometimes I want to fill up empty space with text. This is so much easier than having to upload it into pic monkey. Thank you Irvin for such an informative post!
Chelsea says
Irvin, this is great, thanks! I’ll definitely be bookmarking and using this in the future – I’m still pretty new to Lightroom (one year in) and had no idea this was one of its features! Also, I read the bit about the mouse lint and choked on my tea laughing.
amanda says
great tutorial, irvin! i use lightroom but mostly just for organization and a small amount of post processing. always great to learn more functions. gracias!
Cynthia Rosario says
Your amazing! Thank you so much for your tutorial. I’m a beginner blogger with tons of ideas and vision for what I want to do. I was about to give up on lightroom and you totally changed that for me. Thank you. I have been searching for ways (even braved the pdf tutorial)…. So, I’m putting to practice your tutorial tonight! I’ll keep you posted on how it goes. :0)
Christine N says
Thank you for this! I’m going to give it a try this weekend. I do a lot of scrapbooking and manage and process all my photos in Lightroom. I’ve been taking photos into PS to add text and date on top, but if this process in LR fits my needs, I won’t need to do that to every single photo that I want to print and scrapbook! Thanks.
Christine
Irvin says
I love photoshop but the ability to do a lot of things in LR means I don’t have to flip back and forth between the programs! It might not give you ALL the flexibility of Photoshop with the type but it might keep you from opening and taking all the photos into PS so hopefully that will be helpful! Good luck.
Jolene says
Irvin,
I am familiar with this option of adding text and am grateful you have put together a tutorial for others! It adds even MORE value to LR. I, unfortunately, do not own PS. My question is do you know if the quality of the text is well and good for printing on a large scale? I have only utilized this option for digital purposes, but have been searching for an option when it comes to putting text on an image that will be printed.
Thank you in advance!
Irvin says
Hi Jolene. I’ve never actually printed something with a text this way (as a designer I use PS as well as Illustrator to do my text) but in theory, yes, as long as you set the appropriate output for print quality, the text should render fine when printed. Under the “Print Job” section make sure your file resolution is 300 ppi, the print sharpening is on low and set your JPEG quality to 100% at the file dimensions you want to print at. That said, I would do a test run first though to make sure it looks OK (ie. Send one sample print to your printer to see how it looks, instead a bunch). Good luck and tell me how it turns out!
m says
Thanks – I never would have figured this out!
Renate Flynn says
Thank you so much for this! I wanted to pay tribute to Maya Angelou, on this the day of her death by overlaying one of her quotes onto one of my photos but did not know how to do it. These detailed, easy-to-follow instructions were just what I needed, when I needed them (and I’m definitely drawing inspiration from your blog layout)! Thank you, again.
Presley says
Thanks so much! This helped a ton!!
Marcie Braden says
Thank you!!!
Heidie says
Thank you so much for posting this tutorial! Huge help to a minor issue I wasn’t able to resolve on my own. Big kudos!
Allie Andersen says
THANK YOU SO MUCH!!!
Kan says
Hey! I just came across this post and found it really helpful! Thanks so much for sharing 🙂
Lois says
It didn’t work for me. I followed all the instructions for a graphic to a tee, several times over. But the superimposed graphic was always missing from the export—and I did save. Anyway, I still have my old computer, and I’ll just do it in Photoshop. Thanks for the effort.
Irvin says
That’s odd! Other people haven’t had an issue. Do you have the watermark button checked when you export the file, and have selected the watermark that you created in the pull down menu? I’m sorry it’s not working for you.
Jeremy Moore says
Thank you so much for posting this. I had never thought of using a watermark as a caption. It saves messing around with captioning in the slideshow module, which in my experience is a nightmare.
Teresa says
Thank you for this tutorial!!!
Mary Miller says
After trying to figure out an easy way to get text on photos for a slideshow – I stumbled across this. It would not have occurred to me to use the watermark on export. Thank you sooooo much! This was a big help. Appreciate you posting!!
Luna says
I just started using LR and find it less intimidating than PS. I think the process that you describe here is meant for what is said, watermarking, though you can take advantage from it to add text. I would like Adobe add just an easier way for adding text to images. Especially when adding the same text to large numbers for projects. They should perhaps have simple borders as well without using the vignette tool as described by some people. First time I visit your site seems very informative. Thanks
Ben says
Hey Irvin,
you’re the man!
this was a big help!!
now for the next step – can you advise me how to find a good photoshop tutorial…? (The ones I have found so far on the net are WAY TOO complex…)
thanks
Ben
Irvin says
Hey Ben,
The reason that photoshop tutorials are complex is because the program is complex! You can take a year long course in Photoshop and STILL not know everything about it or how to use all it’s features.
Adobe has a bunch of free videos you can check out http://tv.adobe.com/show/learn-photoshop-cc/ but it can be overwhelming to sift through. My go to is http://www.lynda.com/ – it’s a paid site but they have really awesome tutorials and “classes” ranging from beginning to advanced. If you search online you can probably also find out coupon that allows you to get a free week trial membership, which should be long enough for you to learn what you want to learn from photoshop.
Good luck!
Nick Mayo says
Super clear. Thks.
Miguel says
Hi Irvin,
Great help for my Christmas photo card!
Thank you so much for sharing!
7Song says
One more person thanking your for taking the time to teach this. I do most of my text in Elements, but now I have an option for the simple stuff. And I appreciate your teaching style, engaging and very easy to follow.
Thank you again
Kristina says
How do you get the watermark to show up on the Image after exporting the image? Have exported images to a sub folder and have edited them, but can’t get the watermark to show.
Irvin says
Once you’ve set your watermark, export the image like you normally do, but make sure the watermark button has been checked and you’ve selected the appropriate watermark that you have saved. Once you export the image, the watermark should be on the image.
Christina Miller says
I cannot thank you enough for simplifying the instructions for this task! I knew it had to be easy, but after watching hours of tutorials, I could not figure out how to do this! I had figured out watermarking, but for some reason the one-time text overlay task stumped me. thank you, thank you! Pinned!!
Alvaro Gonzalez says
You are amazing!! Very helpful!! I was pulling my hair out because Adobe tutorials were telling me how to put text to pictures for a slide show but not to the picture.
THANKS!!
anthony says
Thanks so much – clear and creative. Appreciated. Anthony
Bill says
Is there a way to have the watermark, which in this case is text, placed at an angle? The only “angle” option I saw was related to the outline and notThank you for the tutorial on how to do watermark placement. Saved me a lot of time doing it as a batch instead of one at a time.
Irvin says
Sorry! Not that I know of. You can make an image of the text on an angle though and use that as a watermark though. You will need to do that in Illustrator or Photoshop and save the image as PNG with a transparent background. Then you should be able to place the image as a watermark on your photos in Lightroom.
lea says
Oh goodness, the time this saved. Thank you for such a lovely tutorial! I was able to quickly watermark a batch of photographs, and you pretty much saved my husband from what could have turned into a pregnancy tantrum. Real estate nonsense, technological difficulty, and pending kiddos do not mix well.
Design & Promote says
Really great info, this makes watermarking super easy.
Mike says
HI Irvin;
I read you article “Add text to pictures using Lightroom!” where watermark is used. Thanks very much for the excellent info.
I do use watermark. The issue with watermark is that you can’t store a different text for each photo. Is there a way write a text on to the photo or better off letting the title or caption be printed on the photo when exporting?
Thanks
Mike
Melissa Dorai says
Omg! Thank you so much for sharing this. I have finally found a way to edit my photos with text 🙂
Cherie @ FoodRecipesEasy says
Hi! Thanks for the tutorial. If one wants to have both the title /recipe name and site name then …what would be the best way to deal it?
Graham Franklin says
Hi Irvin
Thanks for the tutorial. Someone told me about adding text to Lightroom recently, I didn’t know how to do it, well, I do now.
Gene Martin says
I am wondering where to find my pix after adding a txt, I cant find them anywhere.
Mirina says
hi, i followed your tutorial and got all set as needed, saved, gave it name at the end but after export there is no text at all, it doesnt even show in lightroom on pic that i added text/watermark… anything i missed, please?
Candace Weeks says
I am new to Lightroom, and have only recently purchased Lightroom 6. I was editing some family photos last week and somehow, some way I was editing them with what seemed to be “presets” that put a line of square boxes that you could choose between them as “retro” collection or “vintage” or “black and whites” etc. and somehow, I found a text dialogue box that you could use Sans Script, Handwritten, etc. different type fonts, and inside of those boxes, you could scroll through different variations of each one. It was great! I loved it. I uploaded some more photos the other day and now I cannot for the life of me figure out how in the world I was able to do all of that! haha I have looked for HOURS trying to figure it out. Did I dream it ? lol I have 80 pictures or so that are edited with the text that I added to them. Do you have any idea how I can find these again? The watermarking is great, but it’s not what I was into when I was adding text. I swear I’m not crazy haha Thanks!! 🙂
RB says
I too have purchased Lightroom 6 but that sounds like a different program. Adobe really needs to take some lessons from Picasa or Pic Monkey on how to add any style of text in any font to pictures in a super easy way !!
Molly says
You saved me so much! I was working on a baby pregnancy book and had taken all my pictures hoping to overlay with text using powerpoint. But seeing the poor quality I was getting I went searching for another route. Thank you, thank you!
Val says
Thanks for posting this tutorial. It was very helpful.
Evans Joey says
Thanks for the video because of this I am just downloading adobe creative cloud subscription instead of using my old version of Photoshop. Just taken up photography now I am retired and I have learnt so much from the courses I bought from you and picking up more and more from your other free stuff. Once again thanks for your help
MOLLY says
THANK YOU SO MUCH!!
Hannes says
Thank you. Saving so much effort!!
Diana says
Thank you so much for the tip!! Very helpful!
Ashley says
Thank you so much for this information!! I am just now starting up with trying to open up my own photography studio, and I have always used Lightroom for everything else. I am wanting to start adding text to some pictures 🙂 And this is perfect! Thank you!
Ron Lacroix says
What if you want the text below the picture?
Ellen says
This was exactly what I needed. Thanks so much!
Elizabeth says
Many thanks for your help, it is very much appreciated
Maria says
Hi, Irvin
Thank you so much for this information!
But! Where is my photo after click Export?!
Bob says
How can you update an existing watermark?
I have many hundreds of family pictures that need text. I can edit the last watermark I did, but it requires me to save it with a unique name before I can export. That is going to result in many hundreds of presets. If I can get over this hump, this would save so much time over exporting to Photoshop Elements.
Tey Cindy says
Hey there!
Just thought I’d say thank you for putting this helpful & informative Lightroom tutorial up. I am new to the program & found it very useful, as I was wondering if I should use 2 different editing tools just to add text!
1 question though; what if I wanted to add 2 different kind of fonts? Can it be done?
http://www.teycindy.com
Ritu Tangri says
thank you for the detailed post. So far I was unaware that LR could be used to add texts. So I was using photo shop only . You have saved my problem of shifting b/w LR and photoshop
David says
Thanks but this doesn’t answer my question. I have a graphic designer who makes our event flyers in Photoshop. And, we have her change the text for each event and send us the new file. And, since we use a specific website to create large flyer prints, they need to be in tiff format. After a while, I realized I could simply change the text myself since the style and design are already done. But, I need a program that can open a tiff (and pdf) and allow my to edit that existing text and then export in tiff or pdf. Obviously I want the cheapest program that can do this. I was hoping Lightroom could do this, but I haven’t been able to figure it out. Seems like your solution is adding generic text at export. Do I need Photoshop after all?
Maggie says
You have a wonderful blog and such beautiful photos! I also like to photograph food!
Ruhanee says
Hi! Great post. Very informative. I love adding text to pictures. I have recently started using Add Text To Photos App. I’ll definitely love to try LightRoom 🙂
Judith Gould says
Thank you, this is very useful information for me, I am going to use it soon!