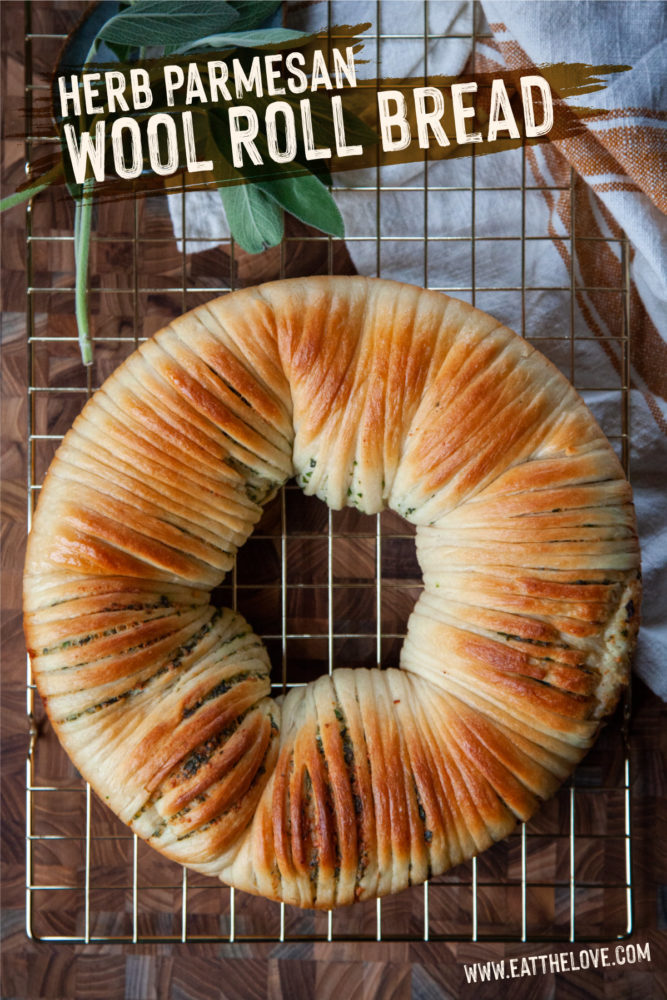
This fancy pants herb parmesan wool roll bread looks difficult to make but is quite easy. It’s packed with chopped herbs and parmesan and is pillowy soft.
Wool roll bread took the internet by storm in early 2021, via a Malaysian vlogger named Apron that posted about on YouTube. Suddenly I was seeing it all over the place. But I didn’t get around to making my own version until the holiday season snuck up on me later in 2021. And though I adore my classic parker house rolls, my potato rolls, my cornbread, and my garlic knots for my holiday spread, I decided that this fun roll would make a great alternative bread dish for the holidays, or really all year round! It’s fun to make, and surprisingly easy to form. The use of the Japanese tangzhong (water roux) method for the dough, creates a super soft pillow crumb that keeps the bread soft for days.
What is wool roll bread
Wool roll bread is a popular trendy bread that looks like wooly rolls of thread. It is often filled with sweet or savory fillings and is served as a breakfast or snack. But I’ve adapted it here to be a little more like a bread roll, with a parmesan herb filling, so it can work as a side item for a dinner.
How do you make wool roll bread
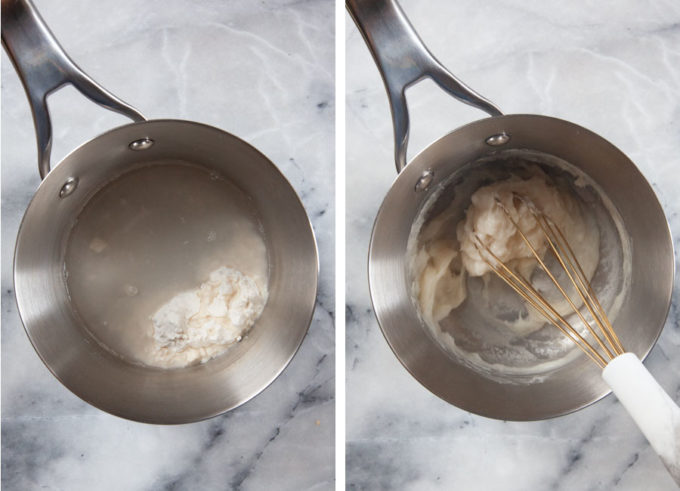
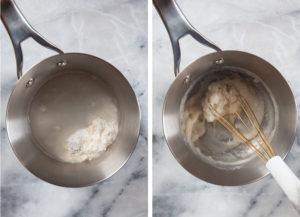
This wool roll bread starts out with a tangzhong or water roux, which is easy to make. You just cook some flour and water on the stovetop until a thick paste forms.
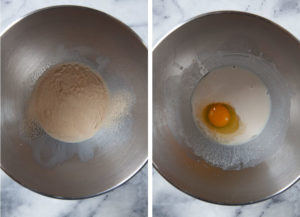
Once the paste has formed, let it cool while you proof the yest in milk. Then beat in the egg and the cooled tangzhong to loosen it a bit. Add flour, a little sugar, melted butter and salt. Knead until a tacky (but not sticky) dough forms. Let rise until double.
While it’s rising, make the filling by melted butter, parmesan cheese, chopped parsley and sage together.
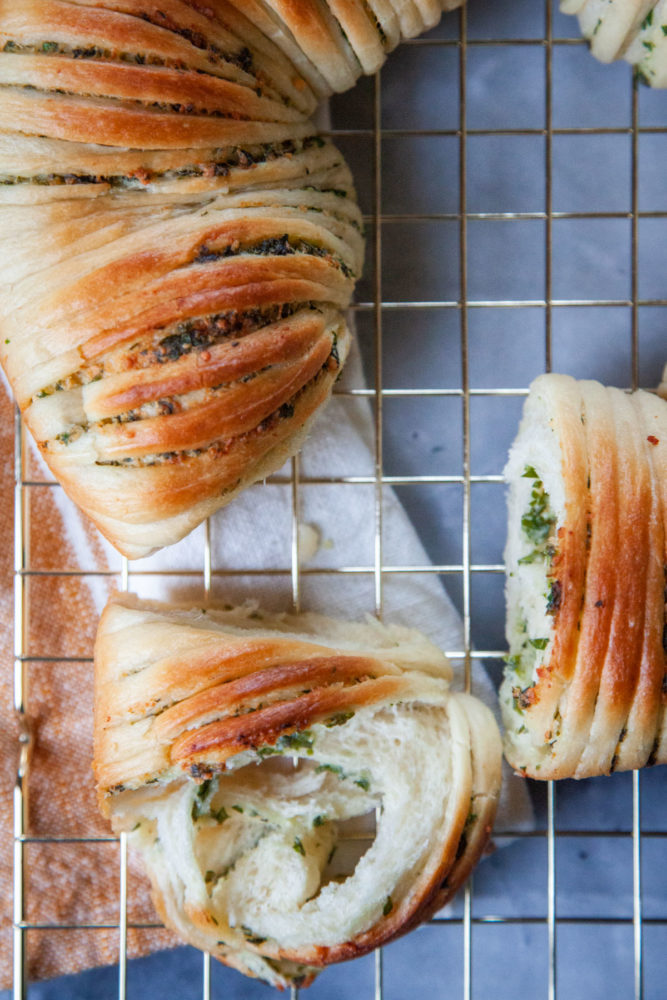
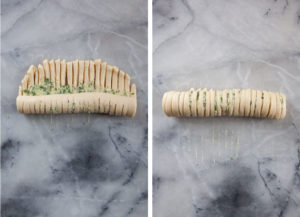
Once the dough has risen, it’s time for the fun part! Shaping the wool roll! Divide the dough into 5 pieces. Roll one piece out into a rectangle and cut the top part of the rectangle into long thin strips, keeping the bottom part of the rectangle whole.

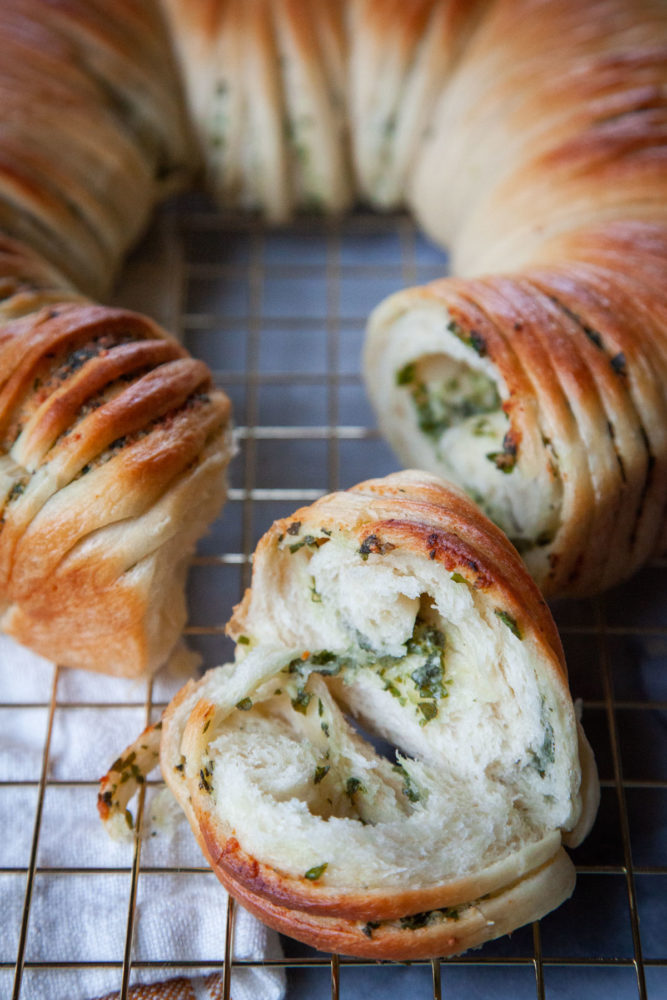
Now spread 1/5th of the filling over the rectangle, leaving about 1/2-inch at the bottom and about 1-inch at the top bare. Then roll the dough up into a log, from the uncut bottom part all the way to the top.

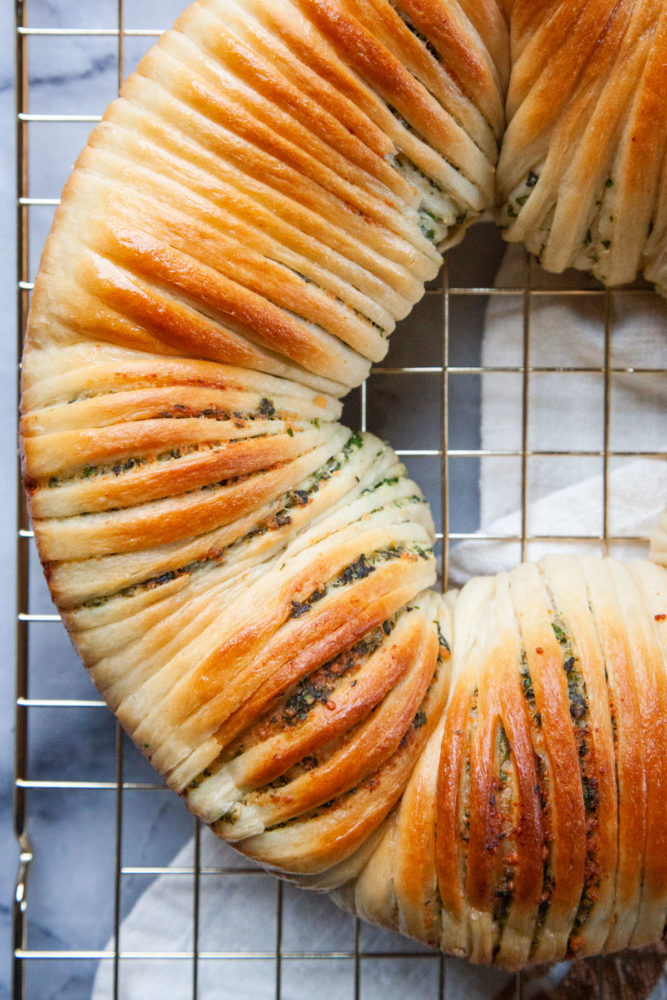
You should have a log of dough that is striped!

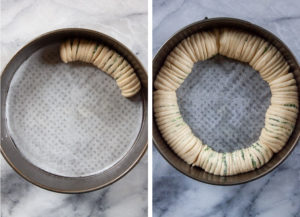
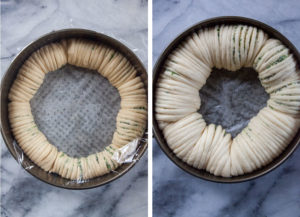
Move the dough to a prepared oiled round baking pan and repeat with the remaining dough. Cover and let rise again until double, then brush with melted butter and bake. Once fully baked, brush with more butter and serve warm.

A how to video on making wool roll bread
Here’s a video on how to make wool roll bread, so you can see exactly how to make and form it.
What is tangzhong?
Tangzhong is a Chinese method of making bread, where you cook a little bit of flour and water (or sometimes milk) first to make a paste. This paste is then added back to bread dough. By pre-cooking some of the flour with water, you are gelantizing the starches in the flour, which helps trap moisture in the dough and the resulting bread.
Though it take less than 5 minutes to do, it really helps create a tender soft crumb that is pillowy fluffy, ideal for a dinner roll. Because the liquid is bound in the gelatinized starch, it also has an added bonus of keeping the bread soft and tender, preventing it from going stale as fast.
Tangzhong is also similar to the Japanese method of cooking the flour called yudane. The difference being tangzhong has you cooking the flour with liquid on the stovetop, while the yudane has you pouring boiling water over flour, stirring it and letting it sit to gelatinize. The work fairly similarly, but I find cooking the flour in the tangzhong method a little faster, so I used it in this recipe.
How do you store this bread?
Because of the tangzhong method, you can store this bread at room temperature for up to 3 days or store it in the fridge for up to 5 days without any noticeable staleness. I do recommend reheating it in the oven or toaster at 300°F for 5 to 10 minutes to warm it up first before serving.
Frequently Asked Questions
Absolutely! Just follow the instructions up to where you add the flour, salt and melted butter. Then stir with a wooden spoon until a rough dough has formed. Dump it out onto a clean surface and knead the dough with the heel of your hand, folding it over and pushing down, and rotating it as you do it.
Continue to knead the dough for about 5 to 7 minutes or until it is smooth, elastic, and slighty tacky. Let rise and continue with the recipe.
Yes. You can use rapid rise yeast or instant yeast if you would like. If you use instant yeast, there’s no need to proof it. Just add the yeast in with the flour, salt and melted butter. If you use rapid rise yeast, add it in like you would the active dry yeast.
Keep in mind that both the rapid rise yeast and the instant yeast tend to rise faster than regular active dry yeast. So keep an eye on the dough and check in about 30 to 45 minutes instead of the full 60 to 90 minutes.
Yes! If you don’t like sage, or don’t have it on hand, try using fresh thyme leaves, chopped fresh rosemary, or chopped fresh oregano.
However I do not recommend using dried herbs in this recipe. Fresh herbs works best in this wool roll bread. Dried herbs won’t hydrate enough in the baking and will give a dry dusty flavor in the bread.

If you like this wool roll bread recipe, check out these other bread recipes
- Tomato Foccacia with Rosemary
- Olive, Green Onion and Cheese Beer Bread
- Sourdough soft pretzels
- Pumpkin Star Bread
- Cinnamon Rolls
- Cranberry Spiral Bread
- Cardamom Buns
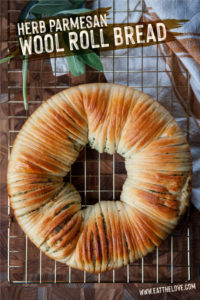
Herb Parmesan Wool Roll Bread
Ingredients
Tangzhong
- 1/2 cup water
- 1/4 cup all-purpose flour 35 g
Dough
- 1/2 cup milk
- 2 1/4 teaspoon active dry yeast
- 1 large egg
- 2 1/2 cups all-purpose flour 350 g
- 2 tablespoons white sugar
- 2 tablespoons melted unsalted butter
- 3/4 teaspoon kosher salt
Filling
- 1/4 cup melted unsalted butter
- 1/2 cup grated parmesan cheese
- 2 tablespoons chopped fresh Italian parsley
- 1 tablespoon chopped fresh sage
to Finish
- 2 tablespoons melted butter
Instructions
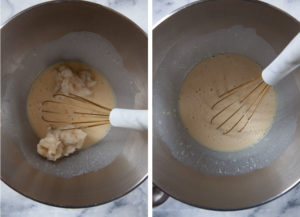
- Make the tangzhong (water roux) by placing the water and flour in a small pan and whisking until the flour had dissolved. Cook the liquid on the stovetop over medium heat, whisking constantly, until it thickens and become a paste, about 2 minutes. Remove from heat and let cool until it is only warm to the touch, about 5 to 10 minutes.

- Heat the milk in a different pan, until it is warm to the touch. Pour into the bowl of a stand mixer fitted with the dough hook. Sprinkle and whisk in the active dry yeast until it is dissolved. Let sit for 5 minutes for the yeast to proof, then add the egg and beat to mix.
- Add the tangzhong to the liquid and whisk to break it up and incorporate it. Don't be concerned if there are still some small lumps. Just break it up as much as you can.
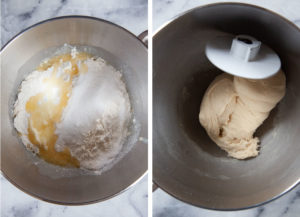
- Add the flour, sugar, butter, and salt to the bowl and then stir with the hook on slow speed, until a rough dough has formed. Increase the speed to medium low and knead the dough for 4 to 5 minutes, or until it is smooth and elastic. The dough should be slightly tacky but not overly sticky. If it is too sticky, add more flour, a tablespoon at a time.
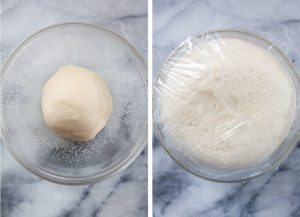
- Place the dough in a well oiled bowl, and cover with plastic wrap. Let rise in a warm place for 60 to 90 minutes, or until doubled in size.
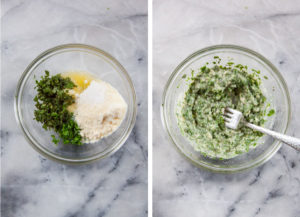
- While the dough is rising, make the filling by mixing the butter, parmesan cheese, parsley and sage together in a small bowl. Set aside.
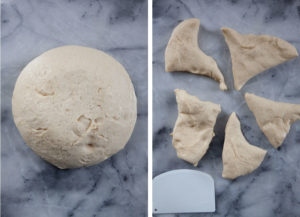
- Grease a 10-inch springform or cake pan, then line it with parchment paper.Once the dough has risen, dump it into a clean surface and divide it into 5 even pieces.
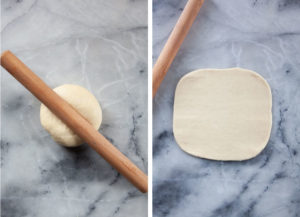
- Take one piece and roll it into a 9 x 5 inch rectangle with it orientated landscape.
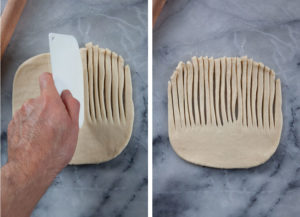
- Using a knife or bench scraper, cut 1/4-inch strips of dough on the top 2/3rds of the dough, leaving the bottom 1/3 of the dough whole and intact. When you’re done, the entire piece of dough will look like a giant hair comb.
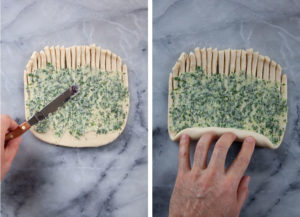
- Spread 1/5th of the filling (about 2 tablespoons) over the dough, leaving about 1/2-inch at the bottom plain, and 1-inch at the top of the strips plain. The plain dough will help “seal” when you roll it. Now, staring form the bottom of the dough, roll the dough up into a tight cylinder, making sure the seal is on the bottom.
- Continue to roll the dough completely up to form a log with stripes. Make sure the seam of the dough is on the bottom.
- Move the dough log to the lined and greased pan, placing it around the edge of the pan, with the seal side down. Repeat with the remaining 4 piece placing them in the pan all the way around, in a circle.
- Cover the pan with plastic wrap and let rise again for 60 minutes or until puffy and double in size.
- About 15 minutes before the dough is finished rising, preheat the oven to 350°F. Once the dough has risen, brush the top of the dough with about 1 tablespoon of melted butter. Bake in the oven for 25 to 30 minutes, or until the top is golden brown. If you have an instant read thermometer, the inside of the dough should read 190°F.Once the bread is baked, remove from the pan and let cool completely on a wire rack. Brush with remaining melted butter and serve.

Cheryl Rose says
This looks amazing and a great way to impress my in laws with my bread making skills!